Baby Bunting Crochet Pattern
Making this baby bunting crochet pattern is a lot of fun, and the perfect thing to make for any new baby in your life, whether for your own baby or as a thoughtful gift for someone else. I loved making this crochet pattern for my baby, and I hope that you will enjoy it too. It is a fun pattern that crocheters of all experience levels can enjoy.

What is a Baby Bunting?
A baby bunting is a hooded sleeping bag for babies. This is a term that originated in the 1920s and is still used today to describe the sweet little sleeping sack for babies. These baby buntings are a way to help keep your baby nice and warm while they rest.
Today, you might also hear a baby bunting referred to as a baby sleeping bag, baby cocoon, or a sleep swaddle. These are all similar items to keep a baby warm and snuggly.

Join our Mailing list!
Be sure to sign up for our email list so that you receive new free crochet patterns right in your inbox! This is our free newsletter so that you never miss out on a new craft project.
Join our Mailing List and Receive a…
Baby Bunting Sleeping Bags
A baby bunting is a warm snuggly sleeping bag that will help to keep a baby cozy while they sleep. This crochet pattern will help you make your own crochet baby bunting that is absolutely the cutest thing, but also serves a purpose. Unlike baby blankets, the baby buntings are already shaped, all you have to do is add your baby. However, it’s important to know that a baby should never be left unattended in this sleeping bag!
This free crochet pattern to make a baby bunting is great for crocheters of all skill levels. If you are an experienced crocheter then you will have no problem making this crochet project. Lifelong crocheters will also be able to add their own twist to this pattern if desired. However, if you are a self-taught beginner at crocheting, don’t worry! You too can make this cute baby sleep sack.
A Note About Yarn
Before you get started I want to mention one quick note about the yarn used for this pattern. I highly recommend that you use #4 medium worsted-weight yarn. This is a nice yarn to work with, and will let your project turn out beautifully. Lion brand has some great options, I also love to walk down the yarn isles at Hobby Lobby, and make a selection from there. No matter what you use, make sure that your yarn is nice and soft, so that it doesn’t scratch the baby.

Free Baby Bunting Bag Crochet Pattern
Materials
Yarn – #4 medium worsted weight yarn
Size 7 crochet hook (4.5 mm crochet hook)
21 inch zipper (I used white)
Scissors
A stitch marker if desired (st marker)
Measuring tape
Abbreviations
sl st – slip stitch
ch – chain
hdc – half double crochet
dc – double crochet
BLO – back loop only
st/sts – stitch/stitches
Please note this pattern is written in US Terms
Finished Measurements
The finished item will measure approximately ____
How to Crochet A Baby Bunting (AKA Baby Cocoon)
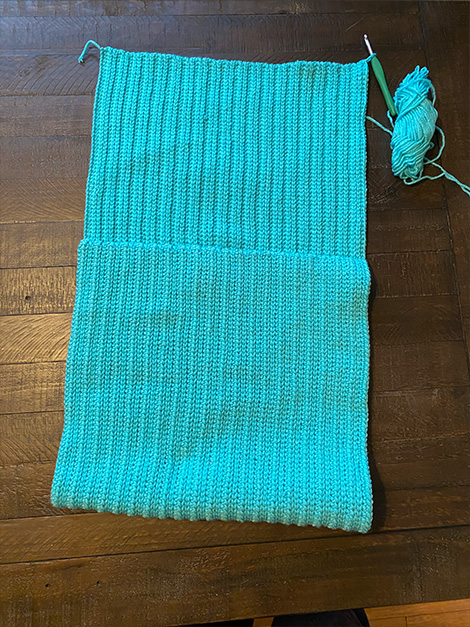
Making the Crochet Fabric
Notes: The ch 2 turning stitches count as a stitch in the project.
Row 1: ch 170 sts
Row 2: working in the back loops of your chains, in the 3rd ch from hook, make a hdc st, hdc in each of the sts across the row. Turn.
Row 3-5: sl st in the BLO of each st across. Turn
Row 6: ch 2, hdc in the BLO of each st across. Turn
Row 7: ch 2, hdc in the BLO of each st across. Turn
Row 8-10: sl st in the BLO of each st across. Turn
Row 11: ch 2, hdc in the BLO of each st across. Turn
Repeat rows 7-11 until your crochet project is 24 inches long (or however wide you prefer it to be).
Edging Worked Around the Entire Piece
When you reach the end of your crochet project, it is time to add the edging. To do this, chain 3 sts, in the same corner, add 4 dc sts, dc in each st around the edge until you come to the next corner, then make 5 dc sts in the corner. Continue making a dc st in each st, and 5 dc sts in the corner. When you get back to where you started, join to the top of the first ch 3 st with a sl st.
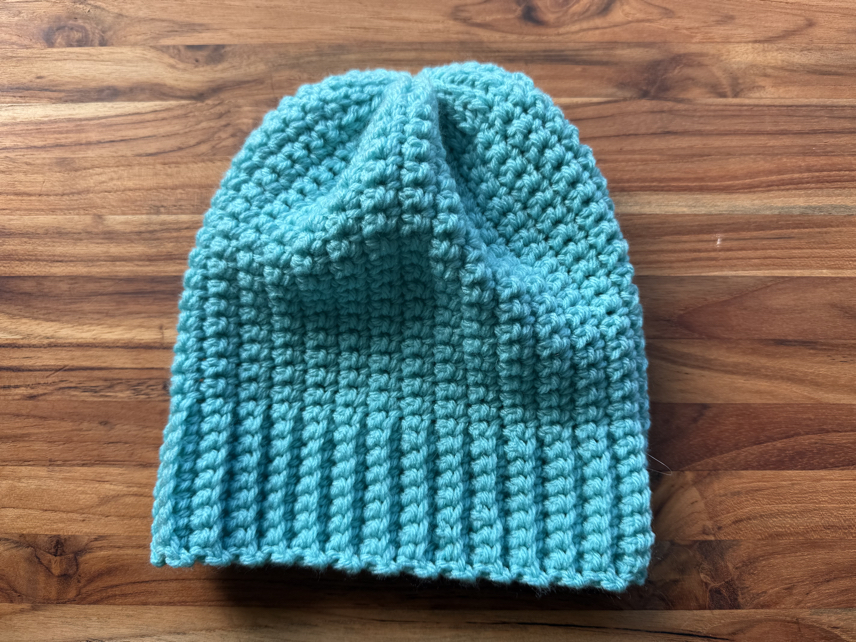
Sewing up the Hood
Turn your project inside out, then fold in the two top corners of your crochet fabric, so that they meet in the middle forming two triangles. Using the same color yarn, and a yarn needle, sew the two sides together (or use a sl st if you prefer to attach the sides), so that they are secured, forming a hood.


Shaping the Baby Bunting
Turn the baby bunting so that the right side is facing down. Then lay it on a flat surface with the hood at the top. Fold the bottom on top of the middle section, so that it forms a sack.
There is no need to form a bottom seam, as it is naturally closed. You are now left with a front panel, and back panel.
At this point, you will need to decide if you are adding a button or zipper to your baby bunting. If not, you can go ahead and either use a slip stitch, or yarn needle and yarn to sew the sides closed. However, if you are adding buttons or a zipper, you will want to leave one or both sides opened.
Adding Buttons or Zipper
When you are adding buttons, there is no need to worry about making button holes, as long as your buttons are small enough to slide between your double crochet stitches.
Simply choose where you want them to be placed, and sew them onto the back panel. Once the buttons are sewn onto the baby bunting, slide them through the double crochet stitches so that they do their job holding the baby bunting closed without a specific button hole, and appear on the front sides of your project adding a bit of character in the process.
If you are adding a zipper, you will want to determine which side you want it on, then sew the other size closed.
Using a needle and matching thread color, sew the zipper inside the remaining edge of the baby bunting. Be sure to sew it securely before finishing.
After your sides are closed, your crochet baby bunting is completed and ready to be used, or given away as a gift.
Special stitches:
In this crochet pattern I highly recommend using a stitch combination of half double crochet stitches, and slip stitches. These stitches combined together form something known as the “kiel stitch”. This crochet stitch combination is easy to make, and looks beautiful.
To learn how to make the half double crochet, and slip stitch, be sure to check out our learning how to crochet tutorial.
Crochet Baby Bunting Pattern Copyright
Please note that this pattern is intended for personal use only, and is not for commercial distribution. By copyright, unless otherwise noted, you are not authorized to copy or claim my content as your own. You are, however, more than welcome to sell your finished products made with my patterns. I always appreciate it when you link to my patterns so that others can find them too!

Tips and Tricks
What size is this baby bunting for?
The crochet baby bunting can be used for a variety of sized babies. The great thing about this pattern is that you can easily make it longer and wider to fit larger babies if desired. This crochet pattern typically works well for 0-6 month old babies, so feel free to adjust the size if desired.
Can I make a larger size?
Absolutely! If you want to make a larger size or the smallest size for newborn or premie babies, you can easily adjust the pattern by making your crochet fabric longer and wider, or shorter and narrower.
Crochet Baby Bunting Sleep Sack
This adorable bunting is a fun crochet project that you can make for the precious new arrival in your life. This baby sleep sack is a great crochet project to make for your own baby, or to give away at an upcoming baby shower.
Thank you so much for stopping by to learn how to make this cute crochet baby bunting pattern. I hope that you will give this pattern a try, and I hope you enjoy it! Thank you so much for stopping by!
Happy Crocheting!
More Free Patterns

Find Us Online!
Be sure to follow us online on your favorite social media platform!

Baby Bunting Crochet Pattern
Materials
- Yarn - #4 medium worsted weight yarn 2 skeins
- Size 7 crochet hook (4.5 mm crochet hook)
- 21 inch zipper (I used white)
- Scissors
- A stitch marker if desired (st marker)
- Measuring tape
Instructions
- Row 1: ch 170 sts
- Row 2: working in the back loops of your chains, in the 3rd ch from hook, make a hdc st, hdc in each of the sts across the row. Turn.
- Row 3-5: sl st in the BLO of each st across. Turn
- Row 6: ch 2, hdc in the BLO of each st across. Turn
- Row 7: ch 2, hdc in the BLO of each st across. Turn
- Row 8-10: sl st in the BLO of each st across. Turn
- Row 11: ch 2, hdc in the BLO of each st across. Turn
- Repeat rows 7-11 until your crochet project is 24 inches long (or however wide you prefer it to be.
- When you reach the end of your crochet project, it is time to add the edging.
- To do this, chain 3 sts, in the same corner, add 4 dc sts, dc in each st around the edge until you come to the next corner, then make 5 dc sts in the corner.
- Continue making a dc st in each st, and 5 dc sts in the corner. When you get back to where you started, join to the top of the first ch 3 st with a sl st.
- Turn your project inside out, then fold in the two top corners of your crochet fabric, so that they meet in the middle forming two triangles.
- Using the same color yarn, and a yarn needle, sew the two sides together (or use a sl st if you prefer to attach the sides), so that they are secured, forming a hood.
- Turn the baby bunting so that the right side is facing down. Then lay it on a flat surface with the hood at the top. Fold the bottom on top of the middle section, so that it forms a sack.
- There is no need to form a bottom seam, as it is naturally closed. You are now left with a front panel, and back panel.
- At this point, you will need to decide if you are adding a button or zipper to your baby bunting. If not, you can go ahead and either use a slip stitch, or yarn needle and yarn to sew the sides closed. However, if you are adding buttons or a zipper, you will want to leave one or both sides opened.
- When you are adding buttons, there is no need to worry about making button holes, as long as your buttons are small enough to slide between your double crochet stitches.
- Simply choose where you want them to be placed, and sew them onto the back panel. Once the buttons are sewn onto the baby bunting, slide them through the double crochet stitches so that they do their job holding the baby bunting closed, and appear on the front sides of your project adding a bit of character in the process.
- If you are adding a zipper, you will want to determine which side you want it on, then sew the other size closed.
- Using a needle and matching thread color, sew the zipper inside the remaining edge of the baby bunting. Be sure to sew it securely before finishing.
- After your sides are closed, your crochet baby bunting is completed and ready to be used, or given away as a gift.
Making the Crochet Fabric
Edging Worked Around the Entire Piece
Sewing up the Hood
Shaping the Baby Bunting
Adding Buttons or Zipper
PIN for Later!

