Learning How to Crochet for Beginners
Are you interested in learning how to crochet? Then you are in the right place! I am so happy you are here! Today you and I will walk through the basics of crocheting. These step-by-step instructions are perfect for absolute beginners. Ready? Let’s get started!

What is Crocheting?
Crochet is a type of yarn craft that uses one hook, also known as a crochet hook to transform an average ball of yarn into a lovely crochet project.
The crochet hook looks like a type of hooked needle. It has a long bar area, where you hold on to the hook, and then the other end has a small hook shape, which is designed for the ease of making your crochet projects.
What can you Crochet?
One of the many reasons I love to crochet is that you can make anything you want out of yarn in your crochet projects. If you are looking for a new hobby, this is a great one to pick up!
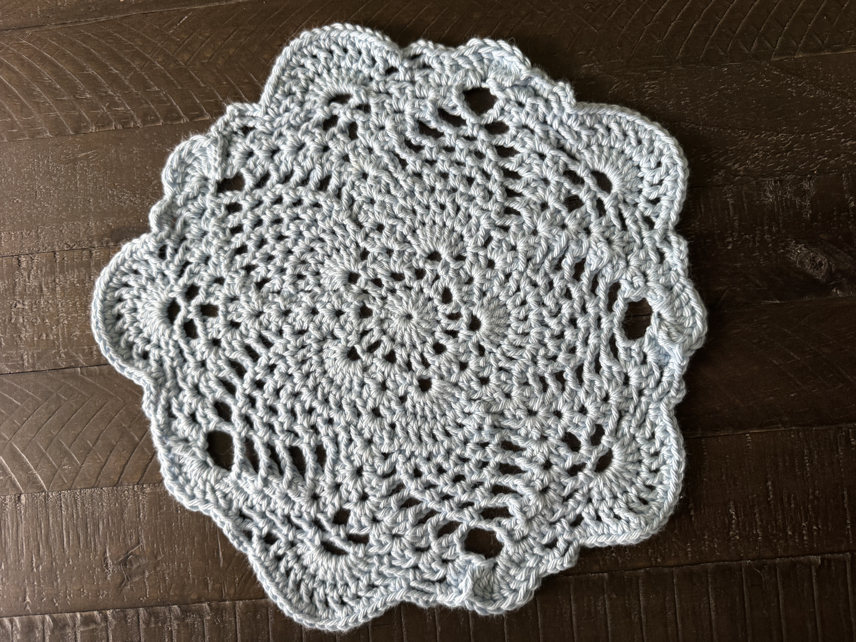
As a beginner, starting with flat projects is a good idea. Things like scarves, kitchen towels, placemats, dishcloths, and blankets are a great place to start. From there you might try making a little more advanced projects like potholders, coasters, and more. Once you master the basic stitches in your flat projects, you might then explore round projects like stuffed animals (amigurumi), or if you are feeling ambitious, you could even try crocheting doilies.
I am going to show you some basic first stitches you will want to master. Then these different stitches can be used in combination to make many different lovely patterns, as you learn to master your crochet skills.
Before we jump into the basic stitches, let’s begin with the set-up of crochet.
What do you Need to Get Started Crocheting?
Before you start to learn how to crochet, you will need to have two basic items on hand. Those are a ball of yarn, and a crochet hook.

What do you need to start crocheting?
Yarn
When you are first starting out, the best kind of yarn to use is going to be something of medium weight, that is nice and smooth.
Crochet Hook
You will also want to have a crochet hook on hand. When you use a medium-weight yarn, you will want to use a size H or I crochet hook. If you are unsure what size crochet hook to use, you can read the package of your yarn, it will give you a good suggestion of what size to start with.
Scissors
Of course, you will want to keep a pair of scissors handy when you are crocheting.
Step-By-Step Guide to Basic Crochet Stitches
The Set-Up
Thankfully, crochet is a pretty easy setup. Basically, you will want to hold the crochet hook in your dominant hand. For me, this is my right hand. This is the hand that you will work your stitches with.
How to Hold Your Crochet Hook
There are two main ways you can hold your crochet hook. Those are called the pencell grip and the knife grip. Feel free to choose whichever one is most comfortable for you.


Pencil Grip. When you hold your hook using the pencil grip, you will notice it really is held like a pencil. The hook is set on the top side of your hand and rests between your pointer finger and thumb, using your middle finger for added balance.
Knife Grip. When you hold a crochet hook in the knife grip, it sets under your hand. Held between your thumb and middle finger, using your pointer finger as extra support and guidance.
Holding the Yarn
Some people have a very particular way of holding the working yarn in their non-dominant hand as they crochet. The working yarn is usually held in your left hand or non-dominant hand, you will want to weave the working yarn over the top of your pointer finger, under your middle and ring fingers then around your pinky.
On your dominant hand, you might want to use your index finger to help guide the yarn as you work it and keep it from falling off of your hook if necessary.
Quite honestly, I don’t hold my yarn like this. It has never felt natural to me, so I only hold it between my thumb and middle finger, then hold the working yarn under my pinky. As you crochet more, you will begin to develop habits that feel right to you.
Exactly how you hold the yarn, and the hook is not going to be a deal breaker in the long run. Find out how you work best and what feels the most comfortable to you.
Yarn Over (YO)
The phrase yarn over is used in all of your crochet stitches. This refers to when you wrap the working yarn from the back of your project, around the top of your crochet hook, to the front of your project towards yourself.
Making A Slip Knot
A slip knot is the basic starting point for all of your crochet stitches, except for cases where the magic ring is used. But at this point, don’t worry about that. Let’s only focus on the slip knot at this point.
To make a slip knot, you will want to take the end of the yarn and form a loop. Then turn the loop, so that the yarn crosses in an x shape.


Reach with your thumb and middle finger through the loop and grab the yarn tail. Pull this slip knot tight.
Notice, that although the knot is tight, you can adjust the size of the loop. Place this loop onto your crochet hook. This is the starting point that you are now going to work into a chain stitch.
The Starting Chain (CH)
A series of chain stitches are used for a variety of reasons. First, as a foundation chain, means that the chain stitches are often used as the foundation for many different types of crochet projects. Another great use of the chain stitch is as a turning chain. This helps you get from one row of your project to the next row.

Hold your slip knot on the hook with your pointer finger, then yarn over. Take the new loop of yarn, near the tip of the hook, that you just added by yarning over, and pull it through the slip knot. To make one chain stitch.
Repeat this process, by yarning over, and pulling the new yarn loop through the loop previously on the hook. If you are following a pattern, make sure to count the correct number of chain stitches needed.


Be sure to check out my quick video tutorial with step-by-step instructions on how to make a slip knot and chain stitches.
Now that you know the foundation stitches. Let’s move on to the single crochet stitch, which is the first basic crochet stitch you will want to know.
Single Crochet Stitches (SC)
The single crochet stitch is a basic crochet stitch that is used in many different patterns. This is one of the easiest, but also the shortest crochet stitch.

To make the single crochet stitch, skip the chain stitch closest to your crochet hook. Insert the hook into the 2nd chain stitch from your hook. Yarn over and pull up a new loop. Now you have two loops on your hook.


Yarn over again and pull the new yarn through the two loops on your hook. This makes a single crochet stitch.
You can repeat these steps to make a single crochet in the next stitch, and across to the end of the row if desired.
To see how to make a single crochet, check out my easy video tutorial for each of these steps to make a single crochet stitch.
Turning a Single Crochet
When you reach the end of the row, you will want to chain one stitch, turn the project, then work your single crochet stitch in the 2nd stitch from your hook. This means that you will skip the chain stitch you just created to get to the next row.


Half Double Crochet Stitches (HDC)
A half-double crochet stitch is slightly taller than a single crochet stitch and has one additional step in making it.

To make a half-double crochet stitch, you will first want to yarn over. Then insert your hook into the 3rd chain from the hook. There are two loops on your hook.
Yarn over and pull up a loop. There are now three loops on your hook.


Yarn over one more time and pull the new yarn through all three loops on your hook to make a half-double crochet stitch.
Repeat these same steps to make a half-double crochet stitch in each chain space across the row.
If you would like to see this demonstrated in a video, please check out my quick video tutorial!


Turning a Half-Double Crochet
When you reach the end of the half-double crochet stitches and are making another row of half-double crochet stitches, you will want to chain two stitches at the end of your row, turn your project, then work your first half-double crochet stitch, in the 3rd stitch from your crochet hook on the new row.


Double Crochet Stitches (DC)
A double crochet stitch is a very nice stitch to make because it is easy and tends to make your project go much faster because it is about double the height of a single crochet stitch.

To make a double crochet stitch, you will first want to yarn over. Then skip the next three chain spaces. Insert your hook into the 4th chain from the hook.


Yarn over and pull the yarn through to make a new loop. There are now three loops on your hook.
Yarn over and pull the new yarn through the first two loops on your hook. There are two loops remaining on the hook.
Yarn over once more and pull the new yarn through the remaining two loops on your hook. This completes your first double crochet stitch.


Repeat these same steps to make a double crochet stitch in the next chain space, and in each chain stitch across the row until you come to the end of the row.
To see a quick and easy video tutorial, in which I walk you through these steps, please check out my video tutorial on YouTube.
Turning a Double Crochet
When you reach the end of the row, you will want to chain 3 stitches. Then turn your project. Make your next double crochet stitch in the 4th stitch from the hook to start your new row. This will be directly above the last double crochet stitch you made on the previous round.


Please Note: depending on your specific pattern, when making double crochet, you might need to skip two or three chain stitches at the end of the rows. Your pattern might also tell you to add two or three stitches for your turning stitches. The most common method is what we have described above, but we wanted to mention that we have seen some projects say otherwise.
Treble Crochet Stitch (TR)
A treble crochet stitch is a little more complicated and less commonly used. However, it is good to know how to make it in case you need it! As you may have guessed, a treble crochet is taller than a double crochet and has a few more steps to make it.
To make a treble crochet stitch, you will want to yarn over twice. Then, skip the four chain stitches closest to the crochet hook, and insert your hook into the fifth stitch from the hook.
Yarn over and pull the new yarn loop through the chain space. There are now four loops on your hook.
Yarn over and pull the new yarn through the first two loops on the hook. There are three loops left on the hook.
Yarn over again and pull through the next two loops on the hook. There are now two loops remaining on the hook.
Yarn over one last time and pull the new yarn through the remaining two loops on the hook to make a treble crochet stitch.
Repeat these steps to make a treble crochet stitch in the next chain space, and in each chain space across the row.


Check out this easy video tutorial on how to make a treble crochet if you prefer to see it in action!
Turning a Treble Crochet
When you get to the end of your treble crochet row, you will want to chain four stitches. Then turn your project. Work your next treble crochet stitch in the fifth stitch from your hook, on top of the last treble crochet stitch made in the previous row.


Making A Slip Stitch (SL ST)
A slip stitch has many different uses. The most common use is to join the first stitch you made, to the last stitch you made when creating a round project. There are also other uses for this type of stitch in flat projects.
To make a slip stitch, you will want to insert your hook into the stitch indicated in your pattern. Then yarn over and pull through all of the loops on your hook, to make a slip stitch.


The Most Common Crochet Stitches
If you are a complete beginner at crocheting, you will want to practice these basic techniques to make different stitches. As they say, practice makes perfect! If your first attempt at these stitches doesn’t come out perfectly, don’t worry.
How to Make a Turning Chain
When you reach the end of your first row, you will need to make a turning chain, in order to turn your project and begin working your crochet stitches in the second row. The number of chain stitches needed will depend on what crochet stitch you are making. Here is a quick look at how many chain stitches are needed for each type of crochet stitch.
Number of Turning Chain Stitches
Single Crochet: 1 chain
Half Double: 2 chains
Double Crochet: 3 chains
Treble Crochet: 4 chains
Slip Stitch: 0 chains
How to Work Row 2
To begin working on the second row of your crochet project, you will first want to chain the appropriate number of stitches. Then turn your project so that it faces the opposite direction.
You will then count your stitches, starting with the closest chain stitches to your hook, and skip the number of chains you just added. You will then make your stitches starting in the next stitch.
For example, if you are using single crochet stitches, you will chain one stitch, and turn your project. Then skip the one chain stitch closest to your crochet hook, and then start making your second row, in the 2nd stitch from your hook.
When using half double crochet stitches, you will skip the 2 chain stitches closest to your hook, and work your stitches in the 3rd stitch from your hook. For double crochet stitches, you will skip the first 3 stitches, and make your first double crochet in the 4th chain from your hook. And for the treble crochet, you will skip the 4 chain stitches closest to your hook, and make your first stitch in the 5th stitch.
How to Finish Off
When you reach the end of your crochet project it is time to fasten off. To do this you will want to cut the yarn but leave a long strand of yarn called a yarn tail. Pull the yarn all the way through the loop of yarn on your hook to finish off the project. Then weave in the yarn tail so that it doesn’t show. This finishes off your crochet project nicely.


With each crochet lesson, you will begin to get the hang of what yarn tension you prefer, and exactly how to make your stitches nice and even. The best way to perfect your crocheting skills is to practice often.
More Crochet Basics
Now that you have the basic crochet stitches that you will need to know, let’s also touch on a few other crochet basics. Like the different types and sizes of crochet hooks, and yarn types, as well as a few basic tips and tricks that will help your journey of learning how to crochet go much more smoothly.
Crochet Hook Sizes
As you may have already gathered, there are many different sizes of crochet hooks to choose from. If you are using a pattern, it will likely give you a suggested size to use. Otherwise, a good starting crochet hook size is usually size H or a 5.00 mm crochet hook.
If you are having difficulty choosing the right crochet hook size, you can also reference the package of yarn you are using. The yarn label will give you a good, recommended crochet hook size that works well for that specific yarn.
Learn more about crochet hooks and the different size options, by exploring Crochet Hook Conversion Chart and Sizes.
The Type of Yarn
If you are taking a walk down the yarn aisle at your local craft store, then you have likely discovered that there are many different types of yarn. From cotton yarn to acrylic yarn, or different yarn weights. Some common yarn weights you will hear mentioned are worsted weight yarn, bulky yarn, or chunky yarn.
Although there are various sizes of yarn to choose from, the weight of the yarn will determine the finished size of your project. It is best to reference the pattern that you are using to see what type of yarn is recommended.

What is the Best Yarn for New Crocheters?
If you are just starting to crochet, the best yarn is going to be a nice medium-weight yarn. Usually, a number 4 or number 5. You will want to be sure to choose something that isn’t super fluffy, but smooth. This way it will be easier to work with and to see your stitches.
Basic Crochet Tips and Tricks
What is a Skein of Yarn?
Perhaps you are wondering what a skein of yarn is. Essentially, this is a ball of yarn that you will use to make your crochet project.
Do I need Stitch Markers?
Stitch markers a usually brightly colored plastic safety pin-looking thing. These are used to help you determine where your round or row changes. If you are just learning to crochet, it is a good idea to use these to help you keep track of where you are in your project.

What is a Yarn Needle Used for?
A yarn needle is a good item to have on hand. This will help you to hide the tail of the yarn that was left when you started the slip knot. You may also want to use a yarn needle to sew different parts of your crochet project together, depending on what you are making.
How to make sure you aren’t Adding or Subtracting Stitches
One of the most important things to keep track of when you are learning to crochet is making sure you are keeping the correct number of stitches. This makes sure that your project keeps its shape, and your number of stitches stays the same.
The best way to do this is to know how many stitches you have in your first round or row of your project. Then count the number of stitches every little while to make sure the number stays the same.
Making Round Crochet Projects (Working in the Round)
The best way to start, when you are learning to crochet is to work with a flat project like we have outlined above. However, when you feel like you have gotten the hang of it, you might enjoy moving on to round projects.
How to Make a Magic Ring
Most round projects start by making a magic ring, also known as a magic circle. Into this foundation circle, you will add your desired number of stitches, then pull the circle tight around your stitches.
This ring is the base of your round projects. From there you can increase your number of stitches as you work your way out from the center.

Chain Two Method
Another method that is sometimes used, in place of the magic ring is the chain two method. When making this method, you will create a slip knot, and then chain two stitches. In the farthest chain from your hook, you will add the number of stitches desired for your round project.
You can adjust the size of your circle by pulling on the yarn tail of the slip knot to make it nice and tight if desired. This alternative method is a great one to keep in mind when working with bulky or velvet yarn.
Increasing and Decreasing
Increasing and decreasing the number of stitches you make is very important for round crochet projects. This is what makes them into their unique shape.
Increase. An increase stitch is usually when you create two stitches in the same space. This increases the overall number of stitches in your project.
Decrease. A decrease stitch is when you combine two consecutive stitches into one stitch. The specific steps you take for a decrease stitch will depend largely on what stitch you are decreasing.

How to Crochet in Front and Back Loop
As you may have noticed, your crochet stitches have both a front and a back loop to them. When you make your crochet stitch through both of these loops at the same time, you end up with a flat project. However, to add texture you might enjoy working through only one of these loops. Some patterns will specifically direct you to work through the front loop only (FLO) or back loop only (BLO) depending on what you are making.
To work through the front loop only is quite simple. You will create your crochet stitch as normal, but instead of inserting your hook through both sides of the previous row’s stitches, you will go through only the front loop.
The same is true of working in the back loop only. To do this, you will create your crochet stitches in the same manner, but only insert your hook through the back loop of the previous row’s stitches.
Different Crochet Stitches
Once you know how to make these basic crochet stitches, you can mix them up and make many different types of crochet stitches. No matter what you are making, the basic stitches will stay the same. But when the different stitches are combined, they can create many different crochet textures you will enjoy.
How to Read a Crochet Pattern
Learning how to read a crochet pattern can be a challenge at first. The most important thing that will help you to get started is to keep a cheat sheet of abbreviations handy or memorize the different abbreviations used in a pattern.
Most crochet patterns will have a section where they tell you the abbreviations the pattern will use, and what each abbreviation means. As long as you can understand those abbreviations and what they mean, you will be able to easily read a crochet pattern.
Free Resource!
If you are struggling to learn how to read a crochet pattern, I have created a helpful guide for you that is full of crochet basics. To get your FREE copy, all you have to do is enter your email address below, and your free copy will be sent directly to your email inbox.
Join our Mailing List and Receive a…
The Basics Of Crochet
Now that you know the basics of crocheting, you can begin practicing these different stitches until you make them perfectly each time. Try not to get frustrated if you don’t make the stitches perfectly the first time. Getting the hang of it really will come with practice.
Then before you know it you will be hooked on crocheting forever, lol! I absolutely love to crochet; it is seriously one of my all-time favorite things to do. I hope that these instructions will help you in learning how to crochet. Make sure to reach out if you have any questions! Welcome to the world of crochet!
Find Us Online!
Be sure to follow us online on your favorite social media platform!
Free Crochet Patterns!


Learning How to Crochet
Materials
- crochet hook size H or I is a good place to start
- 1 skein yarn medium weight and smooth reccomended
- scissors
Instructions
Yarn Over (YO)
- The phrase yarn over is used in all of your crochet stitches. This refers to when you wrap the working yarn from the back of your project, around the top of your crochet hook, to the front of your project towards yourself.
Making A Slip Knot
- A slip knot is the basic starting point for all of your crochet stitches, except for cases where the magic ring is used. But at this point, don’t worry about that. Let’s only focus on the slip knot at this point.
- To make a slip knot, you will want to take the end of the yarn and form a loop. Then turn the loop, so that the yarn crosses in an x shape.
- Reach with your thumb and middle finger through the loop and grab the yarn tail. Pull this slip knot tight.
- Notice, that although the knot is tight, you can adjust the size of the loop. Place this loop onto your crochet hook. This is the starting point that you are now going to work into a chain stitch.
The Starting Chain (CH)
- Hold your slip knot on the hook with your pointer finger, then yarn over. Take the new loop of yarn, near the tip of the hook, that you just added by yarning over, and pull it through the slip knot. To make one chain stitch.
- Repeat this process, by yarning over, and pulling the new yarn loop through the loop previously on the hook. If you are following a pattern, make sure to count the correct number of chain stitches needed.
- Be sure to check out my quick video tutorial with step-by-step instructions on how to make a slip knot and chain stitch.
Single Crochet Stitches (SC)
- To make the single crochet stitch, skip the chain stitch closest to your crochet hook. Insert the hook into the 2nd chain stitch from your hook. Yarn over and pull up a new loop. Now you have two loops on your hook.
- Yarn over again and pull the new yarn through the two loops on your hook. This makes a single crochet stitch.
- You can repeat these steps to make a single crochet in the next stitch, and across to the end of the row if desired.
Turning a Single Crochet
- When you reach the end of the row, you will want to chain one stitch, turn the project, then work your single crochet stitch in the 2nd stitch from your hook. This means that you will skip the chain stitch you just created to get to the next row.
Half Double Crochet Stitches (HDC)
- To make a half-double crochet stitch, you will first want to yarn over. Then insert your hook into the 3rd chain from the hook. There are two loops on your hook.
- Yarn over and pull up a loop. There are now three loops on your hook.
- Yarn over one more time and pull the new yarn through all three loops on your hook to make a half-double crochet stitch.
- Repeat these same steps to make a half-double crochet stitch in each chain space across the row.
Turning a Half-Double Crochet
- When you reach the end of the half-double crochet stitches and are making another row of half-double crochet stitches, you will want to chain two stitches at the end of your row, turn your project, then work your first half-double crochet stitch, in the 3rd stitch from your crochet hook on the new row.
Double Crochet Stitches (DC)
- To make a double crochet stitch, you will first want to yarn over. Then skip the next three chain spaces. Insert your hook into the 4th chain from the hook.
- Yarn over and pull the yarn through to make a new loop. There are now three loops on your hook.
- Yarn over and pull the new yarn through the first two loops on your hook. There are two loops remaining on the hook.
- Yarn over once more and pull the new yarn through the remaining two loops on your hook. This completes your first double crochet stitch.
- Repeat these same steps to make a double crochet stitch in the next chain space, and in each chain stitch across the row until you come to the end of the row.
Turning a Double Crochet
- When you reach the end of the row, you will want to chain 3 stitches. Then turn your project. Make your next double crochet stitch in the 4th stitch from the hook to start your new row. This will be directly above the last double crochet stitch you made on the previous round.
Treble Crochet Stitch (TR)
- To make a treble crochet stitch, you will want to yarn over twice. Then, skip the four chain stitches closest to the crochet hook, and insert your hook into the fifth stitch from the hook.
- Yarn over and pull the new yarn loop through the chain space. There are now four loops on your hook.
- Yarn over and pull the new yarn through the first two loops on the hook. There are three loops left on the hook.
- Yarn over again and pull through the next two loops on the hook. There are now two loops remaining on the hook.
- Yarn over one last time and pull the new yarn through the remaining two loops on the hook to make a treble crochet stitch.
- Repeat these steps to make a treble crochet stitch in the next chain space, and in each chain space across the row.
Turning a Treble Crochet
- When you get to the end of your treble crochet row, you will want to chain four stitches. Then turn your project. Work your next treble crochet stitch in the fifth stitch from your hook, on top of the last treble crochet stitch made in the previous row.
Making A Slip Stitch (SL ST)
- To make a slip stitch, you will want to insert your hook into the stitch indicated in your pattern. Then yarn over and pull through all of the loops on your hook, to make a slip stitch.
Be sure to check out my YouTube channel for short videos on how to make each one of these stitches!
PIN for Later!

