Seed Bead Earring Pattern
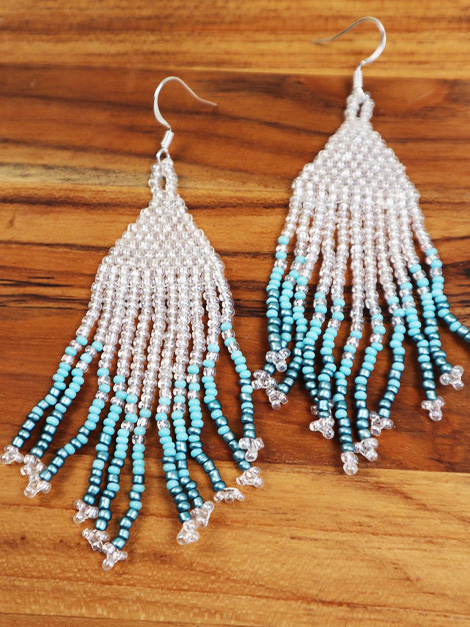
I am so excited to show you how you can make your very own pair of earrings, using this seed bead earring pattern! This pattern uses seed beads in a brick stitch to make the top part, then has a beautiful bead fringe hanging down, to make the most beautiful seed bead earrings ever!

I first discovered the original design of these seed bead earrings that I am about to share with you when I went on a college trip to Guatemala. The ladies were selling so many beautiful pairs of earrings at different markets around the country. I picked up a pair or two, and they are still my favorites to this day.
It recently occurred to me, that I could also make earrings using seed beads, and have them turn out very much like the original design. I am so excited to share with you, how you too can easily make this seed bead earring pattern, with these step-by-step pattern instructions. These earrings are made using a brick stitch, and then have several tassels hanging down below to make them gorgeous earrings.
These beautiful earrings are something that is near and dear to my heart, and I hope you will enjoy making these beautiful seed bead earrings as well!
What are Seed Beads?
Seed beads are a type of glass bead, which are super tiny. They get their name because they resemble a small seed. Hence the name, seed bead. They can come in many different shapes and sizes, the type that we are going to use is 11/0 or 12/0, depending on what you can find. These are a type of very small glass beads.
When I was younger, you used to be able to pick up these seed beads in a variety package for a couple of dollars. Now, you can find them in packages by color, at your local craft store, in the jewelry section. You can also order a multi-pack online if you want to have more colors in one package. When choosing your beads, make sure they are all the same size, and whatever color combination you desire.
Learn Beadweaving (Brickstitch) With a Beaded Earring Tutorial
Fringe earrings made with seed beads are created in what is known as a brick stitch. This is because the top part of the beaded earrings looks like a brick wall in the way that they are laid, using a slightly overlapping method. Let’s look at the different sections of these beaded earrings.
Fringe Earrings
The Pyramid Part
Often with this type of beaded earring, you will first make the brick stitch pyramid part, then attach the fringe part to the earrings. However, it is my preference to make the bottom layer with the fringe part first, then build your pyramid part as desired on top to finish the earrings.
The Fringe Part
When you create the fringe part of the earrings, you can make them as long and as wide as you want them to be. I love to make them as long dangly earrings, but feel free to make them as long or in whatever color pattern you desire.
Creating Beautiful DIY Seed Bead Earrings
Making your own beautiful seed bead earrings is a lot of fun. I am so excited to show you how to make them with this easy tutorial so that you can enjoy wearing your beautiful seed bead earrings!
Simple Seed Bead Earrings
Before we jump into the step-by-step instructions, there are a few craft supplies that you want to have on hand in order to make these seed bead earrings. Here at the craft supplies that you want to have:
Glass Seed Beads. I would recommend using a smaller size for this project. You will want to look at the package of your seed beads so that they are approximately sizes 11/0 or 12/0. These are going to be very small beads.
Beading Needle. To make your jewelry, you will want to have a beading needle. This is a needle, that has a very small head and is like a normal needle. You can find a beading needle also in the jewelry section of your craft store. This way you won’t have any trouble when you try to create your earrings, threading the needle through and having it gets stuck inside of the small beads.
Jewelry Thread. Jewelry thread can also be found in the jewelry-making section of your craft stores. This is a specific type of strong thread, but you do not want to use wire or elastic, because both of those are quite difficult to work with. Your best option is to look for a very strong thread for jewelry making, or another alternative would be to use quilting thread.
Earring Hook. You will want to find some ear wire, that will hook onto your earrings, and hold them in your ears. You can use studs, earring hooks, or whatever you prefer.
Jump Rings. I recommend using 2 mm jump rings, to hold your earrings hooks to your finished seed bead earrings. This is optional if you would prefer to skip the jump rings.

Seed Bead Earrings Step by Step Instructions
You will first want to take and determine what color combination you want to use, what pattern you want to make with different colors, or if you want to make the earrings solid.
When your color pattern is determined, take your beading needle and thread it. Make sure that your thread is plenty long enough.
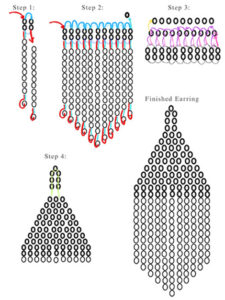
Step 1:
Put the first two beads on the needle, these will be your base, then add as many beads as desired for the fringe.
When your needle is threaded through all of the beads, skip the last bead added, then push the needle back up through all of the beads.
Add two new beads for the next row. These will also be the base. Push the needle from these two new beads, up through the first two beads made from the previous row. This makes a square shape out of the beads.
Add your beads for the fringe, making sure to add one more bead than the previous row. After the beads are all threaded on, skip the last one added, and push the needle back up through all of the beads just added.
Step 2:
Repeat the steps of adding two beads, then forming a square, before adding on the fringe before you move on. When the earring is as wide as you wish, step two in the images will be complete. It is then time to move on to step 3 pictured below, which will create what is known as brick beading.
Step 3:
After the base row, and the frindge is made, you can move on to adding the beads like bricks to make the top portion of the earrings.
To do this, you will want to add one bead to the needle. Loop the needle through the thread between the two beads in the previous row, and then push the needle up through the last bead added. Repeat this step until you reach the end of the row.
When you reach the end of the row, you will simply add a new bead, then insert the needle into the loop between the two beads on the previous row. Push the needle back up through the last bead added in your new row, then continue this process until the top of your earrings are finished.
Step 4:
To finish the earrings, I like to add as many beads as needed to make a loop of beads to hold the earring hooks. Add the hooks, then tie a knot securely to hold the earrings. Weave in the ends of the thread so that they are not visible before finishing off the earrings.

Finished Earrings
Your finished earrings are eleven beads wide, at the widest area. Then you can make your seed bead earrings as long as you wish. Feel free to add as many beads to the tassel as desired. Remember to start it from the outside, then add one bead to each tassel as you work your way to the center, with the center one tassel being the longest. This is what gives you the cool finish.
Free Seed Bead Earring Printable Pattern
I have created a printable pattern for these seed bead earring patterns, they can help you visualize how you want the color layout of your earrings to be. This will help you brainstorm different patterns you can make with your earrings.
Please note that this printable pattern is available to you in an instant download, in a PDF file. Please note this pattern is intended for your personal use only and should not be re-distributed.

Tips and Tricks
Adding Bling to Your Designs
Adding bling is a lot of fun! Feel free to mix things up and add some extra bling to your beaded earrings. You can do this by adding special beads, or whatever accents you wish.
Seed Bead Tutorial
I hope the seed bead earring tutorial has helped you to learn how to make your own earrings following this simple pattern. Once you start making your own seed bead earrings, you just might be addicted to making this beautiful jewelry.
I hope that you have a fun time making new projects, and I hope that you enjoy this free earring pattern! Thank you so much for taking the time to learn how to make the seed bead earrings, following this easy pattern!
Find Us Online!
Be sure to follow us online on your favorite social media platform!
More Tutorials For Your Related Interests


Seed Bead Earring Pattern
Materials
- Glass Seed Beads
- Beading Needle
- Jewelry Thread
- Earring Hook
- Jump Rings
Instructions
- Put the first two beads on the needle, these will be your base, then add as many beads as desired for the fringe.
- When your needle is threaded through all of the beads, skip the last bead added, then push the needle back up through all of the beads.
- Add two new beads for the next row. These will also be the base. Push the needle from these two new beads, up through the first two beads made from the previous row. This makes a square shape out of the beads.
- Add your beads for the fringe, making sure to add one more bead than the previous row. After the beads are all threaded on, skip the last one added, and push the needle back up through all of the beads just added.
- Repeat the steps of adding two beads, then forming a square, before adding on the fringe before you move on. When the earring is as wide as you wish, step two in the images will be complete. It is then time to move on to step 3 pictured below, which will create what is known as brick beading.
- After the base row, and the fringe is made, you can move on to adding the beads like bricks to make the top portion of the earrings.
- To do this, you will want to add one bead to the needle. Loop the needle through the thread between the two beads in the previous row, and then push the needle up through the last bead added. Repeat this step until you reach the end of the row.
- When you reach the end of the row, you will simply add a new bead, then insert the needle into the loop between the two beads on the previous row. Push the needle back up through the last bead added in your new row, then continue this process until the top of your earrings is finished.
- To finish the earrings, I like to add as many beads as needed to make a loop of beads to hold the earring hooks. Add the hooks, then tie a knot securely to hold the earrings. Weave in the ends of the thread so that they are not visible before finishing off the earrings.
PIN for Later!

