How to Tie Dye Shoes
I am so excited to help you learn how to tie dye shoes! Making tie-dye shoes is such a fun project, and with this method you can use permanent markers, making it much less of a mess, but still a fun project!
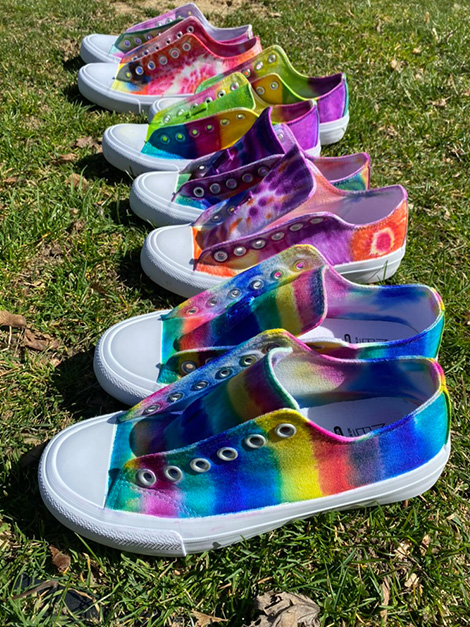
This summer I made my first pair of tie-dyed shoes because I found some white canvas shoes on clearance for $1! Of course, we just had to tie-dye them! Turning your average white canvas shoes into an awesome tie dye creation is a fabulous option, plus you get to rock your creation in style.
Easy Summer Craft Project
If you are looking for a fun tie dye project, then you should definitely try tie dye sneakers! You don’t have to worry about the mess or hassle of a tye dye kit, or fabric dye. With this easy tie-dye method, you don’t even have to mess with rubber bands and soda ash.
Making tie-dyed shoes is an easy craft and so much fun! I’m so excited to show you the easy way to make your shoes appear tie-dyed. Let’s get started by looking at the different materials you will want to have in order to make this project.
Materials Needed:
Plain White Canvas Shoes. For the best results, you will want to use white canvas shoes for Sharpie tie-dye.
Sharpie Markers. Sharpie markers in your desired colors are going to be ideal for this project. However, other brands of permanent markers like Sharpie will also work for this project.
Painter’s Tape. Painter’s tape will give you the best results, but you can also use masking tape if needed.
Isopropyl Alcohol (Rubbing Alcohol). Using rubbing alcohol is very important as this is what gives you the tie-dye appearance.
Eye Dropper or Spray Bottle. Using an eye dropper or spray bottle will help you get the rubbing alcohol right where you want it.
Paper Towels. It is always a good idea to have paper towels on hand when you are tie-dying a project to help minimize any mess.
Plastic Bag. A large plastic bag or plastic tablecloth will help to protect your work surface.
Simple Steps to Tie Dye Shoes
Step 1: Prepare the Shoes
Before you begin it is very important to put painter’s tape over the entire soles of the shoes. This will protect them from getting any unwanted color on them as you work. Make sure that the painter’s tape is sealed securely before you continue working with them.
When I did this, I didn’t add the tape until after I had colored them. I would highly encourage you to add the tape first. This way you will keep the rubber part of the shoes nice and clean.

Step 2: Protect Work Surface
I strongly recommend that you work on this project outside if it is warm enough. This will help to minimize any damage or mess that might be caused by the permanent marker.
However, if you are unable to do the project outside, make sure that you protect your work surface with a large plastic bag or plastic tablecloth.
Step 3: Create your Design
Now it’s time for you to create your desired design on your white canvas shoes. There are many different ways that you can design your shoes, all of which will give a very unique look. How you color the shoes with the Sharpies will determine the different results.

You can color the shoes with stripes or make a spiral design. My niece also did different colored polka dots, which turned out to look really cool on the front of the shoes.
Feel free to get creative and make whatever designs you prefer!
Tip: As you are adding your design, make sure to leave white space on the canvas sneakers. This is very important to the finished outcome of your shoes.
Once you have drawn the design on your first shoe, make sure to add the same design, or even a different design if you would rather to your second shoe.
Step 4: Apply Rubbing Alcohol
Now comes the fun part! Once your shoes have been colored with a sharpie to get your desired design, it’s time to apply the rubbing alcohol to get the cool, tie-dye effect.
To do this, you will want to put the isopropyl alcohol into medicine droppers, or a spray bottle. Then spray it onto the part of your shoe with the Sharpie design. You will notice as you add the rubbing alcohol that the marker drawing will begin to run into the white spaces and have a tie-dyed appearance.
Add as much rubbing alcohol as needed to get your desired effect.

Step 5: Blend and Spread
If you want to spread the colors even more, you can take a Q-tip or cotton ball and gently spread the colors or blend them even more if you wish. This step is completely optional.

Step 6: Let them Air Dry
Once your shoes have gotten the tie dye effect to your satisfaction, it’s time to let the tie dye project dry. Place the pair of tie dye shoes in a warm sunny location if possible and let them air dry until the canvas top of the shoe is completely dry.
After the canvas part of the shoe has been tie-dyed and has dried completely, you can carefully remove the painter’s tape from the soles of the shoes.
When the shoes are completely dry, you are ready to rock your tie-dyed shoes in style!

Tie Dye Shoes Tips and Tricks
Old Shoes vs New Shoes
It really doesn’t matter if you want to use a brand new pair of white canvas shoes or rejuvenate some old shoes. As long as your shoes are white canvas, this is the important part!
Wearing Old Cloths
It is always a good idea to wear old cloths when you are making a tie-dyed project. Often some of the colors get away from you and can end up in places you don’t want them.
Wear Rubber Gloves
Because you are working with permanent markers, it is a good idea to wear rubber gloves as you tie-dye your shoes. This way, you don’t get the marker colors on your hands as you work on your project.
Can tie-dyed shoes be washed in the washing machine?
Although not required, yes, most white canvas shoes that have been tie-dyed can be washed in the washing machine. Before washing them, you might want to rinse them in cold water, then wash them in the washing machine using warm water. If you are going to wash tie-dyed shoes, it is a good idea to wash the shoes in a separate load the first time or two. Make sure to let the pair of shoes air dry after washing.
Remember, because we are using Sharpies for this project, it is not required that you wash your project before wearing them. Only make sure that the marker has completely dried before wearing the shoes.

Sharpie Tie Dyed Shoes
Making tie dye shoes with sharpie’s is a fun summer craft that you can enjoy with your kids, or just for fun. This is a great project to convert your plain white shoes into something really fun. You can easily color your white canvas pair of shoes with permanent marker to get a super cute tie dye look.
Now that you know the easy way to make tie-dyed shoes, it’s time for you to try it out! Make sure to give it a try and let me know how it goes!
Happy crafting!
Be sure to follow us online on your favorite social media platform!
Looking for your next project?
Be sure to check out this fun tie-dye tutorial on how to reverse tie dye, or how to reverse tie dye a sweatshirt!

How to Tie Dye Shoes
Materials
- Plain White Canvas Shoes
- Sharpie Markers
- Painter’s Tape
- Isopropyl Alcohol Rubbing Alcohol
- Eye Dropper or Spray Bottle
- Paper Towels
- Plastic Bag
Instructions
Step 1: Prepare the Shoes
- Before you begin it is very important to put painter’s tape over the entire soles of the shoes. This will protect them from getting any unwanted color on them as you work. Make sure that the painter’s tape is sealed securely before you continue working with them.
- When I did this, I didn’t add the tape until after I had colored them. I would highly encourage you to add the tape first. This way you will keep the rubber part of the shoes nice and clean.
Step 2: Protect Work Surface
- I strongly recommend that you work on this project outside if it is warm enough. This will help to minimize any damage or mess that might be caused by the permanent marker.
- However, if you are unable to do the project outside, make sure that you protect your work surface with a large plastic bag or plastic tablecloth.
Step 3: Create your Design
- Now it’s time for you to create your desired design on your white canvas shoes. There are many different ways that you can design your shoes, all of which will give a very unique look. How you color the shoes with the Sharpies will determine the different results.
- You can color the shoes with stripes or make a spiral design. My niece also did different colored polka dots, which turned out to look really cool on the front of the shoes.
- Feel free to get creative and make whatever designs you prefer!
- Tip: As you are adding your design, make sure to leave white space on the canvas sneakers. This is very important to the finished outcome of your shoes.
- Once you have drawn the design on your first shoe, make sure to add the same design, or even a different design if you would rather to your second shoe.
Step 4: Apply Rubbing Alcohol
- Now comes the fun part! Once your shoes have been colored with a sharpie to get your desired design, it’s time to apply the rubbing alcohol to get the cool, tie-dye effect.
- To do this, you will want to put the isopropyl alcohol into medicine droppers, or a spray bottle. Then spray it onto the part of your shoe with the Sharpie design. You will notice as you add the rubbing alcohol that the marker drawing will begin to run into the white spaces and have a tie-dyed appearance.
- Add as much rubbing alcohol as needed to get your desired effect.
Step 5: Blend and Spread
- If you want to spread the colors even more, you can take a Q-tip or cotton ball and gently spread the colors or blend them even more if you wish. This step is completely optional.
Step 6: Let them Air Dry
- Once your shoes have gotten the tie dye effect to your satisfaction, it’s time to let the tie dye project dry. Place the pair of tie dye shoes in a warm sunny location if possible and let them air dry until the canvas top of the shoe is completely dry.
- After the canvas part of the shoe has been tie-dyed and has dried completely, you can carefully remove the painter’s tape from the soles of the shoes.
- When the shoes are completely dry, you are ready to rock your tie-dyed shoes in style!
PIN for Later!

