Tie Dye Sweatshirt – Hot to Tie Dye a Sweatshirt at Home
Tie-dying is such a fun activity! Today we’re going to learn how to tie-dye and sweatshirt. Because tie-dye never seems to go out of style, you can now enjoy tie-dye all year round, by rocking that awesome tie-dye sweatshirt during the cooler months of the year.

Tie Dyeing
There are many different ways you can enjoy making a tie dye project. not only can you have fun making memories but you can also create your own artistic designs on your clothes, or other items and rock them for the world to see. If you’re looking for an easy DIY project, then you should definitely check out how to tie-dye a sweatshirt. Let’s jump right in!
Which Sweatshirts are the Best to Tie Dye?
The best type of sweatshirt to tie-dye is going to be either hoodies or sweatshirts that are made with mostly cotton material. Choosing a sweatshirt on what it is made out of will be a determining factor in if your tie-dyed sweatshirt turns out, or is a complete flop.
Choosing the Right Fabrics
When I first went to make a tie-dye sweatshirt, my project wasn’t working. The bleach wasn’t doing its thing. Then I realized that the sweatshirt I had was made of mostly polyester, and let me tell you, friends, this won’t work for tie-dying.
I was finally able to find a hoodie online that was 90% cotton, and this worked. When you are choosing your sweatshirt or hoodie to tie-dye, it is going to be extremely important that your shirt is made from fabric that is primarily cotton.
Where to get Sweatshirts to Tie Dye
What I learned when I was looking for a sweatshirt to buy and make reverse tie dye out of it is that finding a hoodie made from mostly cotton is a challenge. I was finally able to determine that Hanes makes a hoodie that is primarily cotton. It was called Hanes’s ultimate cotton heavyweight pullover. This is what I ended up using because it was the most reasonably priced sweatshirt I could locate to tie-dye.
What Type of Tie Dye To Use
There are many different types of dye to choose from when making a tie-dye project. And there’s RIT dye, which might seem like a good option, or you can pick up a tie-dye kit at most craft stores. If you’re a first-timer, then I would definitely recommend going for the tie-dye kit. It’s an easy way to make sure that you have everything and don’t have to mess with any special items such as soda ash.
The best brand of tie-dye that I like to use is the Tulip tie-dye kit, as it has soda ash included with the color dye, so you don’t have to worry about doing anything special. All you have to do is your basic tie dye using this particular kit.
White vs. Black Tie Dye
Usually, when you make tie-dye projects you start with a white shirt or white sweatshirt. This is all well and good, but did you know that you can also use a black shirt or black sweatshirt to make tie-dye? Today I am excited to show you how you can make bleach tie-dye using cotton fabrics, or even a sweatshirt.
However, if you don’t care to use the bleach tie-dye method, also known as reverse tie-dye, you can simply skip to the basic tie-dye instructions included below. The main difference between tie-dying a black shirt, compared to a white shirt is that you first must bleach the black shirt in order for the colored tie-dye to show up.
Even though using a black shirt to tie-dye does add an additional step, the result is awesome, and it’s definitely worth it. Making a reverse tie-dye sweatshirt it’s also a lot of fun, which is why I’m excited to show you how to do it.

Different Patterns with Tie Dye
Not only can you use different colored sweatshirts, but you can also create different patterns depending on how you fold the sweatshirt. The tie-dye patterns will give your sweatshirt a different look depending on how it is folded.
You can also give your tie-dye sweatshirt different looks by the different colors you use. You can make a color change in the tie-dye pattern to accent it and make your design eye-catching.
The Best Tie Dye Patterns For: Sweatshirts
There are a ton of different tie-dye patterns that you can choose from to make your project. Some designs are easier than others, but they are all a lot of fun to do. Here’s a quick summary of each of the tie-dye pattern techniques.
DIY Swirl Pattern Tie Dye Hooded Sweatshirt
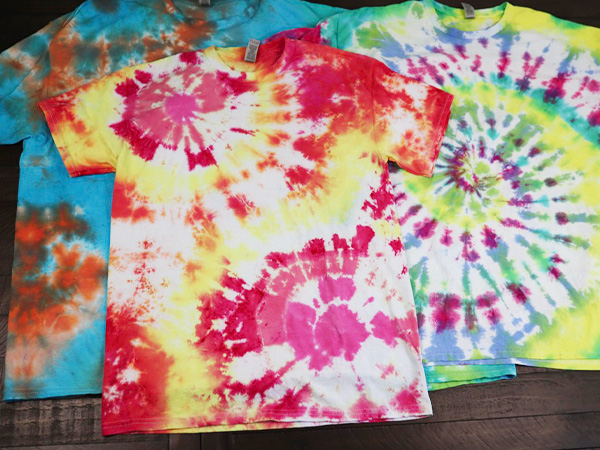
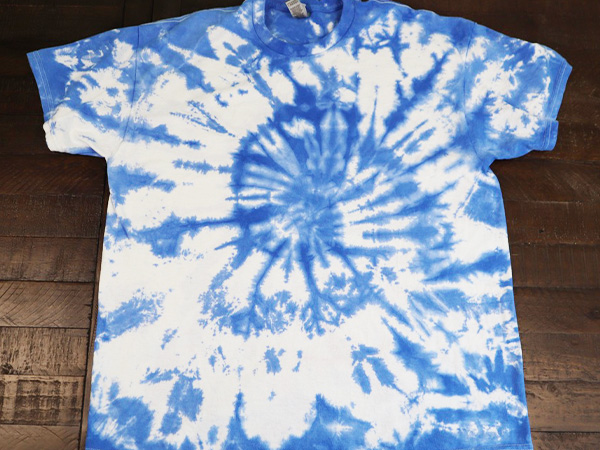
Spiral Pattern. The spiral tie dye pattern is your traditional pattern. When you think of tie-dye this is usually the pattern you imagine. The spiral shape can be centered on the sweatshirt or offset to the side.
Crumple Technique in Tie Dye
Crumple Technique. The crumple technique is a fun and easy tie-dye pattern if you are looking for no definite pattern on your project. To create this pattern, you can simply crumple the shirt up and secure it in place with rubber bands or string before tie-dying it.
Tie Dyed Bullseye Pattern
Bullseye. The bullseye tie dye pattern looks like, well a bull’s eye. It is made by selecting a central point and pulling the rest of the shirt back then securing it with rubber bands or string.
Making a Tie Dyed Sunburst
Sunburst. A sunburst pattern is similar to that of a bullseye tie dye pattern. To make a sunburst pattern, you usually choose a few different center points and secure them with rubber bands, then gather the shirt up a little further and add another rubber band or two. You can then add colors that go together to make these sunbursts while dying the rest of the sweatshirt another color.
Polka Dot Tie Dye
Polka Dot. Polka dot tie dye is also done by selecting different points on the sweatshirt and securing rubber bands around them. Then dye the rubber banded portions your desired color, and the rest of the shirt another color.
DIY Vertical Striped Tie Dye Sweatshirts
Vertical Stripes. Vertical stripes can be made by folding the sweatshirt in a specific direction.

Tie Dyed Horizontal Stripes
Horizontal Stripes. You can also make horizontal stripes by folding the shirt in the opposite direction of the vertical strips. Then apply the dye in sections.
Diagonal Stripes Tie Dye Pattern
Diagonal Stripes. Diagonal stripes are created by folding the sweatshirt in a diagonal. Then once folded and secured with rubber bands, apply the dye colors in sections.
Chevron Tie Dye
Chevron. You can make a chevron pattern with as many folds as you want. Start by folding the shirt down the center, from the neckline to the waist. Then fan fold each side so that they match. Use a washable marker to draw diagonal lines as desired across the top fold. Fan fold along each of the diagonal lines and secure them in place with a rubber band. You can then tie dye each section as desired.
Heart Shaped Tie Dye
Heart. To fold a heart, fold the shirt in half where you want to place the heart. Then use a washable marker to draw half of a heart. Gather along this line, making the curved line as straight as you go. Secure it in place with a rubber band.
Rainbow Tie Dye Pattern
Rainbow. You can use rainbow colors or make a rainbow shape on your shirt. To make a rainbow shape, first, fold the shirt in half. Then use a washable marker to draw the shape you want. Gather along these lines and secure them in place with a rubber band. You can then add your tie-dye colors as desired.

Bleach Tie-Dyeing (AKA Reverse Tie-Dye)
I am so excited to show you how to reverse tie-dye by using a black sweatshirt and then adding your tie-dye. This method is perfect for any dark-colored shirts, and it’s a fun way to mix things up from your traditional tie-dye.
Let’s turn our attention to how to tie-dye a sweatshirt, focusing primarily on using a black sweatshirt, but if you wish to use a white sweatshirt you can skip the bleach part and look at the traditional tie-dye for sweatshirts.
Instructions for How to Tie Dye a Sweatshirt
Materials Needed:
A cotton, black sweatshirt
Some plastic gloves
Lots of rubber bands
A tie-dye kit or soda ash and dye colors
A spray bottle or a squeeze bottles
Some plastic bag or plastic wrap
Your bleach mixture
Reverse Tie Dye Sweatshirt: How to Tie Dye with Bleach
Step 1: Prewash the Sweatshirt
Make sure that your sweatshirt has been fully washed and dried, without using fabric softener before you begin tie-dying it. Please note that you can use your regular laundry detergent but skip the fabric softener.

Step 2: Clean and Cover a Flat Surface
Clean off a flat work surface then lay out your sweatshirt. To reverse tie dye it, it will work best if your sweatshirt is slightly damp, so take the dry sweatshirt and you might want to use a spray bottle to get it a little wet. Then fold the sweatshirt into your desired tie-dye pattern and secure it in place with rubber bands.
Step 3: Prepare the Bleach Solution
To make a reverse tie-dye hoodie, you will need to bleach the hoodie first, before applying the color. To do this, you can use your desired bleach solution, whether you choose to use toilet bowl cleaner, straight bleach, or part bleach mixed with warm water.
My favorite is to add straight bleach into a large bowl. Just a splash will work, you don’t need much! Then make sure you wear gloves before you set the folded sweatshirt into the bleach.
It’s a good idea to set the entire mixture into your kitchen sink if you are making your project in the house. This way you are less likely to end up with bleach in places you don’t want it.
Add household bleach into a bowl, just a little bit, then place your folded damp sweatshirt into the bleach. Let it set for 10-15 minutes before removing from the bleach. You can also turn the folded sweatshirt over and bleach the top side if you want.

Step 4: Rinse the Bleach
Remove the sweatshirt from the bleach once you can see light pink areas. Then remove the rubber bands holding it in place and rinse it thoroughly under cold water for the best results, to remove any remaining bleach.
Step 5: Wash and Dry
Place the rinsed sweatshirt into your empty washing machine. Use hot water and laundry detergent as you run the bleach tie-dyed shirt through the laundry. Dry the sweatshirt in the dryer until it is completely dry.
You have now completed the DIY reverse tie dye sweatshirts. At this point, you can add traditional tie dye to your project if you wish.
Traditional Tie Dye: Adding Colors
You may choose to follow these instructions for the traditional tie-dye method using a white shirt, or once your sweatshirt has been tie-dyed with bleach to add colors to the bleached sections.
Step 1: Fold the Sweatshirt
Even if your sweatshirt has been reverse tie-dyed, you will still want to fold the sweatshirt into your desired pattern once more, to secure place rubber bands to hold it in place.
If you are choosing to do the traditional tie-dye only, make sure that your sweatshirt has been completely washed and dried before you begin. Then select your desired pattern and fold the sweatshirt accordingly. Secure it in place with rubber bands.
Step 2: Clean Work Surface for Tie Dye Sweatshirt Project
It’s a good idea to protect your work surface by laying out a garbage bag as a protector. Then line the work area with paper towels. It’s also a good idea to use a baking rack with paper towels underneath to dye the project on. This way the extra dye will get soaked up by the paper towels and not end up places you don’t want it.
After your sweatshirt is folded, and your work area is prepared, it’s time to wear rubber gloves and get started with your colorful fun!

Step 3: Making the Tie Dye Project
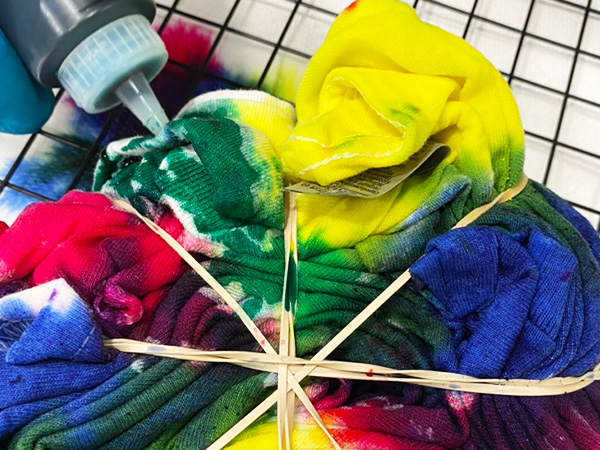
Fill the squirt bottle with dye in it, with water. Make sure to shake it up so that the dye dissolves in the water. Then apply your tie-dye colors as desired to the white spaces on your sweatshirt.
Step 4: Let it Set
After you are finished applying dye to your project, you will want to place the tie-dye sweatshirt into a plastic bag and seal it securely. Let the sweatshirt rest for 8 to 24 hours. The longer you let it set, the better your results will likely be. But don’t let it set for more than 24 hours or it might start to mold.
For the best results, store your tie dye project, secured in a sealed plastic bag. Then place that bag in a warm location. This will help the color set the best.
Step 5: Rinse in Cold Water
After your tie-dye sweatshirt has set, you can remove it from the plastic bag and rinse it under cold water. Once the water runs clear, remove the rubber bands and continue to rinse out any excess dye. When the water runs clear again, squeeze out any excess water before washing the sweatshirt.
Step 5: Wash and Dry
Place your rinsed tie-dye sweatshirt into your empty washing machine, and turn the water to hot water, or as hot as it will go. Add laundry detergent but skip the fabric softener. Wash on hot, then dry in your dryer until it is completely dry.
At this point, your colors should have been set, but it is always a good idea to wash any new tie-dye projects separately for the first few times once they are set.

The Type of Dye
The type of dye you choose to use will largely determine how bright colors are when your project is finished. Some types of dye will stay in your fabric better than others. For example, some will likely run quite a bit. Other types of dye such as tulip are not likely to run as much. There is also a nice dye, which tends to have brighter colors when complete.
Common Questions About Tie Dye
Should you use Soda Ash?
The purpose of soda ash is to help your colors set better so that they are brighter and longer lasting in your tie dye project. For some types of dye, you will want to use soda ash. Specifically, if you are using a dye powder. Other types of dye, such as Tulip dyes come with soda ash already in the mixture, so there is no need to add more.
If you are unsure, I would recommend reading the packaging of the dye you intend to use to see what it recommends. If your dye does not already include soda ash, then it might be a good idea to soak your sweatshirt in the soda ash before you start tie-dying it.
How much dye is needed to tie dye sweats?
When you are making a tie-dye sweatshirt you will need approximately one and a half or two times the amount of dye needed for a t-shirt. I like to make sure I have pleanty of color.
If you are using a tie-dye kit, you can estimate that your kit won’t go quite as far as if you were making a t-shirt.
How long to let the hoodie set?
For the best results, it is a good idea to let your hoodie or sweatshirt set for a minimum of 8 hours but no more than 24 hours. It will work best if you wrap the hoodie securely so that it says moist, and place it in a warm location. This way the colors will set the best.
Tie-Dye a Hoodie (or Sweatshirt) the Easy Way
Making a tie-dye sweatshirt is a fun project! Not only can you rock your tie-dye in the summer months, but by tie-dying a sweatshirt you get to enjoy it all year round. With these easy step-by-step instructions, you can learn how to tie-dye the sweatshirt, in a way that is fun and hopefully stress-free.
Thank you so much for stopping by to learn how to tie a sweatshirt. I hope this tutorial has been helpful to you! Now it’s time to start tie-dying your project!
Find Us Online!
Be sure to follow us online on your favorite social media platform!

How to Tie Dye Sweatshirt
Materials
- A cotton black sweatshirt
- Some plastic gloves
- Lots of rubber bands
- A tie-dye kit or soda ash and dye colors
- A spray bottle or a squeeze bottle
- Some plastic bags or plastic wrap
- Your bleach mixture
Instructions
Step 1: Prewash the Sweatshirt
- Make sure that your sweatshirt has been fully washed and dried, without using fabric softener before you begin tie-dying it. Please note that you can use your regular laundry detergent but skip the fabric softener.
Step 2: Clean and Cover a Flat Surface
- Clean off a flat work surface then lay out your sweatshirt. To reverse tie dye it, it will work best if your sweatshirt is slightly damp, so take the dry sweatshirt and you might want to use a spray bottle to get it a little wet. Then fold the sweatshirt into your desired tie-dye pattern and secure it in place with rubber bands.
Step 3: Prepare the Bleach Solution
- To make a reverse tie-dye hoodie, you will need to bleach the hoodie first, before applying the color. To do this, you can use your desired bleach solution, whether you choose to use toilet bowl cleaner, straight bleach, or part bleach mixed with warm water.
- My favorite is to add straight bleach into a large bowl. Just a splash will work, you don’t need much! Then make sure you wear gloves before you set the folded sweatshirt into the bleach.
- It’s a good idea to set the entire mixture into your kitchen sink if you are making your project in the house. This way you are less likely to end up with bleach in places you don’t want it.
- Add household bleach into a bowl, just a little bit, then place your folded damp sweatshirt into the bleach. Let it set for 10-15 minutes before removing from the bleach. You can also turn the folded sweatshirt over and bleach the top side if you want.
Step 4: Rinse the Bleach
- Remove the sweatshirt from the bleach once you can see light pink areas. Then remove the rubber bands holding it in place and rinse it thoroughly under cold water for the best results, to remove any remaining bleach.
Step 5: Wash and Dry
- Place the rinsed sweatshirt into your empty washing machine. Use hot water and laundry detergent as you run the bleach tie-dyed shirt through the laundry. Dry the sweatshirt in the dryer until it is completely dry.
- You have now completed the DIY reverse tie dye sweatshirts. At this point, you can add traditional tie dye to your project if you wish.
PIN for Later!