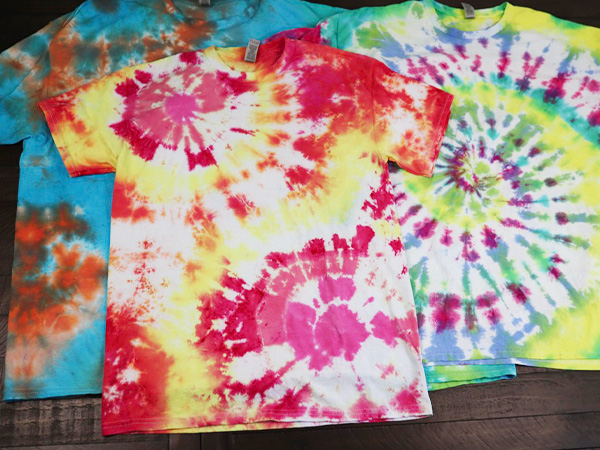
Cool Reverse Tie Dye Patterns
There are so many cool reverse tie dye patterns that I am excited to share with you! We will walk through the step-by-step process of how to create each of the different patterns as well as go through a tutorial on how to create your reverse tie dye project. This is such a fun project, that you won’t want to miss out on!

Bleach Tie Dye Shirts
Did you know that you can create a tie-dye project using bleach? This is actually one of my favorite ways to make tie dye, because it is different from your traditional method, and the finished project is a really cool one!
Using bleach to tie-dye shirts is also known as reverse tie-dye. This is because the traditional tie-dye method uses a white shirt to add colors to it. Reverse tie dye uses black shirts, and bleaches them to create a white space. You can then leave the white spaces blank, or tie-dye the shirts with color, to make them into an awesome tie-dye project.
Making bleach tie dye is an easy way to give old clothes a new life and create a fun project. If you are looking for a fun project to do, that is a little different from your traditional tie-dye, making a reverse tie-dye shirt is a great way to mix things up a little bit.
Bleach Tie-Dyeing Vs Traditional Tie Dye
The main difference between making reverse tie dye, or bleach tie dye, and your traditional tie dye methods is in the color of the shirt that you start with. Traditional tie dye uses white shirts, and you add colored dye to it, to create the tie dye patterns.
Bleach dye, on the other hand, is when you take black fabric, or a colored shirt, usually a black shirt, and bleach it, to create a bleach tie dye. Once you have created the bleach tie dye pattern, you can add colored dye to the bleached areas, or leave it plain bleach. It’s up to you if you add colors or not.
Different Folding Techniques for Reverse Tie Dye
There are many different patterns that you can make with your cool reverse tie dye designs. Just because you are making reverse tie dye or bleach tie dye, doesn’t really change the type of folds you can make to your shirts.
The main thing with creating your cool patterns using these different techniques is that they will have a bolder appearance when completed. You will also want to keep in mind that if you are planning to add color to your reverse tie-dyed project, you will want to complete the whole dying process twice, first with bleach, and then with your color.
Let’s look at some of the different cool reverse tie dye patterns that you can make for this project! There are a lot of different options to choose from, but here are a few ideas to get you started thinking.
Please Note: To make the first step of reverse tie-dye, it is going to be best if your black shirt is lightly damp when you fold it.

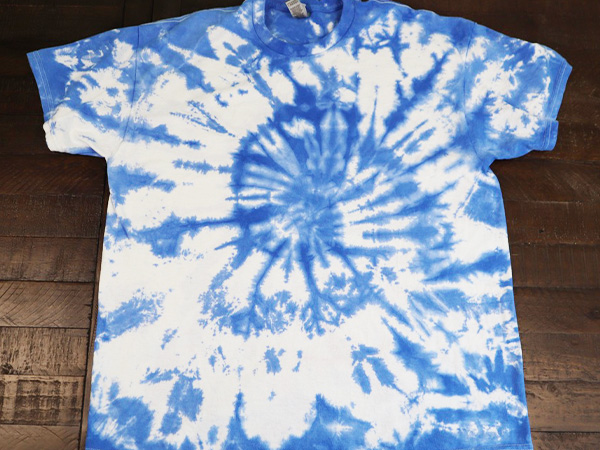
#1 Spiral Tie Dye Pattern
The spiral pattern is probably the most common tie dye pattern that is made. Usually, when you think of tie-dye, you think of the iconic swirl created in the center of the shirt. This is a fun pattern to make with reverse tie dye as well.
To create this tie-dye pattern, you will want to lay the black shirt out flat, and then determine where you want the center of the spiral to appear on your shirt.
Pinch that location between your fingers, then slowly twist the entire shirt. Let the shirt create natural folds, that you can carefully organize to lay in place as you twist.
When the whole shirt is twisted, secure it in place by adding rubber bands across the shirt to create sections like pizza slices. Add as many rubber bands as needed to hold the shirt securely.
#2 Double Spiral Design
Another fun way to create a spiral design on your reverse tie-dye shirt is to create the double spiral, which has two spirals on one shirt. You can make both spirals go the same direction or make them opposite so that you end up with “s” shape swirls.
To make double spirals, you will want to determine where you want the two centers of the spirals to be located on your shirt. Then pinch each center, and twist them together, until the entire shirt is twisted.
You may need to fold the outer edges of the shirt around both spirals. Secure the double spiral design in place using rubber bands.
#3 Bulls Eye
The bull’s eye is another classic tie-dye pattern. When creating a reverse tie-dye pattern for the bull’s eye, you will want to be careful to not bleach the entire shirt, but only sections so that the pattern is apparent.
To fold your shirt for the bull’s eye pattern, select the center of your pattern, and gather it in your hand, pulling the shirt out from the flat surface. Add a rubber band around the first section to hold it in place.
Repeat these steps to continue making the bull’s eye on your reverse tie-dye shirt.
#4 Vertical Stripes
To make vertical tie-dye stripes, you are first going to want to fold the shirt in half from the neck to the waistline.
Then fold the shirt using a fan fold method, working from the waste to the neckline. Be sure the make your fan folds all about the same size. Then secure the shirt in place with rubber bands.
#5 Horizontal Stripes
Horizontal stripes are created similar to vertical ones. The main difference is that rather than folding the shirt in half from top to bottom, you will want to fold the shirt in half across the center.
To fold the shirt for horizontal strips, fold the shirt in half, so that the waist touches the neckline. Try to make sure that they are even. Then it is time to start your fan fold.
Working from side to side or from sleeve to sleeve, create even fan folds across the shirt. When the whole shirt is folded, secure it in place with rubber bands.
#6 Diagonal Stripes
To make diagonal stripes, it’s a good idea to first use a washable marker and a yardstick, or chalk to draw a straight line diagonally across the shirt. This line will determine how your stripes appear on your finished shirt.
When the line is drawn, gather your shirt along that line, keeping the line straight as you go. Secure that line in place with a rubber band. Then straighten out the rest of the shirt on either side and secure it in several places using a rubber band, or string.

#7 Chevron
To make a chevron design on your shirt, you can first determine which ways you want your lines to go. Then fold the shirt in half accordingly.
When the shirt is folded into even halves, make fan folds, either working from side to side or from top to bottom. These fan folds should be as wide as you want the chevron design to be.
After the fan folds are complete, use a washable marker or chalk and a ruler to draw your diagonal lines evenly across the shirt.
Working with your fingers, gather the shirt up along these lines, and secure it in place with elastic bands.
#8 Crumple Tie Dye Pattern
The crumple tie-dye pattern is a lot of fun. There isn’t a specific way to fold for this pattern. You literally crumple the shirt up and secure it in place with your rubber bands.
#9 Sunburst
The sunburst tie dye pattern is very similar to that of a bull’s eye. The main difference with the sunburst pattern is that there are usually several small sunbursts on a shirt.
To make your sunburst pattern, determine where you want the center of each one to be located. Then pinch the center and secure it with a rubber band. Pull it up a little more and add another rubber band. Pull the shirt up once more and add another rubber band. Repeat these steps until you have your desired number of sunbursts made.
#10 Heart Shape Dye
To make a heart, first decide where you want the heart to be located on your shirt. Fold the shirt in half, and draw half of the heart using a washable marker.
Working along the line that you drew, gather the shirt along the line, into a gathered straight line. Secure it in place with a rubber band.
Gather the rest of the shirt and hold it in place using additional rubber bands.
#11 Hourglass Tie Dye
To make an hourglass tie dye pattern, fold the shirt into two even halves from the neck to the waste line. Then use a washable marker or chalk to draw a curved line from the shoulders to the waste. Gather the shirt together along this line, so that it forms a straight line when gathered together.
Secure it in place with rubber bands. Then arrange the rest of the shirt so that the gatherings fold out evenly. Secure the remainder of the shirt in place with more rubber bands. When you bleach this pattern, you will only bleach half of the shirt after it has been gathered.

#12 Fan Fold
To make a fan fold, you will select a center point, usually at the side of your shirt. Pull that section out, then gather the rest of your shirt together, away from that point.
As you gather the shirt, try to make sure that your folds are nice and neat before you add the rubber bands to hold it in place.
Start by adding the rubber bands near your central point and work your way out from that point.
#13 Tie Dyed Line
To make a tie-dyed line on your shirt, you will first want to decide where you want this tie-dyed section to fall on your shirt.
When you have the section selected, draw a line using a washable marker, or chalk down the center of this area.
Then working down this line, gather the shirt together in nice even folds. Secure it in place using a rubber band. Then working out from that line, add additional rubber bands for as wide as you want the line to be.
Please note, that you want your rubber bands to be only in the area you intend to tie dye for this pattern. The rest of the shirt will not be dyed. Watch this short YouTube video to see a quick video on how to do it!
There are so many different cool reverse tie dye patterns to choose from, you just might have to make more than one project! Remember that these cool reverse tie dye patterns make great gifts, or you can wear your original style to show off your creativity!
Reverse Tie-Dyeing
In order to make your cool reverse tie dye project you will need to make a color change from black, or whatever color your shirt might be. To do this, there are a few different things you can use, but the best results are usually with straight bleach or a bleach solution.
If you are a little nervous about using straight household bleach, you should also combine the liquid bleach, so that it is part bleach and part water. This will help to lessen your chances of burning a hole in your clothes from the concentrated bleach.
Depending on what reverse tie dye pattern you are making, you might want to consider using a bleach pen for small details. Another solution that you can use is toilet bowl cleaner, but my preference is to either use straight bleach, or bleach mixed with a little water.
No matter what bleach solution you decide to use, make sure that you make your bleach tie dye in a well-ventilated area so that you aren’t breathing in the bleach fumes.
Reverse Tie Dyeing The Shirt
To make reverse tie-dye, there are three main ways. Let’s look at some different ways to create reverse tie-dye.
Option 1: Bleach Tie Dye
This is my favorite option to make a reverse tie-dye project. You can use the bleach to dye the black shirt. Then once you have sections of the t-shirt bleach dyed, you can go back and add colors.
Option 2: Bleach Toilet Cleaner
The next option you could choose to use as the agent to turn your tie-dyed project white is to use toilet cleaner. Most toilet cleaners still have bleach in them, therefore this will also work.
Option 3: Tulip Reverse Tie Dye Kit
The other option is to purchase a reverse tie dye kit. These will have specific instructions included in them, for how to use each one.
Does hydrogen peroxide neutralize bleach?
You might see it circulating around the internet that you should use hydrogen peroxide to neutralize the bleach. This is not a good idea. This mixture could explode, which is not a reaction you want! Your best bet to neutralize the bleach when you are ready is to simply wash it thoroughly with water. But don’t worry we will go over those details a little later on.

How to Make a Reverse Tie Dye Project
Materials You Will Need:
A black shirt
A spray bottle
Regular bleach
Rubber bands
Tie dye kit
Squeeze bottle
Plastic bag
Rubber gloves
Before you Begin: Prewash your T-shirt
Before you begin making your tie-dye it’s important that you pre-wash the shirt. When you wash it, wash it just with laundry detergent and then dry the shirt. Make sure to skip using fabric softener before you tie-dye your T-shirt.
Step 1: Fold the Shirt
First, you will need to determine what reverse tie-dye pattern you want to make. Then get your shirt lightly damp by spraying it with a squirt bottle filled with water. You don’t need it very wet, just use a little bit of water to dampen it so that you will have better bleach results.
Lay it on a flat surface and fold the shirt. Secure it in place with string or with rubber bands. When your shirt is folded you can begin the bleaching process for your reversed tie-dye project.
Step 2: The Bleaching Process
Prepare your bleach mixture. You can either use straight bleach or add a splash of bleach to a little bit of water. When your bleach mixture is ready, pour it into a larger container that will fit your shirt.
The next step is to set your folded shirt in the bleach mixture. Please note that this step applies to most of the patterns outlined above but if you’re doing a finer pattern such as the tie-dye line, or Bullseye patterns you may want to use a spray bottle with bleach in it so that you can more accurately determine what part of the shirt gets bleached.
For a basic spiral tie-dye pattern, you can set the folded shirt directly in the bleach mixture.
When you have let the shirt sit in the bleach mixture for a few minutes, you’ll begin to see it turn a pinkish color. You need the pink color to become light pink so that the colors will appear later on when you tie-dye it.
After the first side of your shirt is a light pink, take the shirt over and set the shirt in the bleach on the other side. Let it soak for a few more minutes until that side turns light pink as well.
Step 3: Rinse the Bleach in Cold Water
After your shirt has been bleach tie-dyed, you will want to rinse it immediately with cold water. Make sure to rinse the shirt thoroughly, then remove the rubber bands and continue rinsing in cold water to remove all of the bleach.
Tip: Rather than removing the rubber bands, during the first rinsing process, I like to leave them on and run them through the washer while still folded. This is completely up to you, but it is a good way to make sure you add colors directly to the bleached areas, AND are sure the bleach is completely removed.
Step 4: Wash and Dry
To make sure that any trace of the bleach is removed, put your bleach and rinsed shirt into the washer. Add laundry soap but skip the fabric softener. Wash the shirt like normal, then dry the shirt thoroughly.
Note: After your bleached tie-dye shirt has been washed and dried, you can either enjoy it as a bleach tie-dye or you can go ahead and add colors using the traditional tie-dye process.

Step 5: Fold the Shirt in the Same Way Once More
Now that you have bleached the shirt, it’s ready to tie-dye. Before you begin tie-dying you need to fold your shirt in the same cool reverse tie dye pattern that it was folded before. Secure it in place with rubber bands. Now comes the color!
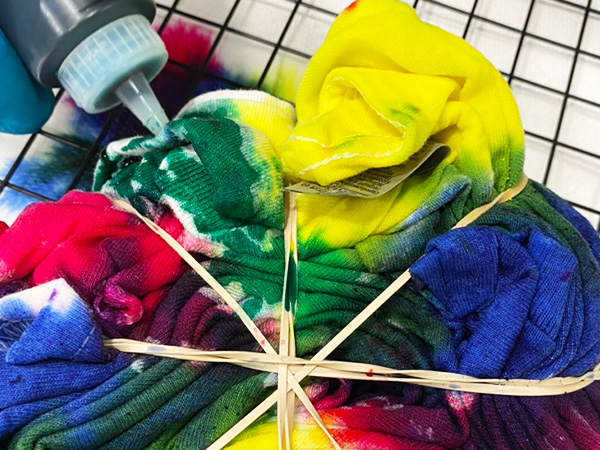
Step 6: Colored Tie Dye Process
Select the different colors that you want to use from your tie-dye kit. Add water, and make sure to shake the squeeze bottles thoroughly so that the dye is completely dissolved.
Make sure to wear rubber gloves, and use a wire rack, like a cookie sheet to do your tie-dying on. This way your shirt won’t sit in any dye that has dropped off, and you can better control where the colors are added.
Make sure to protect your work surface, before you start adding colors. It’s a good idea to lay down a plastic bag, or tablecloth then a layer of paper towels, tapped by your wire rack before you begin to tie-dye.
Place your folded dry shirt on the wire rack and add your tie-dye colors to the golden shirt as desired. Make sure to add colors to both sides of the shirt, so that the shirt is soaked in color.
Step 7: Let the Shirt Set
After your tie-dye project is finished, set the tie-dye in a plastic bag. Placed the plastic bag in a warm dry location. It works best if the plastic bag is sealed so that the moisture stays in your shirt. Let the shirt set for 8 to 24 hours. The longer your shirt is set the better the colors will be, but you do not want to let it sit any longer than 24 hours.

Step 8: Rinse in Cold Water
After the shirt has set, rinse the shirt in cold water. After the water runs clear, remove the rubber bands in continue rinsing once more in cold water until the water runs clear.
Squeeze out any excess water from your shirt before placing it into the washer.

Step 9: Wash in Hot Water and Dry
Add your tie-dyed shirt into the washing machine, and wash with hot water, as hot as your machine will go, and laundry detergent. After your tie-dye shirt has been washed, you can dry it thoroughly in the dryer.
Now that your cool reverse tie dye pattern shirt is ready to wear! Keep in mind that it’s always a good idea to wash your tie-dye projects separately for the first time or two before they are washed. After that, they can be washed with your regular load of laundry.

A Few Helpful Tips
Use a Flat Surface. For your entire tie-dye project, it is going to work best to use a flat work surface.
Work in the Kitchen Sink. Often, if you can’t do that actual-colored tie-dye part outside, using the kitchen sink is another great option.
Reverse Tie Dye with a Black T-shirt. Use a black cotton T-shirt for your reverse tie-dye projects to get the best results. You can also use another colored cotton t-shirt to make reverse tie-dye projects if desired.
Reverse Tie Dye Techniques
These cool reverse tie-dye patterns are a lot of fun to make and are a great change from your traditional tie-dye projects. I hope that you have been able to find a reverse tie-dye pattern that looks fun to make!
Thank you so much for stopping by to check out these different cool reverse tie dye patterns with bleach. I hope that you have found a technique to inspire your next project!
Find Us Online!
Be sure to follow us online on your favorite social media platform!
More Tie Dye Projects!
Another of my favorite reverse tie-dye project ideas that I want to share with you is how to reverse tie-dye a sweatshirt. This is a great project! Be sure to check out more fun tie-dye ideas below!
Cool Reverse Tie Dye Patterns
Materials
- A black shirt
- A spray bottle
- Regular bleach
- Rubber bands
- Tie-dye kit
- Squeeze bottle
- Plastic bag
- Rubber gloves
Instructions
#1 Spiral Tie Dye Pattern
- The spiral pattern is probably the most common tie dye pattern that is made. Usually, when you think of tie-dye, you think of the iconic swirl created in the center of the shirt. This is a fun pattern to make with reverse tie dye as well.
- To create this tie-dye pattern, you will want to lay the black shirt out flat, and then determine where you want the center of the spiral to appear on your shirt.
- Pinch that location between your fingers, then slowly twist the entire shirt. Let the shirt create natural folds, that you can carefully organize to lay in place as you twist.
- When the whole shirt is twisted, secure it in place by adding rubber bands across the shirt to create sections like pizza slices. Add as many rubber bands as needed to hold the shirt securely.
#2 Double Spiral Design
- Another fun way to create a spiral design on your reverse tie-dye shirt is to create the double spiral, which has two spirals on one shirt. You can make both spirals go the same direction or make them opposite so that you end up with “s” shape swirls.
- To make double spirals, you will want to determine where you want the two centers of the spirals to be located on your shirt. Then pinch each center, and twist them together, until the entire shirt is twisted.
- You may need to fold the outer edges of the shirt around both spirals. Secure the double spiral design in place using rubber bands.
#3 Bulls Eye
- The bull’s eye is another classic tie-dye pattern. When creating a reverse tie-dye pattern for the bull’s eye, you will want to be careful to not bleach the entire shirt, but only sections so that the pattern is apparent.
- To fold your shirt for the bull’s eye pattern, select the center of your pattern, and gather it in your hand, pulling the shirt out from the flat surface. Add a rubber band around the first section to hold it in place.
- Repeat these steps to continue making the bull’s eye on your reverse tie-dye shirt.
#4 Vertical Stripes
- To make vertical tie-dye stripes, you are first going to want to fold the shirt in half from the neck to the waistline.
- Then fold the shirt using a fan fold method, working from the waste to the neckline. Be sure the make your fan folds all about the same size. Then secure the shirt in place with rubber bands.
#5 Horizontal Stripes
- Horizontal stripes are created similar to vertical ones. The main difference is that rather than folding the shirt in half from top to bottom, you will want to fold the shirt in half across the center.
- To fold the shirt for horizontal strips, fold the shirt in half, so that the waist touches the neckline. Try to make sure that they are even. Then it is time to start your fan fold.
- Working from side to side or from sleeve to sleeve, create even fan folds across the shirt. When the whole shirt is folded, secure it in place with rubber bands.
#6 Diagonal Stripes
- To make diagonal stripes, it’s a good idea to first use a washable marker and a yardstick, or chalk to draw a straight line diagonally across the shirt. This line will determine how your stripes appear on your finished shirt.
- When the line is drawn, gather your shirt along that line, keeping the line straight as you go. Secure that line in place with a rubber band. Then straighten out the rest of the shirt on either side and secure it in several places using a rubber band, or string.
#7 Chevron
- To make a chevron design on your shirt, you can first determine which ways you want your lines to go. Then fold the shirt in half accordingly.
- When the shirt is folded into even halves, make fan folds, either working from side to side or from top to bottom. These fan folds should be as wide as you want the chevron design to be.
- After the fan folds are complete, use a washable marker or chalk and a ruler to draw your diagonal lines evenly across the shirt.
- Working with your fingers, gather the shirt up along these lines, and secure it in place with elastic bands.
#8 Crumple Tie Dye Pattern
- The crumple tie-dye pattern is a lot of fun. There isn’t a specific way to fold for this pattern. You literally crumple the shirt up and secure it in place with your rubber bands.
#9 Sunburst
- The sunburst tie dye pattern is very similar to that of a bull’s eye. The main difference with the sunburst pattern is that there are usually several small sunbursts on a shirt.
- To make your sunburst pattern, determine where you want the center of each one to be located. Then pinch the center and secure it with a rubber band. Pull it up a little more and add another rubber band. Pull the shirt up once more and add another rubber band. Repeat these steps until you have your desired number of sunbursts made.
#10 Heart Shape Dye
- To make a heart, first decide where you want the heart to be located on your shirt. Fold the shirt in half, and draw half of the heart using a washable marker.
- Working along the line that you drew, gather the shirt along the line, into a gathered straight line. Secure it in place with a rubber band.
- Gather the rest of the shirt and hold it in place using additional rubber bands.
#11 Hourglass Tie Dye
- To make an hourglass tie dye pattern, fold the shirt into two even halves from the neck to the waste line. Then use a washable marker or chalk to draw a curved line from the shoulders to the waste. Gather the shirt together along this line, so that it forms a straight line when gathered together.
- Secure it in place with rubber bands. Then arrange the rest of the shirt so that the gatherings fold out evenly. Secure the remainder of the shirt in place with more rubber bands. When you bleach this pattern, you will only bleach half of the shirt after it has been gathered.
#12 Fan Fold
- To make a fan fold, you will select a center point, usually at the side of your shirt. Pull that section out, then gather the rest of your shirt together, away from that point.
- As you gather the shirt, try to make sure that your folds are nice and neat before you add the rubber bands to hold it in place.
- Start by adding the rubber bands near your central point and work your way out from that point.
#13 Tie Dyed Line
- To make a tie-dyed line on your shirt, you will first want to decide where you want this tie-dyed section to fall on your shirt.
- When you have the section selected, draw a line using a washable marker, or chalk down the center of this area.
- Then working down this line, gather the shirt together in nice even folds. Secure it in place using a rubber band. Then working out from that line, add additional rubber bands for as wide as you want the line to be.
Before you Begin: Prewash your T-shirt
- Before you begin making your tie-dye it’s important that you pre-wash the shirt. When you wash it, wash it just with laundry detergent and then dry the shirt. Make sure to skip using fabric softener before you tie-dye your T-shirt.
Step 1: Fold the Shirt
- First, you will need to determine what reverse tie-dye pattern you want to make. Then get your shirt lightly damp by spraying it with a squirt bottle filled with water. You don’t need it very wet, just use a little bit of water to dampen it so that you will have better bleach results.
- Lay it on a flat surface and fold the shirt. Secure it in place with string or with rubber bands. When your shirt is folded you can begin the bleaching process for your reversed tie-dye project.
Step 2: The Bleaching Process
- Prepare your bleach mixture. You can either use straight bleach or add a splash of bleach to a little bit of water. When your bleach mixture is ready, pour it into a larger container that will fit your shirt.
- The next step is to set your folded shirt in the bleach mixture. Please note that this step applies to most of the patterns outlined above but if you’re doing a finer pattern such as the tie-dye line, or Bullseye patterns you may want to use a spray bottle with bleach in it so that you can more accurately determine what part of the shirt gets bleached.
- For a basic spiral tie-dye pattern, you can set the folded shirt directly in the bleach mixture.
- When you have let the shirt sit in the bleach mixture for a few minutes, you’ll begin to see it turn a pinkish color. You need the pink color to become light pink so that the colors will appear later on when you tie-dye it.
- After the first side of your shirt is a light pink, take the shirt over and set the shirt in the bleach on the other side. Let it soak for a few more minutes until that side turns light pink as well.
Step 3: Rinse the Bleach in Cold Water
- After your shirt has been bleach tie-dyed, you will want to rinse it immediately with cold water. Make sure to rinse the shirt thoroughly, then remove the rubber bands and continue rinsing in cold water to remove all of the bleach.
- Tip: Rather than removing the rubber bands, during the first rinsing process, I like to leave them on and run them through the washer while still folded. This is completely up to you, but it is a good way to make sure you add colors directly to the bleached areas, AND are sure the bleach is completely removed.
Step 4: Wash and Dry
- To make sure that any trace of the bleach is removed, put your bleach and rinsed shirt into the washer. Add laundry soap but skip the fabric softener. Wash the shirt like normal, then dry the shirt thoroughly.
- Note: After your bleached tie-dye shirt has been washed and dried, you can either enjoy it as a bleach tie-dye or you can go ahead and add colors using the traditional tie-dye process.
Step 5: Fold the Shirt in the Same Way Once More
- Now that you have bleached the shirt, it’s ready to tie-dye. Before you begin tie-dying you need to fold your shirt in the same cool reverse tie dye pattern that it was folded before. Secure it in place with rubber bands. Now comes the color!
Step 6: Colored Tie Dye Process
- Select the different colors that you want to use from your tie-dye kit. Add water, and make sure to shake the squeeze bottles thoroughly so that the dye is completely dissolved.
- Make sure to wear rubber gloves, and use a wire rack, like a cookie sheet to do your tie-dying on. This way your shirt won’t sit in any dye that has dropped off, and you can better control where the colors are added.
- Make sure to protect your work surface, before you start adding colors. It’s a good idea to lay down a plastic bag, or tablecloth then a layer of paper towels, tapped by your wire rack before you begin to tie-dye.
- Place your folded dry shirt on the wire rack and add your tie-dye colors to the golden shirt as desired. Make sure to add colors to both sides of the shirt, so that the shirt is soaked in color.
Step 7: Let the Shirt Set
- After your tie-dye project is finished, set the tie-dye in a plastic bag. Placed the plastic bag in a warm dry location. It works best if the plastic bag is sealed so that the moisture stays in your shirt. Let the shirt set for 8 to 24 hours. The longer your shirt is set the better the colors will be, but you do not want to let it sit any longer than 24 hours.
Step 8: Rinse in Cold Water
- After the shirt has set, rinse the shirt in cold water. After the water runs clear, remove the rubber bands in continue rinsing once more in cold water until the water runs clear.
- Squeeze out any excess water from your shirt before placing it into the washer.
Step 9: Wash in Hot Water and Dry
- Add your tie-dyed shirt into the washing machine, and wash with hot water, as hot as your machine will go, and laundry detergent. After your tie-dye shirt has been washed, you can dry it thoroughly in the dryer.
- Now that your cool reverse tie dye pattern shirt is ready to wear! Keep in mind that it’s always a good idea to wash your tie-dye projects separately for the first time or two before they are washed. After that, they can be washed with your regular load of laundry.
PIN for Later!

