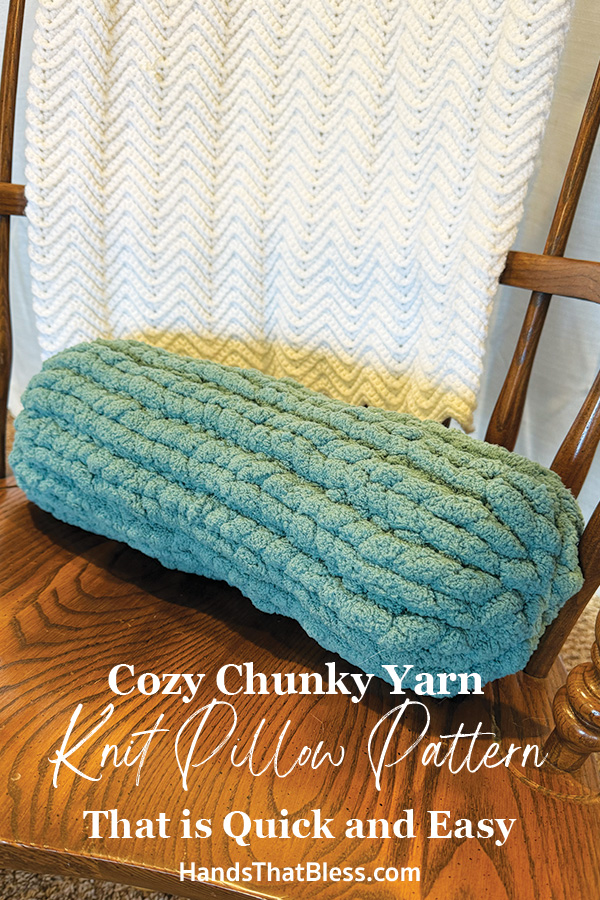
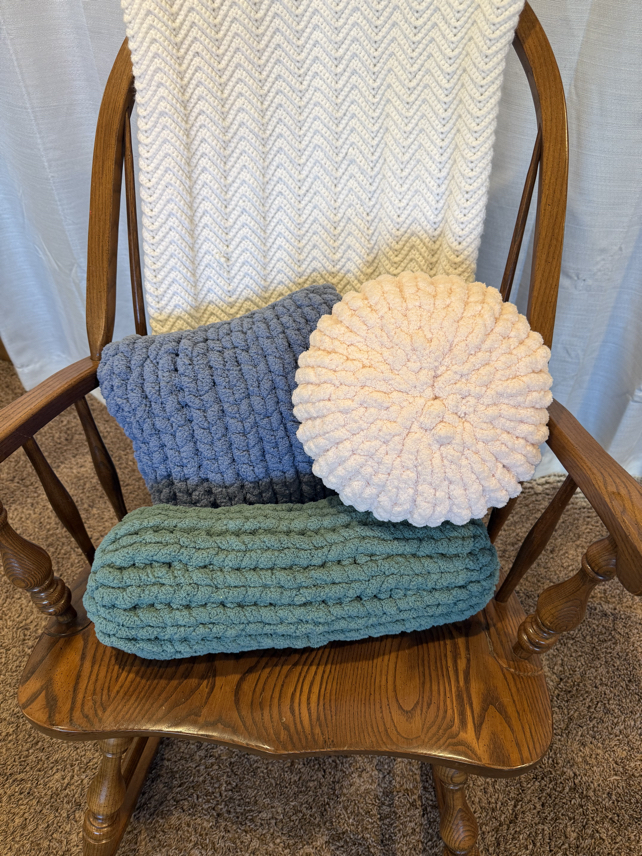
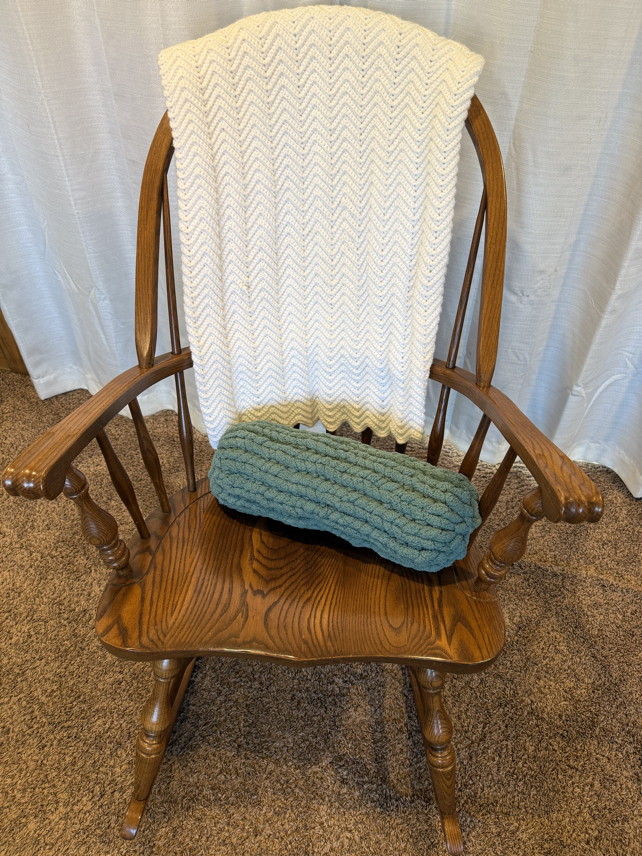
Chunky Yarn Knit Pillow Pattern
Making this chunky yarn hand knit pillow pattern is the perfect use for jumbo yarns. The yarn is so huge, but this pattern is so easy to follow. The pillow works up very quickly, and makes some adorable home decorations.
I am so excited to share this hand knitting pattern with you to make a chunky yarn, hand knit pillow. Don’t worry, it’s okay if you’re a beginner knitter, or have absolutely no knitting experience. For this project, you simply need to be able to follow the basic instructions, but don’t need any special tools.

Chunky Knit Pillow Pattern Free
Using the super thick yarn to make a chunky hand knit pillow allows you to easily make a cute decorative pillow without any knitting needles. It is surprisingly easy to make these little throw pillows by hand knitting the stockinette stitch.
I love to make these hand neck pillows, using the chunky yarn. Not only are they addicting to make, but the finished item is also very cute to use as decoration around your home.
Let’s get started by jumping into the free pattern to make a hand knit pillow using chunky yarn.
Join our Mailing List and Receive a…
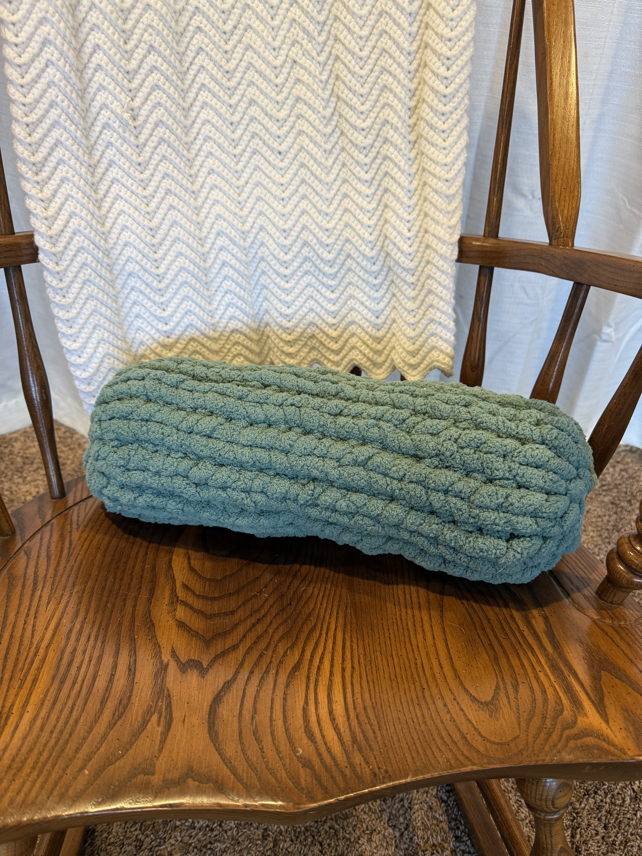
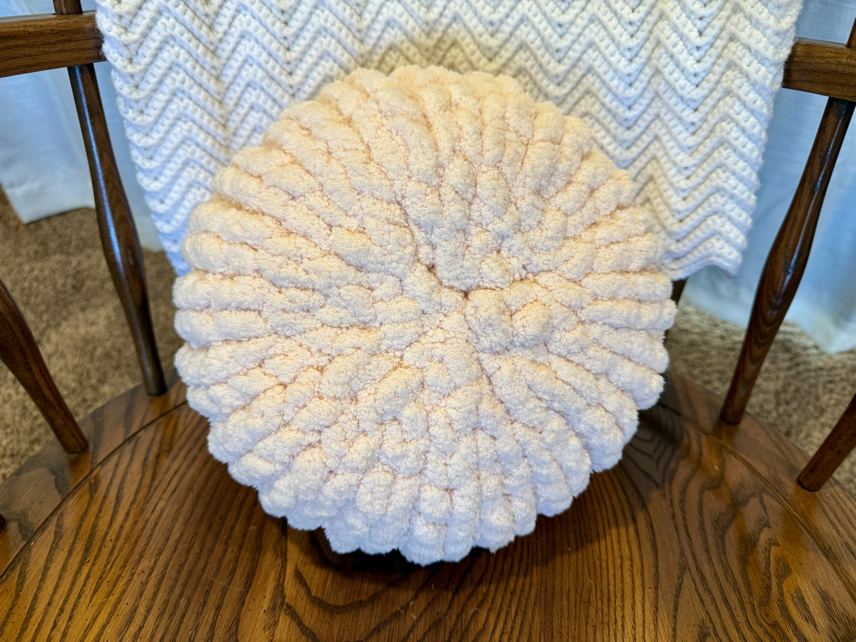
Hand Knit Round Pillow
Materials
1 skein Super Bulky Yarn (I used Hobby Lobby’s yarn bee eternal bliss)
Fiber fill stuffing
Scissors
How to Hand Knit a Pillow with Jumbo Yarn
Step 1: cast on
To start the pillow, chain 12 stitches.
To make the chain, you will first create a slipknot. Make the slipknot, leaving a yarn tail that is approximately 12 to 18 inches long, leave the loop of the slipknot approximately the size around of your thumb.
Twist the working yarn and pull a loop of the working yard through the slipknot loop created. Pull up another loop through the previous working loop. Repeat this process to create each of the chain stitches. Each loop counts as a chain stitch.
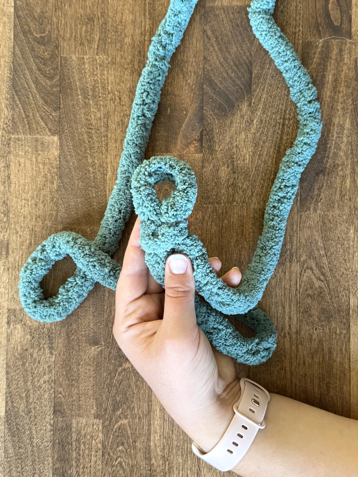
Step 2: join in a round
After the chain is created, take the working loop and slip it through the first chain stitch created to form a round circle.
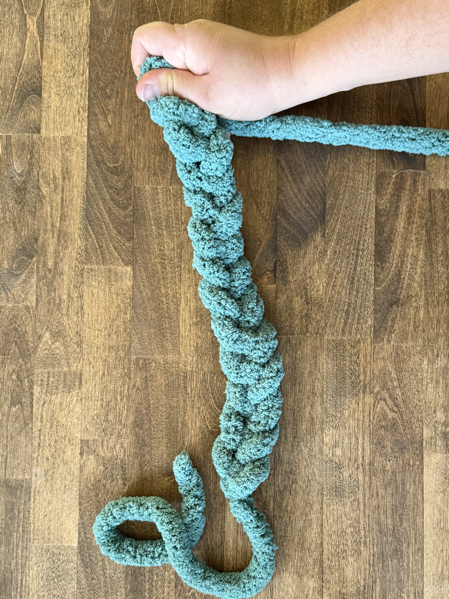
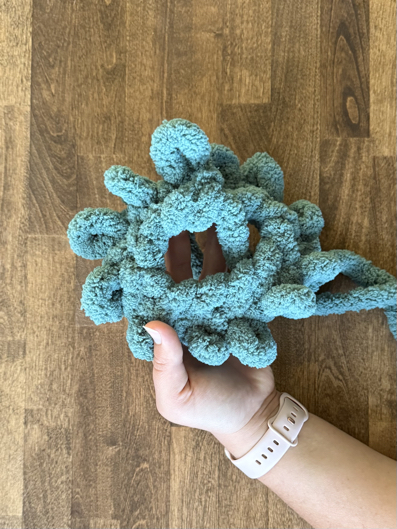
Step 3: create the body
Now, take the working yarn and pull up a loop through each of the chain stitches made. Be careful to keep each of the loops approximately the same size as you work.
After you have the initial loops pulled through the chain spaces, repeat the process by pulling a loop of the working yarn through each of the previous loops created. Repeat the steps around until you have approximately 12 to 18 inches of your yarn left.

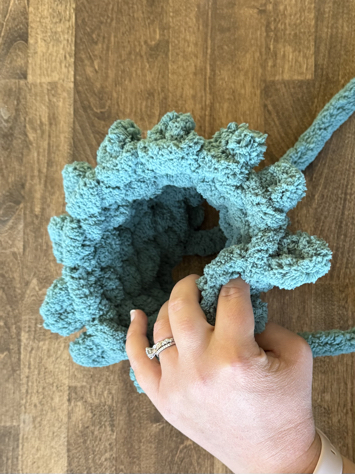

Step 4: close the sides and stuff
To close the end, where you first started, you will want to take the tail of yarn and slip it through every other stitch.
When you have the yarn through every other stitch you can pull it tight. As you pull, be very careful not to break the yard. You might need to slide the yarn with your fingers. Fish the yarn tail to the inside of the pillow.
After the beginning side is closed fill the pillow as desired with fiber fill stuffing.
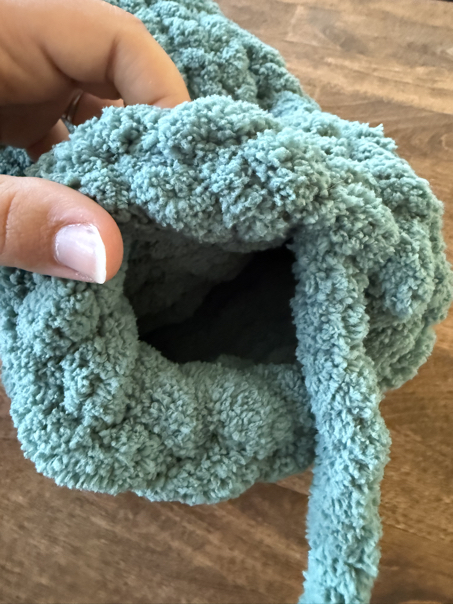
Then you can close the remaining side of the pillow. There are a couple of different ways you can do this. The first is to simply thread your yarn tail through all of the working loops and pull it tight.
The other way is to cast off your stitches and then feed the yarn tail through every other loop before pulling it tight. Please note that with the second method, you will need a longer tail of yarn to finish the pillow.
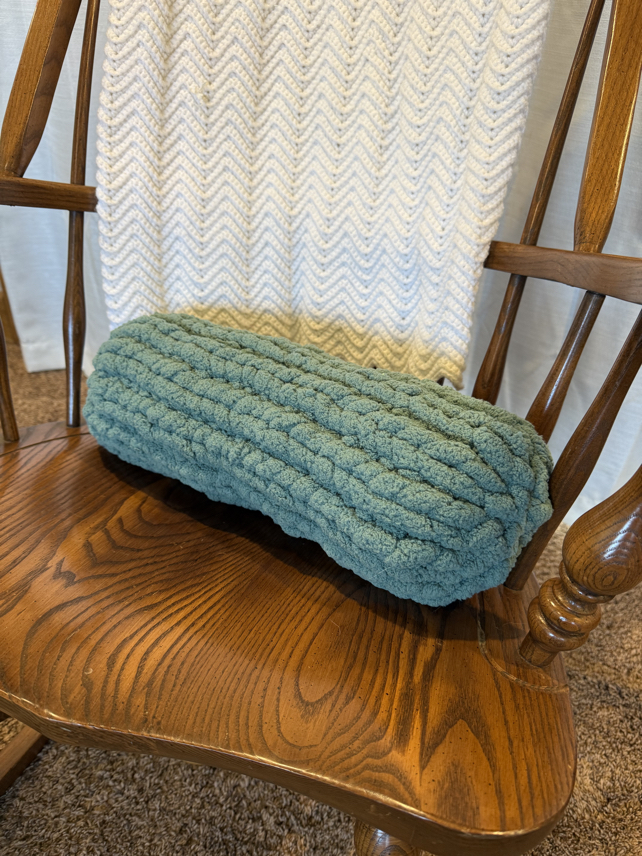
Step 5: finish up
Before you are done, make sure of the yarn tail are tucked inside securely, and tied off if needed. You might also need to weave in the yarn tail across the opening to help close it all the way, if it is not pulled tight enough.
If desired, you can also shape the pillow by pulling the two sides together to help flatten out the pillow. You can also add a button to the center of each side if you wish. It is entirely up to you what type of embellishments or exactly how you finish out the round hand knit pillow.
Hand Knit Pillow Tips and Tricks
Do I need a pillow form?
A lot lot of times, the knit chunky pillow is made as a pillow cover for a pillow form. However, for this pattern, you do not need to use a round pillow form, instead you can use as much fiber fill stuffing as desired for the stiffness of the round hand knit pillow you want to have.
Tips to Maintaining Tension
Maintaining the same amount of tension with all of your stitches and approximately the same size loops for your stitches is very important. In order to help with this, I would highly recommend using something like the pad of your thumb, your thumb or a specific finger inserted in each loop to help gauge the size of your loops as you work with the hand knitted pillow pattern.
Chunky Yarn Knit Pillow Pattern for Beginners
making a hand knit round throw pillow using the jumbo yarn is so much fun and a great pattern to make your own home decor. You do not need any knitting knowledge in order to make this fun round hand knitted pillow. All you have to do is follow a few easy steps to make this project.
Thank you so much for stopping by to check out our free, chunky yarn knit pillow pattern. It is my hope that you will give this free hand knit pillow pattern a try, and I hope that you will love making this project!
Happy hand knitting!
Be sure to follow us online on your favorite social media platform!
More Hand Knit Patterns


Chunky Yarn Knit Pillow Pattern
Materials
- 1 skein Super Bulky Yarn (I used Hobby Lobby’s yarn bee eternal bliss)
- Fiber fill stuffing
- Scissors
Instructions
- Step 1: cast on
To start the pillow, chain 12 stitches.
To make the chain, you will first create a slipknot. Make the slipknot, leaving a yarn tail that is approximately 12 to 18 inches long, leave the loop of the slipknot approximately the size around of your thumb.
Twist the working yarn and pull a loop of the working yard through the slipknot loop created. Pull up another loop through the previous working loop. Repeat this process to create each of the chain stitches. Each loop counts as a chain stitch. - Step 2: join in a round
After the chain is created, take the working loop and slip it through the first chain stitch created to form a round circle. - Step 3: create the body
Now, take the working yarn and pull up a loop through each of the chain stitches made. Be careful to keep each of the loops approximately the same size as you work.
After you have the initial loops pulled through the chain spaces, repeat the process by pulling a loop of the working yarn through each of the previous loops created. Repeat the steps around until you have approximately 12 to 18 inches of your yarn left. - Step 4: close the sides and stuff
To close the end, where you first started, you will want to take the tail of yarn and slip it through every other stitch.
When you have the yarn through every other stitch you can pull it tight. As you pull, be very careful not to break the yard. You might need to slide the yarn with your fingers. Fish the yarn tail to the inside of the pillow.
After the beginning side is closed fill the pillow as desired with fiber fill stuffing.
Then you can close the remaining side of the pillow. There are a couple of different ways you can do this. The first is to simply thread your yarn tail through all of the working loops and pull it tight.
The other way is to cast off your stitches and then feed the yarn tail through every other loop before pulling it tight. Please note that with the second method, you will need a longer tail of yarn to finish the pillow. - Step 5: finish up
Before you are done, make sure of the yarn tail are tucked inside securely, and tied off if needed. You might also need to weave in the yarn tail across the opening to help close it all the way, if it is not pulled tight enough.
If desired, you can also shape the pillow by pulling the two sides together to help flatten out the pillow. You can also add a button to the center of each side if you wish. It is entirely up to you what type of embellishments or exactly how you finish out the round hand knit pillow.
PIN for Later!