Chunky Yarn Blanket Pattern
In this free pattern we will walk through exactly you can make your own chunky knit blanket, using just some jumbo yarn and your fingers. This cute pattern will allow you to make a cozy blanket to keep you warm and snuggly during chilly winter days. This blanket pattern is the perfect use of your super bulky yarn, and you can enjoy your super cute blanket when you are finished.
Chunky Knit Blanket Pattern
This finger knit chunky yarn blanket pattern is the perfect project to make if you are looking for a fun hand knitting project to try. You don’t need any knitting needles, or a ton of knitting knowledge. All you need is some super bulky yarn, your fingers and be able to follow instructions to make some simple stitches for the finger knit blanket. It is also helpful if you have a flat surface to work on your blanket on.

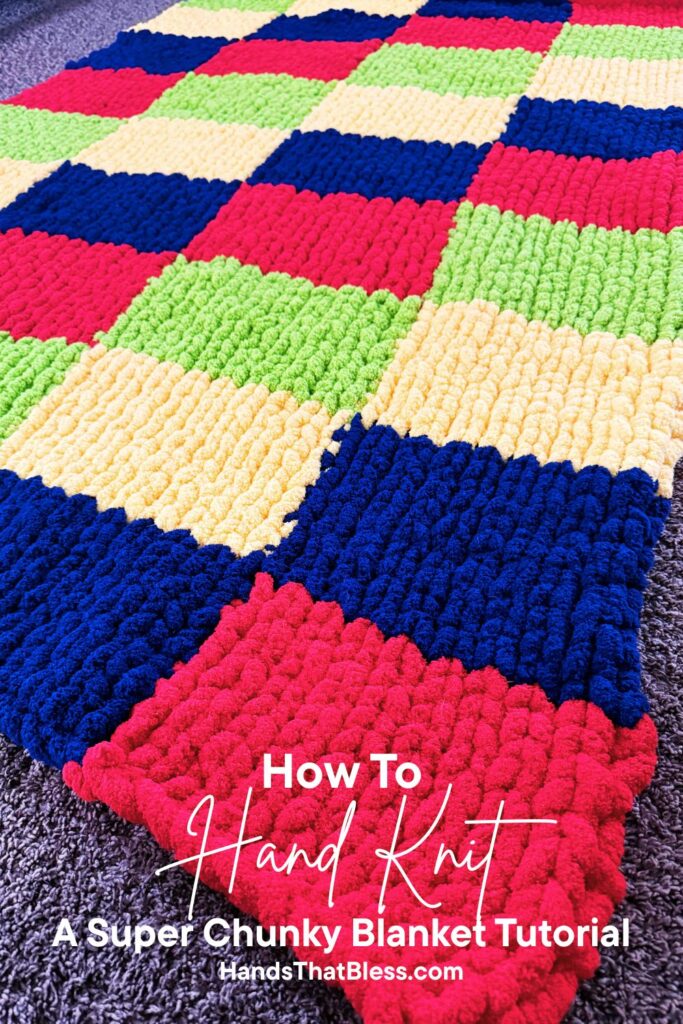
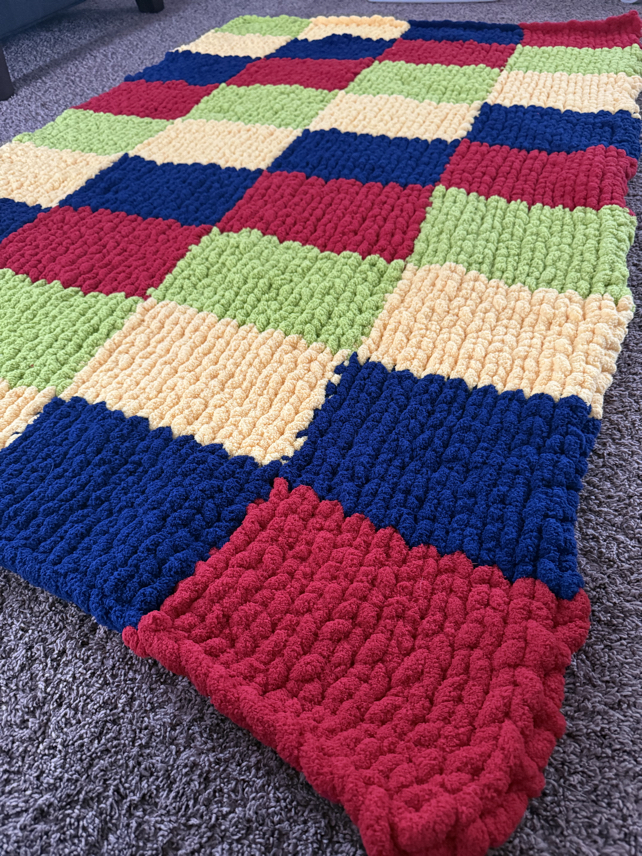
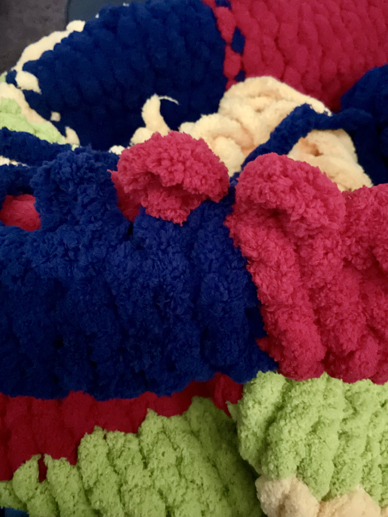
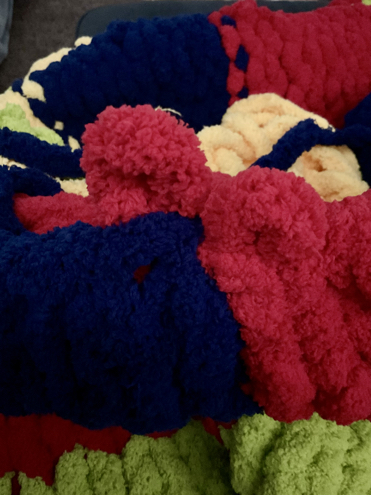
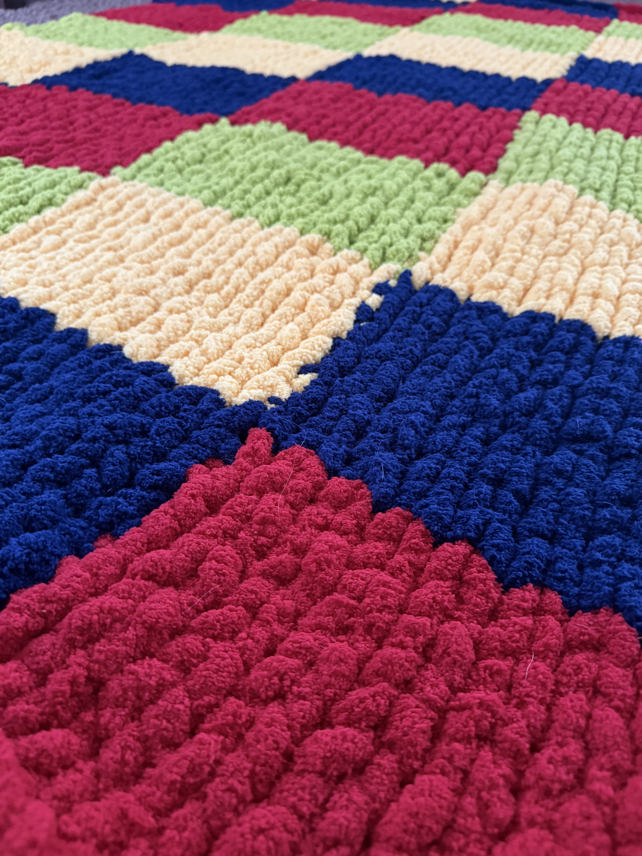
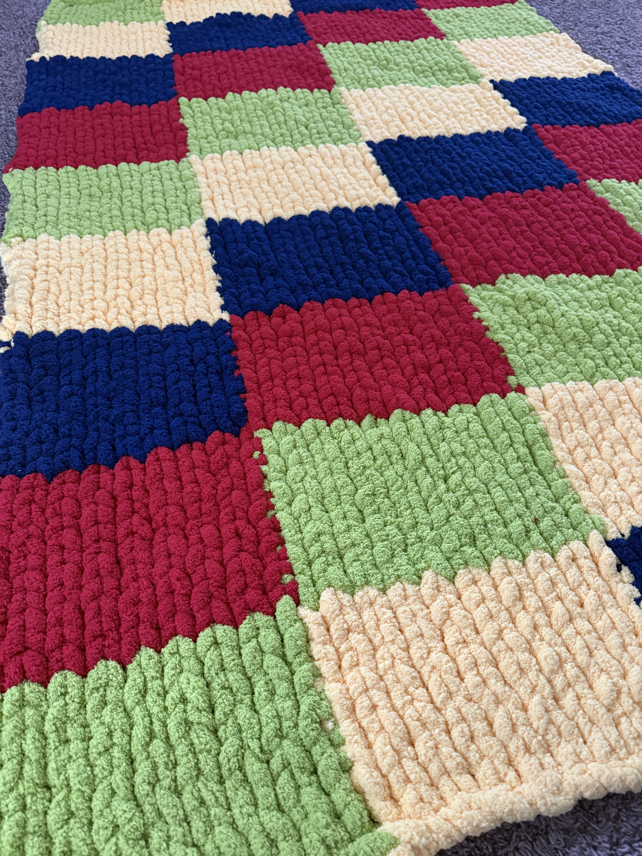
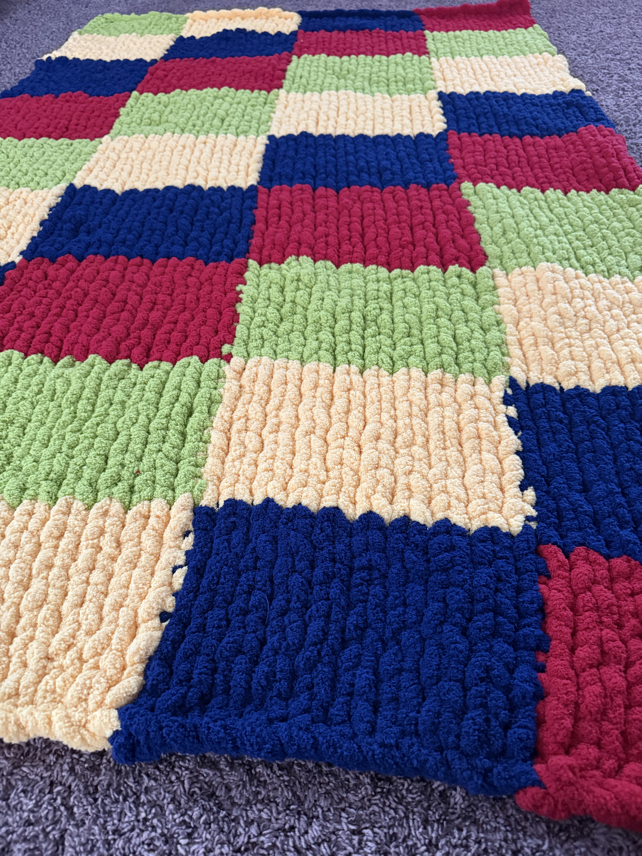
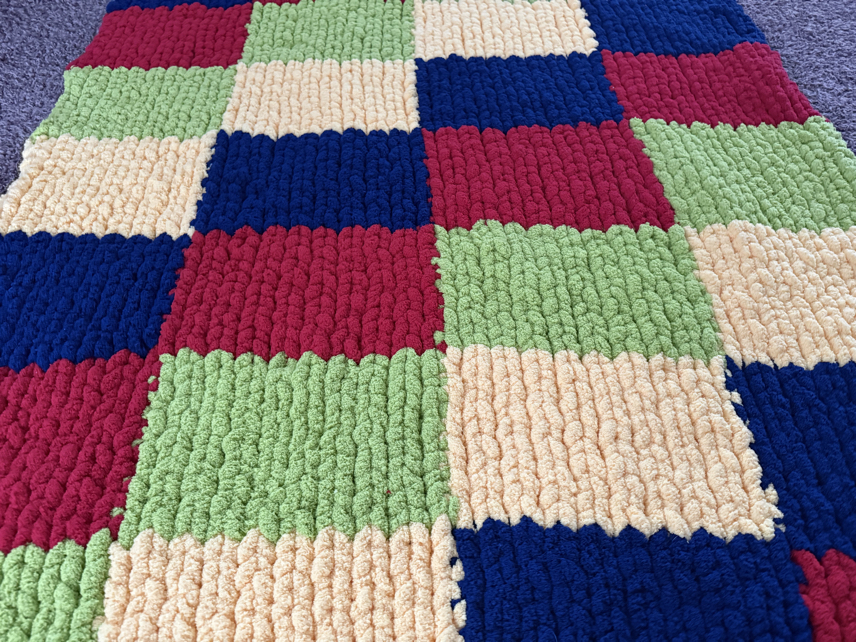
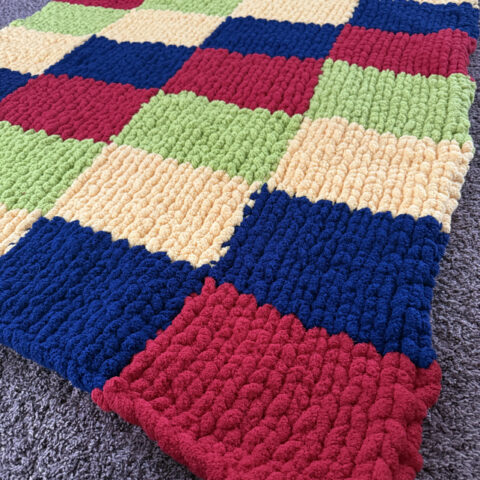
There are so many different color patterns you can choose to make with finger knitting chunky yarn blankets. This design is one of my favorites, though it does take a bit more focus than some designs to get it started. However, once you are going, it is quite easy, and the finished blanket looks so beautiful with the pretty diagonal square designs.
Join our Mailing List and Receive a…
Easy Chunky Yarn Blanket Pattern
Materials
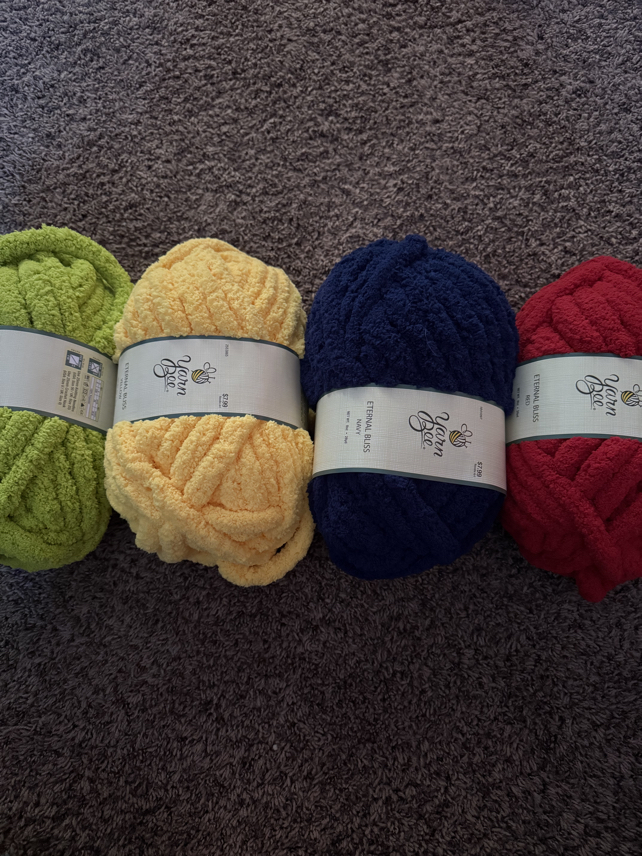
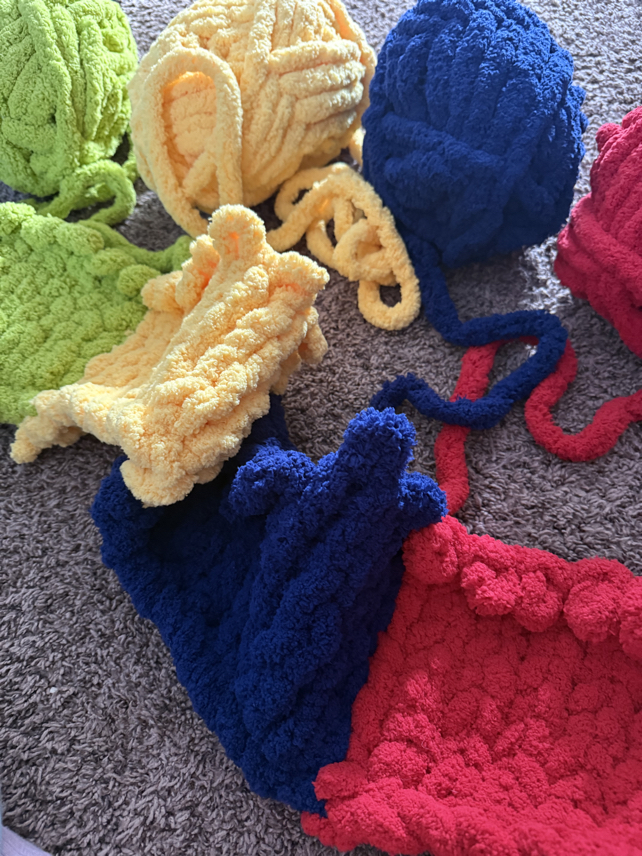
12 skeins of yarn – I used the super chunky yarn from Hobby Lobby for a throw sized blanket. I chose to use 4 colors, 3 skeins of each color. You can determine your colors and how you want to break them up. The squares of this blanket are 9 columns by 10 rows.
Scissors
And your fingers, primarily your index finger, middle finger and thumb!
How to Hand Knit a Chunky Yarn Blanket Pattern
Before you Begin
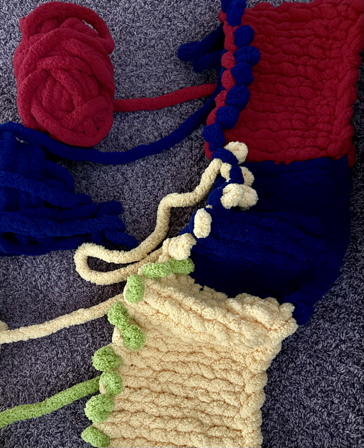
Choose the color pattern you want to have and then lay out the first four skeins of yarn in the color order you will be using. Open each skein of yarn and pull out the ends.
Step 1: Getting Started
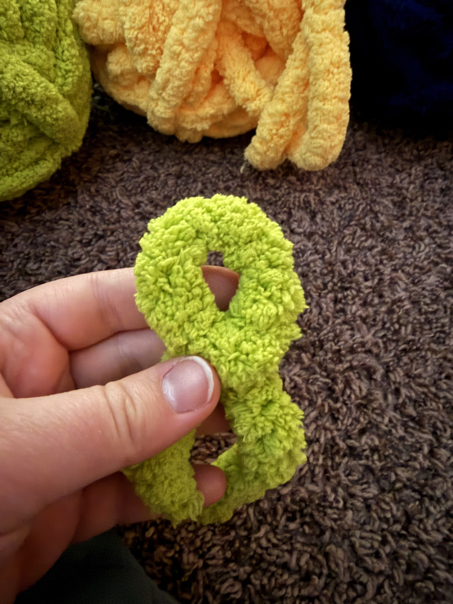
To start your blanket you will first want to make a slip knot with your first color, in my case it was green yarn, near the end of the yarn. Make sure that the loop is large enough to comfortably fit your thumb through the loop. Then loop the yarn and pull it through the slip knot loop. You are going to repeat this step to make your foundation chain in your desired length. Make sure that you have as many chain stitches as you want for as wide as you want the blanket to be.
BUT because we are doing the diagonal square pattern, the foundation chain also needs to reflect these colors. In this pattern, I am going to refer to the colors that I used to make this blanket, but remember you can use any color scheme you want.
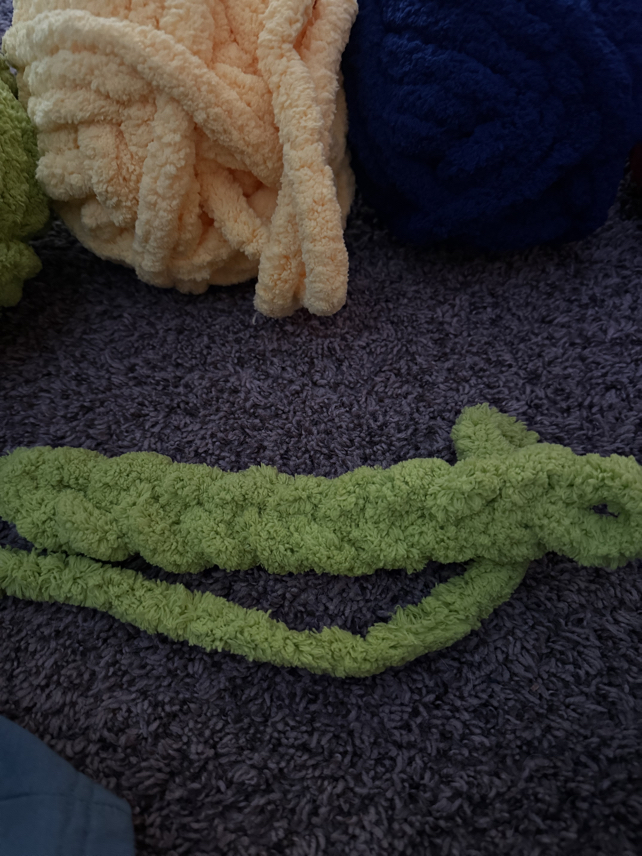
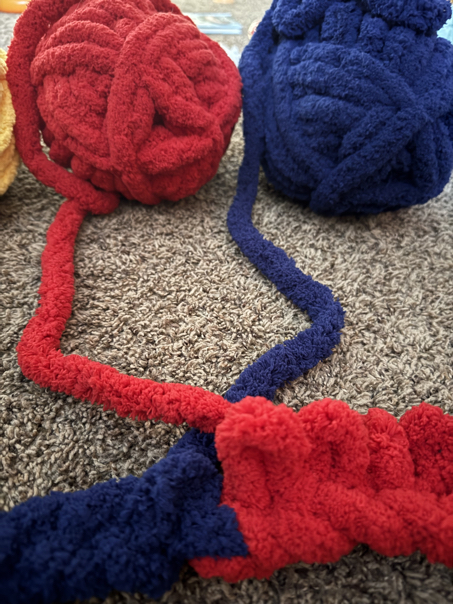
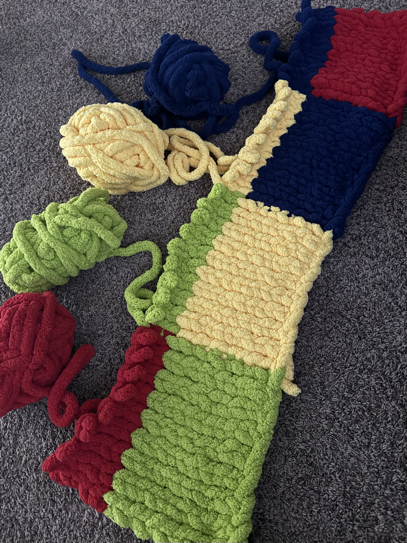
After you make your slip knot with green yarn, make a total of 9 chain stitches with this color.
Then join your next color of yarn. In my case, this was yellow yarn. Make another 9 chain stitches with yellow yarn. Join the next color, in mine its blue yarn, and chain 9 stitches. Last, join the final color, in my case it was red yarn, and chain 10 stitches.
Step 2: Starting the Design
Now, with your working yarn, we will be heading back the other direction. Do NOT turn the project over. You will always want to work it with the same side up.
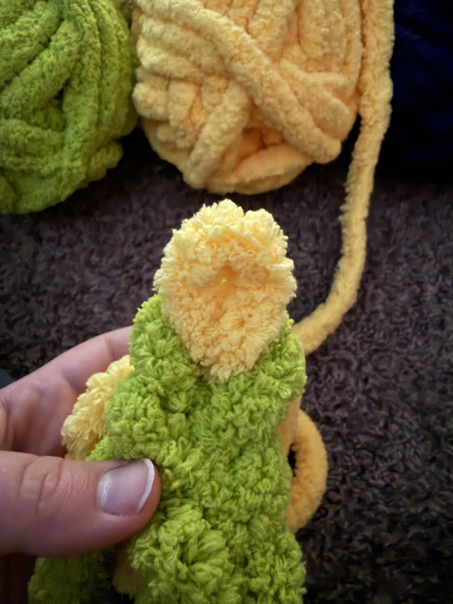

To start your first row, place your fingers in the 3rd loop from the end, and pull up a loop. Note; the last loop on the chain row counts as your first loop in your second row. Pull up a loop in each of the remaining 7 chain stitches of red yarn.
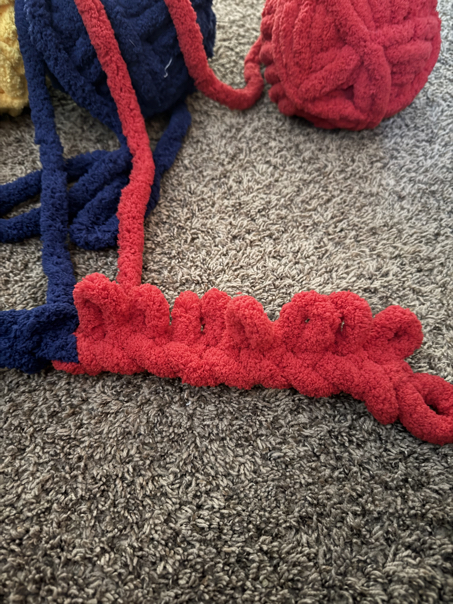
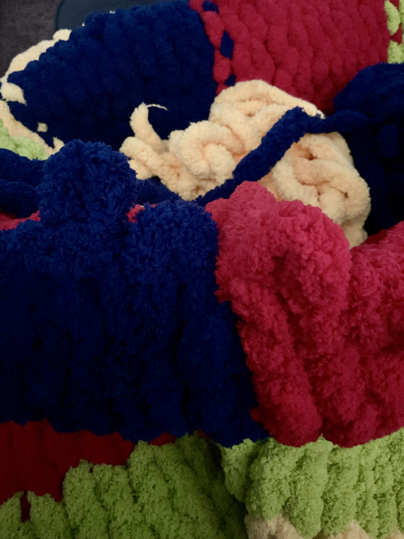
Now, take your ball of red yarn, cross it over top of the blue yarn, and wrap it around behind the blue yarn. You will complete this crossover of yarn anytime you change colors.
Now working with the blue yarn, pull up a loop in each of the chain stitches, until you get to the end of the blue section. Take the skein of blue yarn, cross it over the top of the yellow yarn, then wrap it around behind the yellow yarn.
Switch to working with the yellow yarn. pull up a loop in each of the chain stitches, until you get to the end of the yellow section. Cross the skein of yellow yarn over the top of the green yarn, and wrap it around behind.
With the green yarn, pull up a loop through each of the green chain stitches until you get to the end of the row. After you have completed the last stitch in that row, loop the yarn back around and pull another loop through the last stitch made.
Now move your working yarn to the right, in the direction that you are now going and work your way back the other direction following the same steps, crossing the yarn over and around behind before you change the color you are working with. I would suggest that you repeat row one so that you have a total of 10 rows of these stitches before changing the colors. As you work, do not turn the blanket over, keep working with the right side up.
Step 3: Creating the Diagonal Pattern
Once you have the first row completed, repeat the same steps in this same color pattern a total of 10 times, before you switch the colors around to start the diagonal pattern. Please note, you can make as many or as few rows as you want before changing up the colors, this is just how many rows I made.
Make sure that you end with all of the working yarn on your right hand side.
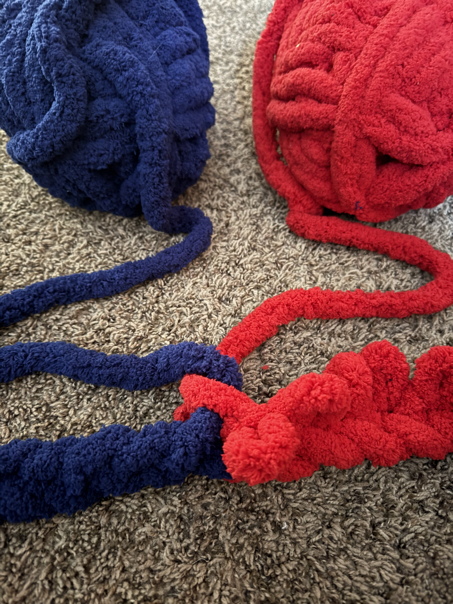
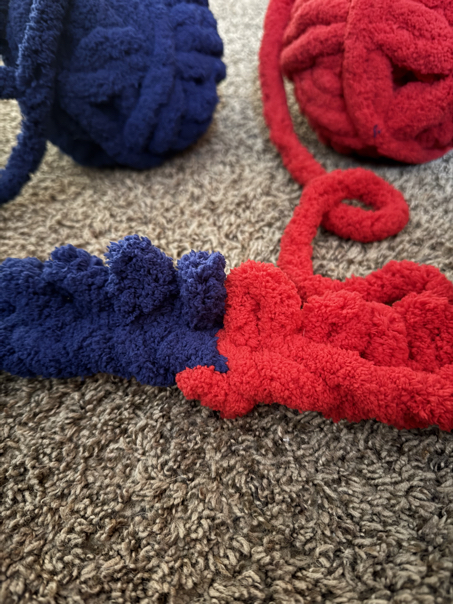
To start the diagonal square pattern, cut off the yarn on the right hand side, leaving approximately 6 inches of a yarn tail. Take this color of yarn over to the left hand side of your blanket, make a slip knot, and loop the new yarn through the first loop on your left hand side of the blanket. Be sure to tie a knot to attach the yarn but weave in the yarn tail so that it is not visible at all.
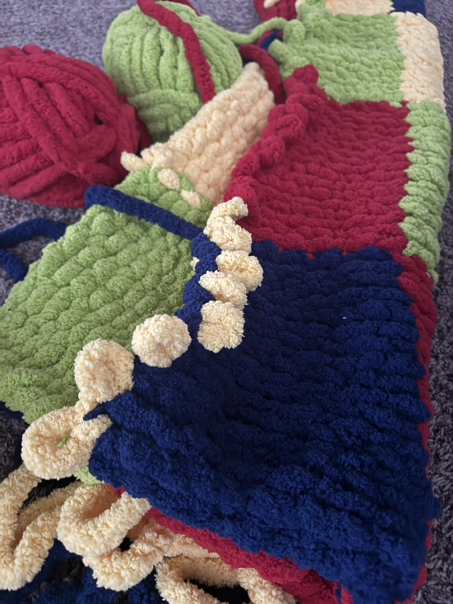
With your new color added, work the loops in the first 9 stitches with the new color. Then take that same yarn and wrap it around the working yarn of the previous color yarn that was just worked on the last row. In my case, I cut the red yarn, and moved it from the right handed side to the left side of the blanket. Then wrapped it around the green working yarn.
Now pick up the green working yarn, and work the next 9 loops with this color. Wrap it around the yellow yarn, then work the next 9 loops with the yellow yarn. Wrap the yellow yarn around the blue yarn, then work the last 9 stitches with the blue yarn.
Now that your new color blocks are started, you can work them the same as before.
Making the Blocks:
Starting at the right handed side, make another loop in the last loop you just created to start a new row, then work the loops in the next 8 stitches (9 total in this color block). Wrap the working color over top and around behind the next color.
Pick up your next color and work the next 9 loops. Wrap the working color over top and around behind the next color. Repeat this step two more times, until you reach the left handed side of the blanket.
Starting at the left handed side, make another loop in the last loop you just created, work the loops in the next 8 stitches (9 total in this color block). Wrap the working color over top and around behind the next color.
Pick up your next color and work the next 9 loops. Wrap the working color over top and around behind the next color. Repeat this step two more times, until you reach the right handed side of the blanket.
Creating the Diagonal
End the blocks with the working yarn on the right handed side.
Cut the yarn leaving an approximate 6 inch tail. Attach the new piece of yarn to the left handed side of your blanket.
Work the loops with your new color in the first 9 stitches on the left handed side of your blanket. Wrap the working yarn around the previous color for those same stitches. Then pick up the color you used for those stitches previously, and work the next 9 stitches. Repeat these steps across the rest of the blanket.
Continue making the blocks and creating the diagonal until your finger knitted blanket reaches your desired size.
Step 4: Finishing it Out
When you have your blanket the size you want it to be, it’s time to “cast off” your working loops as the very last step to finish the blanket.
To do this, you will want to work the first 2 stitches as normal, then loop the second loop through the first loop, work the next stitch as normal, and loop this through the previous loop. Repeat these steps until you get to the last loop in the color block.
Now, in the last stitch, take the working yarn from the next color block and work a loop with this color in the block with the one stitch remaining, loop this stitch through the last one, continue on the next 8 stitches in the new color. Then reach over to the next color, and loop it through the last stitch in the block. Repeat this across the row to cast off all of the stitches.
Make sure to go back and tie any knots needed, and securely weave in any loose ends of yarn. Then you are finished and ready to enjoy your beautiful finger knitted diagonal square blanket made with super chunky yarn.
Pattern Copyright
Please note that this pattern is intended for personal use only, and is not for commercial distribution. By copyright, unless otherwise noted, you are not authorized to copy or claim my content as your own. You are, however, more than welcome to sell your finished products made with my patterns. I always appreciate it when you link to my patterns so that others can find them too!
Super Chunky Yarn Blanket Tips and Tricks
Choosing the best yarns
The best type of yarn to use for this finger knit blanket pattern is going to be the super fat yarn you can find at your local craft store. The technical size you will want is yarn weight seven or jumbo yarn.
Determining the blanket size
The sky is the limit when it comes to determining the size of the blanket you can make with this hand knit blanket pattern. In this pattern, the blanket size I made is a nice throw blanket. You can also make smaller ones in the size of baby blankets or as big as a king size bed if you want. It’s really up to you.
When it comes to the blanket size you want, for this specific pattern you will also want to consider how many colors you are using, then make sure that the math works out. For example, for my throw sized blanket, I had four color blocks, each 9 stitches wide, giving me 36 stitches. Make sure that your color combination and desired size works out as well, then make the number of stitches you need for the size and color pattern.
Making consistent loops
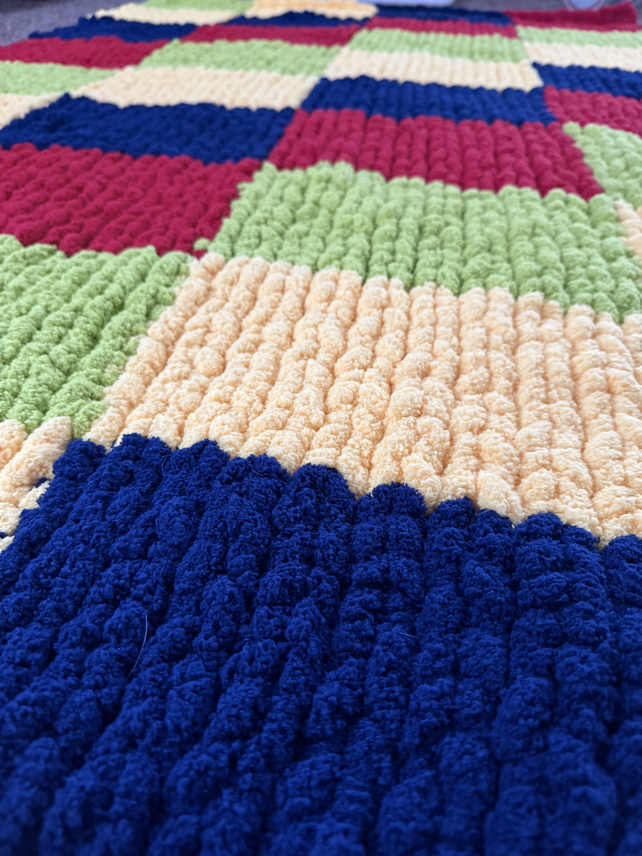
For your finished blanket to turn out the best, it is very important to have consistent tension. Meaning, make sure that each loop yarn is a similar size. This way your finished blanket will have even stitches and look nice. This is one of the most important things to do when finger knitting a blanket of any kind, but especially this pattern.
Care tips for the finished blanket
Be sure to reference your specific yarn package for care instructions, and to see if it is machine washable. However, most of this jumbo yarn is not going to wash well in the washing machine, both because of the yarn type and also because the blanket is so big and puffy. If you must, hand wash the blanket, or better yet, hand wash spots as needed rather than trying to wash the whole thing.
Chunky Yarn Blanket
Making your own blanket with our diagonal squares finger knitting pattern is so much fun, and it is a fun use of bulky weight yarns. You don’t need a lot of knitting experience, just take your time and carefully follow the written pattern instructions in order to make this fun design. These blankets are so cozy to enjoy yourself, or you can give them as a thoughtful Christmas gift.
Thank you so much for stopping by to check out our diagonal square chunky yarn blanket pattern. I hope that you will give it a try, and I hope you will enjoy making this fun finger knitting blanket pattern. Careful, you just might get addicted to making these beautiful blankets.
Happy Finger Knitting!
Be sure to follow us online on your favorite social media platform!
More Finger Knitting Ideas!

Finger Knit Diagonal Super Chunky Yarn Blanket Pattern
Materials
- 12 skeins of yarn
- Scissors
Instructions
- Before you Begin
Choose the color pattern you want to have and then lay out the first four skeins of yarn in the color order you will be using. Open each skein of yarn and pull out the ends. - Step 1: Getting Started
To start your blanket you will first want to make a slip knot with your first color, in my case it was green yarn, near the end of the yarn. Make sure that the loop is large enough to comfortably fit your thumb through the loop. Then loop the yarn and pull it through the slip knot loop. You are going to repeat this step to make your foundation chain in your desired length. Make sure that you have as many chain stitches as you want for as wide as you want the blanket to be.
BUT because we are doing the diagonal square pattern, the foundation chain also needs to reflect these colors. In this pattern, I am going to refer to the colors that I used to make this blanket, but remember you can use any color scheme you want.
After you make your slip knot with green yarn, make a total of 9 chain stitches with this color.
Then join your next color of yarn. In my case, this was yellow yarn. Make another 9 chain stitches with yellow yarn. Join the next color, in mine its blue yarn, and chain 9 stitches. Last, join the final color, in my case it was red yarn, and chain 10 stitches. - Step 2: Starting the Design
Now, with your working yarn, we will be heading back the other direction. Do NOT turn the project over. You will always want to work it with the same side up.
To start your first row, place your fingers in the 3rd loop from the end, and pull up a loop. Note; the last loop on the chain row counts as your first loop in your second row. Pull up a loop in each of the remaining 7 chain stitches of red yarn.
Now, take your ball of red yarn, cross it over top of the blue yarn, and wrap it around behind the blue yarn. You will complete this crossover of yarn anytime you change colors.
Now working with the blue yarn, pull up a loop in each of the chain stitches, until you get to the end of the blue section. Take the skein of blue yarn, cross it over the top of the yellow yarn, then wrap it around behind the yellow yarn.
Switch to working with the yellow yarn. pull up a loop in each of the chain stitches, until you get to the end of the yellow section. Cross the skein of yellow yarn over the top of the green yarn, and wrap it around behind.
With the green yarn, pull up a loop through each of the green chain stitches until you get to the end of the row. After you have completed the last stitch in that row, loop the yarn back around and pull another loop through the last stitch made.
Now move your working yarn to the right, in the direction that you are now going and work your way back the other direction following the same steps, crossing the yarn over and around behind before you change the color you are working with. I would suggest that you repeat row one so that you have a total of 10 rows of these stitches before changing the colors. As you work, do not turn the blanket over, keep working with the right side up. - Step 3: Creating the Diagonal Pattern
Once you have the first row completed, repeat the same steps in this same color pattern a total of 10 times, before you switch the colors around to start the diagonal pattern. Please note, you can make as many or as few rows as you want before changing up the colors, this is just how many rows I made.
Make sure that you end with all of the working yarn on your right hand side.
To start the diagonal square pattern, cut off the yarn on the right hand side, leaving approximately 6 inches of a yarn tail. Take this color of yarn over to the left hand side of your blanket, make a slip knot, and loop the new yarn through the first loop on your left hand side of the blanket. Be sure to tie a knot to attach the yarn but weave in the yarn tail so that it is not visible at all.
With your new color added, work the loops in the first 9 stitches with the new color. Then take that same yarn and wrap it around the working yarn of the previous color yarn that was just worked on the last row. In my case, I cut the red yarn, and moved it from the right handed side to the left side of the blanket. Then wrapped it around the green working yarn.
Now pick up the green working yarn, and work the next 9 loops with this color. Wrap it around the yellow yarn, then work the next 9 loops with the yellow yarn. Wrap the yellow yarn around the blue yarn, then work the last 9 stitches with the blue yarn.
Now that your new color blocks are started, you can work them the same as before. - Making the Blocks:
Starting at the right handed side, make another loop in the last loop you just created to start a new row, then work the loops in the next 8 stitches (9 total in this color block). Wrap the working color over top and around behind the next color.
Pick up your next color and work the next 9 loops. Wrap the working color over top and around behind the next color. Repeat this step two more times, until you reach the left handed side of the blanket.
Starting at the left handed side, make another loop in the last loop you just created, work the loops in the next 8 stitches (9 total in this color block). Wrap the working color over top and around behind the next color.
Pick up your next color and work the next 9 loops. Wrap the working color over top and around behind the next color. Repeat this step two more times, until you reach the right handed side of the blanket. - Creating the Diagonal:
End the blocks with the working yarn on the right handed side.
Cut the yarn leaving an approximate 6 inch tail. Attach the new piece of yarn to the left handed side of your blanket.
Work the loops with your new color in the first 9 stitches on the left handed side of your blanket. Wrap the working yarn around the previous color for those same stitches. Then pick up the color you used for those stitches previously, and work the next 9 stitches. Repeat these steps across the rest of the blanket.
Continue making the blocks and creating the diagonal until your finger knitted blanket reaches your desired size. - Step 4: Finishing it Out
When you have your blanket the size you want it to be, it’s time to “cast off” your working loops as the very last step to finish the blanket.
To do this, you will want to work the first 2 stitches as normal, then loop the second loop through the first loop, work the next stitch as normal, and loop this through the previous loop. Repeat these steps until you get to the last loop in the color block.
Now, in the last stitch, take the working yarn from the next color block and work a loop with this color in the block with the one stitch remaining, loop this stitch through the last one, continue on the next 8 stitches in the new color. Then reach over to the next color, and loop it through the last stitch in the block. Repeat this across the row to cast off all of the stitches.
Make sure to go back and tie any knots needed, and securely weave in any loose ends of yarn. Then you are finished and ready to enjoy your beautiful finger knitted diagonal square blanket made with super chunky yarn.
PIN for Later!