How to Hand Knit a Pillow
I am super excited to walk you through the step by step process of making a hand knit round throw pillow using super chunky yarn. If you have never tried a finger knit project before, be warned, it is a lot of fun and very addicting to make!
With finger knitting, you don’t need to have any knitting knowledge or special skills. All you need is some very chunky yarn, and some stuffing to make these round hand knit pillows.

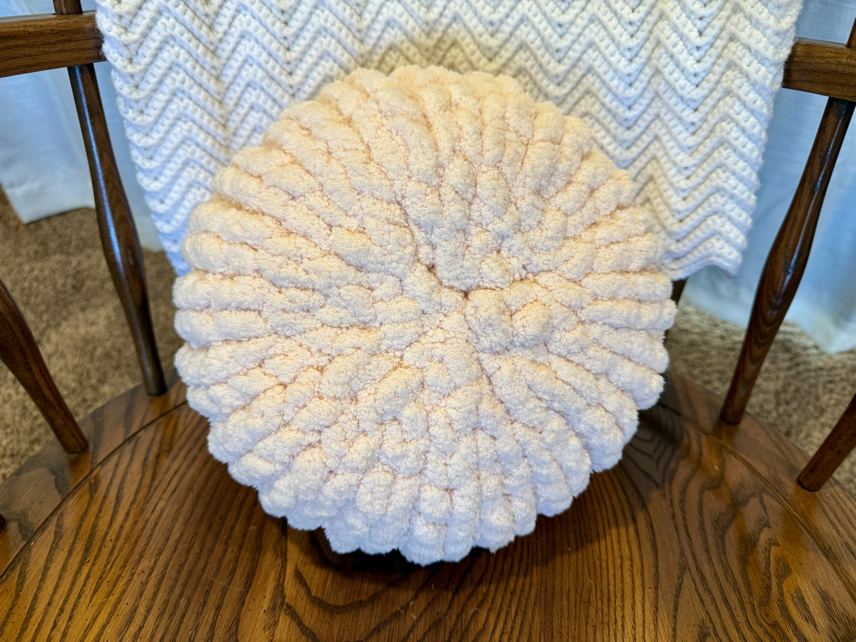
Chunky Knit Pillow
I am so excited to share the easy steps to make your own round hand knit throw pillow with you. This is an easy pattern that you can enjoy making for some very cute throw pillows!
Let’s get started by looking at the materials you will need, followed by some easy step by step instructions.

Hand Knit Pillow Pattern
Materials
1 skein super bulky chunky yarn (I used Hobby Lobby’s)
Fiber fill stuffing
Scissors
Hand Knit Round Pillow Pattern
Step 1: cast on the stitches
To begin, you will want to leave a yarn tail that is approximately 12-18 inches long, then create a slip knot.
Next we are going to create what is known as a chain. To do this you will want to insert your fingers through the loop of the slip knot, wrap the yarn around in a loop and pull the new yarn loop through the previous one. This creates a chain stitch.
Repeat this process until you have 20 chain stitches “cast on” to your project. Then take the loop remaining on your project and slip it through the first chain space made to form your project into a circle.


Step 2: create the body of the pillow
After the foundation row has been joined to form a circle, you want to take the working yarn and pull a loop up through each of the chain spaces.
After a loop has been pulled up through each of the chain spaces, repeat the process again as you work your way around. Continue to pull a new loop up through the previous loop until you have approximately 24 inches of yarn remaining. Keep in mind the number of rows of stitches in the project may very depending on how tight your loops are.
Step 3: close the first side
No, we are going to take a break from where you have been working, and go back to the beginning. Using end of the yarn tail that you left at the beginning we are going to close up the first side of the pillow.
To do this, you will want to take the yarn tail and weave it through every other stitch around the entire opening. Then carefully pull it tight so that the project sent is together. Feed your yarn tail through to the center of the pillow and tie it off, so that the opening does not pull apart again. Leave the yarn tail inside of the pillow.


Step 4: fill with stuffing
Take your stuffing and fill the inside of your pillow with plenty of stuffing. Do you want to make sure that it is nicely filled so that your pillow is nice and puffy. However, do not over stuff the pillow so that the stuffing is seeping out. Once you have your pillow stuffed, it’s time to close the remaining side.
Step 5: close the last side
Now we are going to go back to where you were creating the body of the pillow and close the bottom of the pillow. There are two ways you can do this, the first is to simply thread your yarn tail through each of the loops and pull it tight.
However, my preferred method is as follows. First cast off your working loops. To do this you will pull up a loop in the first two stitches and then take the second loop and feed it through the first one, repeat this process around until you have and just one loop remaining.
Now take the yarn tail and weave it through every other stitch. Once the yarn tail is through all of the stitches, carefully pull it tight to close the remaining opening.
Tie it off, and weave in the remaining yarn tail so that it is no longer visible on the outside. Now you’re round hand, knit pillow is finished and ready to be enjoyed!

Finger Knit Throw Pillow Tips and Tricks
How to make a firm pillow
With this hand knit round pillow pattern, it’s nice to have a firm pillow, but difficult to find a pillow insert that will fit your round pillow appropriately. Therefore, I like to use fiber fill stuffing. It’s a balancing act to get the pillow stuffed so that it is nice and firm, but not too much stuffing.
You might have to add and subtract some of the stuffing in your throw pillow until you are happy with the results. Remember, you will still need to close the pillow, so don’t fill it with too much stuffing.
Maintaining Tension
Maintaining the tension of your loops when finger knitting is one of the most important things you can do, to have your project turn out nicely. It’s a good idea to use something as a reference point. I like to use the ball of my thumb as my reference point when making the stitches, but you can wrap the yarn around your entire thumb, or a finger if you prefer.

How to Hand Knit a Pillow Easy
Hand knitting a round throw pillow is a fun way to add your own unique accents to your home. These round throw pillows are nice and soft, and the perfect addition to your home decor.
Thank you so much for stopping by to learn how to hand knit a pillow with jumbo chunky yarn. This is such a fun project to make because it works up quickly and is very satisfying to work with the super chunky yarn. It is my hope that you give this pattern a try and that you will enjoy making these fun throw pillows!
More Finger and Hand Knit Patterns


How to Hand Knit a Round Pillow
Materials
- 1 skein super bulky chunky yarn (I used Hobby Lobby’s)
- Fiber fill stuffing
- Scissors
Instructions
- Step 1: cast on the stitches
To begin, you will want to leave a yarn tail that is approximately 12-18 inches long, then create a slip knot.
Next we are going to create what is known as a chain. To do this you will want to insert your fingers through the loop of the slip knot, wrap the yarn around in a loop and pull the new yarn loop through the previous one. This creates a chain stitch.
Repeat this process until you have 20 chain stitches “cast on” to your project. Then take the loop remaining on your project and slip it through the first chain space made to form your project into a circle. - Step 2: create the body of the pillow
After the foundation row has been joined to form a circle, you want to take the working yarn and pull a loop up through each of the chain spaces.
After a loop has been pulled up through each of the chain spaces, repeat the process again as you work your way around. Continue to pull a new loop up through the previous loop until you have approximately 24 inches of yarn remaining. Keep in mind the number of rows of stitches in the project may very depending on how tight your loops are. - Step 3: close the first side
No, we are going to take a break from where you have been working, and go back to the beginning. Using end of the yarn tail that you left at the beginning we are going to close up the first side of the pillow.
To do this, you will want to take the yarn tail and weave it through every other stitch around the entire opening. Then carefully pull it tight so that the project sent is together. Feed your yarn tail through to the center of the pillow and tie it off, so that the opening does not pull apart again. Leave the yarn tail inside of the pillow. - Step 4: fill with stuffing
Take your stuffing and fill the inside of your pillow with plenty of stuffing. Do you want to make sure that it is nicely filled so that your pillow is nice and puffy. However, do not over stuff the pillow so that the stuffing is seeping out. Once you have your pillow stuffed, it’s time to close the remaining side. - Step 5: close the last side
Now we are going to go back to where you were creating the body of the pillow and close the bottom of the pillow. There are two ways you can do this, the first is to simply thread your yarn tail through each of the loops and pull it tight.
However, my preferred method is as follows. First cast off your working loops. To do this you will pull up a loop in the first two stitches and then take the second loop and feed it through the first one, repeat this process around until you have and just one loop remaining.
Now take the yarn tail and weave it through every other stitch. Once the yarn tail is through all of the stitches, carefully pull it tight to close the remaining opening.
Tie it off, and weave in the remaining yarn tail so that it is no longer visible on the outside. Now you’re round hand, knit pillow is finished and ready to be enjoyed!
PIN for Later!

