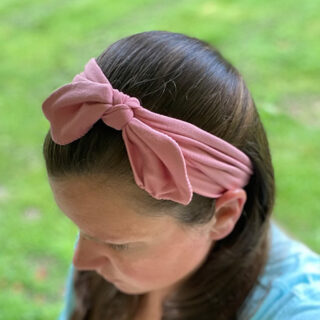
Knotted Headband Sewing Pattern
This free pattern to make a sewn knotted headband is so much fun and a great project to make for yourself or as a gift. I am so excited to share my free sewing pattern with you to make a cute knotted headband. This is a very easy sewing project to make and it’s a fun one to wear!

This DIY headband is perfect for girls of all ages, no matter if you are looking to make a headband for a baby girl, or for an adult. You can easily adapt the size of the knotted headband to fit anyone!
Free Knotted Headband Sewing pattern
I love to make this headband pattern because it is easy to sew, but very cute to wear with the knot bow headband adding a special flare to your style. This sewing project is a great one because it isn’t very complicated to make, and can be prepared in a short amount of time. Let’s get started walking through the step by step instructions on how to make this headband!
Free Headband Sewing Pattern
Supplies Needed for your Top Knot Headband:
Jersey knit fabric
Safety pin
Thread to match your fabric
Sewing machine that does zigzag
Scissors
Iron and ironing board
3/8 inch seam allowance
How to Sew a Knotted Headband
Step 1: Choose your Fabric
First select your fabric. It will work best if you use a type of Jersey knit fabric for this headband pattern. Once you have picked out your fabric you will want to get the pattern ready to use.

Step 2: Cut the Fabric
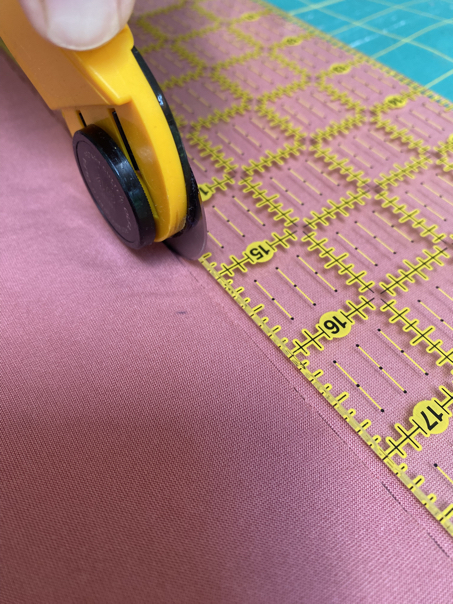
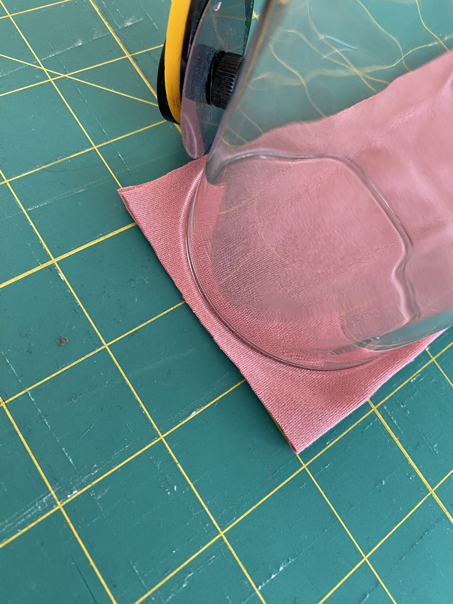
You will want to cut the fabric out next. Start by cutting the headband piece, so that it is approximately 22 inches long by 8 inches wide, for an average adult’s head. Then cut out the knot piece, that is approximately 8 inches by 7 1/2 inches. Don’t worry if the not isn’t exactly perfect, this can also be a scrap fabric piece that you have left over to make the twisted knot.
Fold the small piece, in half, long ways, so that it is about 3 1/4 inches wide. To round it out, I used a glass, then cut around it at both ends of the fabric with a rotery cutter.
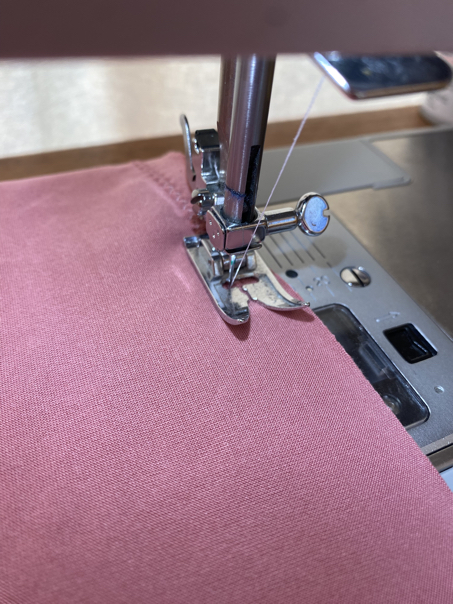
Step 3: Sewing the Headband
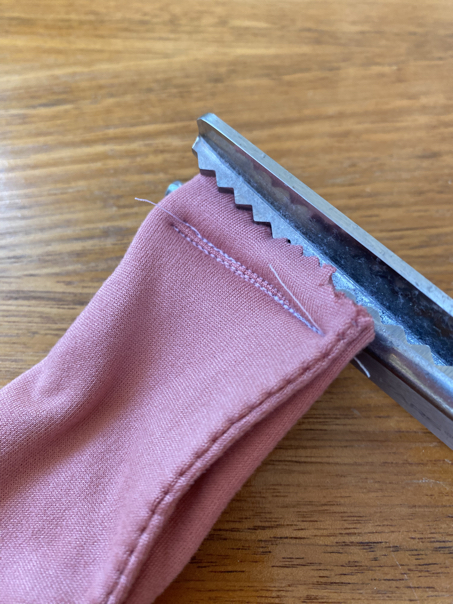
To start sewing the headband, fold the long piece of fabric so that the right sides are together, then zigzag stitch along the long edge side of the fabric.
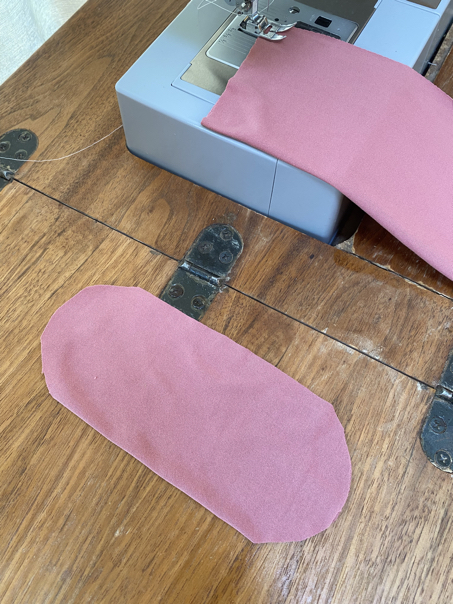
Next, take the small piece of fabric that you have cut out, and turn it so that the right sides are together. Zigzag stitch around the outer edge, leaving a small opening for turning.

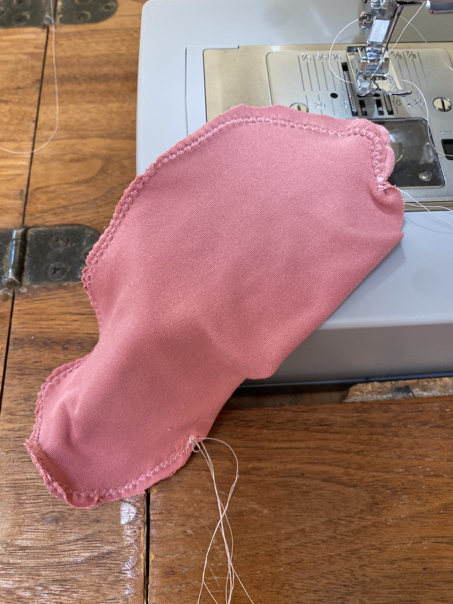
Step 4: Turning
To hide the raw edges, turn both pieces of fabric right side out. With the smaller piece, you can simply work it right side out through the opening. Once it is turned, press it in place with the iron, then hand stitch the whole shut.
Use a safety pin through the long piece to help turn it right side out. Press it open with an iron.
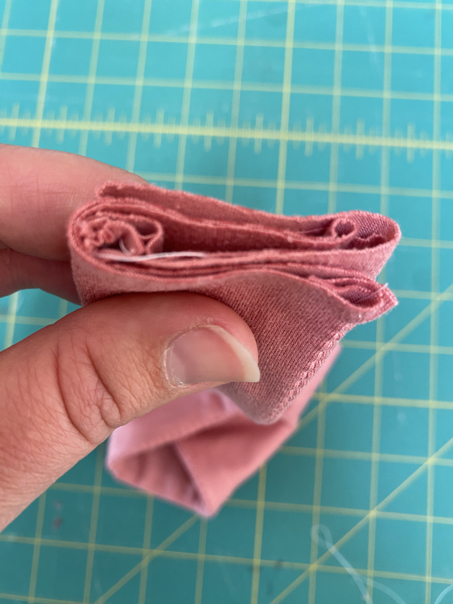
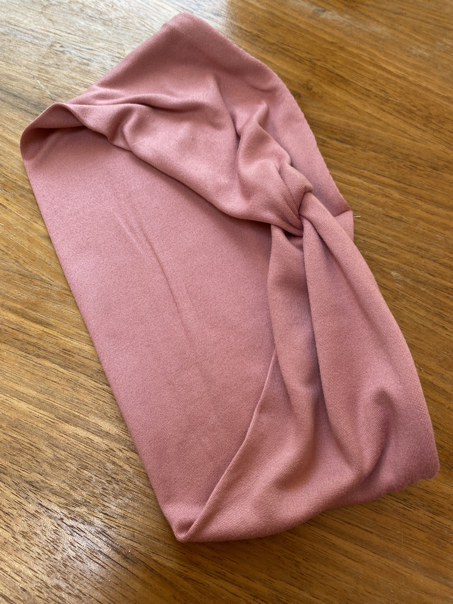
Bring the two raw ends of the headband together. Overlap them half way, then fold one aroudn the other, then fold the remaining strip of fabric around the other one. This creates a twisted look. Use a straight stitch to sew across the short end that you have folded together to close the end. Trim away any access fabric with pinking scissors, then open up the headband with the seam you just created facing the inside of the headband.


Step 5: Creating the Twist-knot
With your remaining short piece, hand stitch the opening closed. Use the iron to press it flat , especially around the edges.


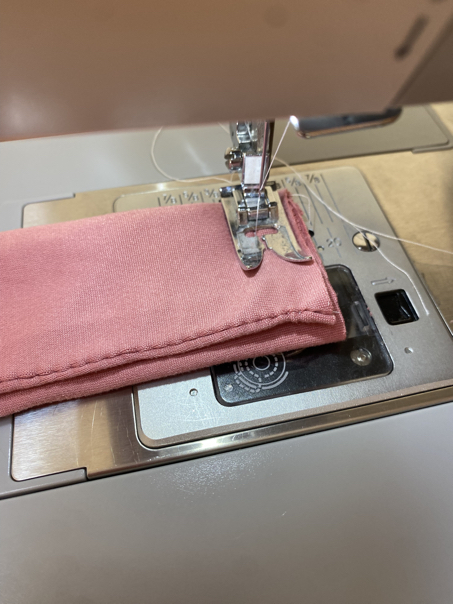
Step 6: Finishing the Knotted Headband
Take the small strip and tie it in a knot to the top of the headband, put it around the seam that you created, to cover it completely.
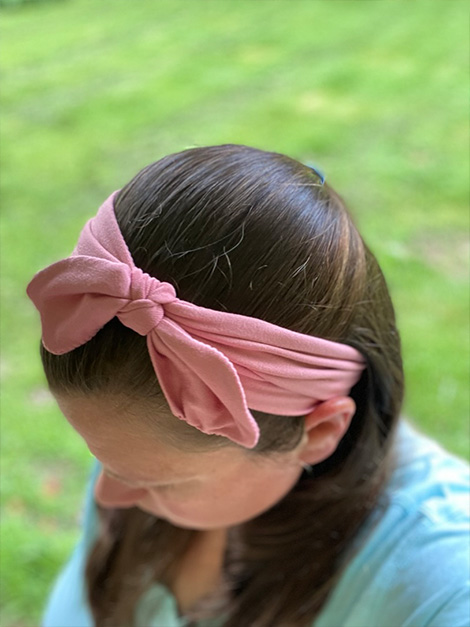
Trim away any excess threads. Your finished headband is now ready to proudly wear to show off your hard work and cute style for everyday wear!


Knotted Headband Tips and Tricks
The best fabric
Although there are no specific fabric requirements, I would highly recommend that the best fabric you use is a jersey fabric. You want at least a two way fabric, but a four way stretch will also work well.
Head Measurement
The best way to make sure that your headband has the perfect fit is to take a head circumference measurement of the person you want to make this headband for. However, if you’re not able to, you can use the printed pattern, which will get you close to the correct head size. I printed pattern is based on the average head measurements in the different categories it is labeled with.
Using the stretch stitch
It is really important that you use the stretch stitch when creating these headbands. In this case, the stretch stitch is simply a nice zigzag stitch. This allows the headband to stretch as needed without ripping the stitches out.
Remember it’s your personal preference
Remember, this pattern is simply instructions to make a nodded headband in the way that I recommend. However, you are making this project yourself, so feel free to adjust it to your personal preference.

Simple Knotted Headband Sewing Pattern
Miss nodded headband is a nice soft knit fabric headband with a cute not on top. This headband is easy to make, and a fun way to mix things up from your normal headband.
Thank you so much for stopping by to check out my headband tutorial for how to make a knotted headband, sewing pattern. It is my hope that you will give this free sewing pattern a try and enjoy making your own nodded headbands. I love these headbands and I hope you will too!
Happy sewing!
Be sure to follow us online on your favorite social media platform!
More Sewing Inspiration:
Knotted Headband Sewing Pattern
Materials
- Jersey knit fabric
- Safety pin
- Thread to match your fabric
- Sewing machine that does zigzag
- Scissors
- Iron and ironing board
Instructions
Step 1: Choose your Fabric
First select your fabric. It will work best if you use a type of Jersey knit fabric for this headband pattern. Once you have picked out your fabric you will want to get the pattern ready to use.
Step 2: Cut the Fabric
You will want to cut the fabric out next. Start by cutting the headband piece, so that it is approximately 22 inches long by 8 inches wide, for an average adult’s head. Then cut out the knot piece, that is approximately 8 inches by 7 1/2 inches. Don’t worry if the not isn’t exactly perfect, this can also be a scrap fabric piece that you have left over to make the twisted knot.
Fold the small piece, in half, long ways, so that it is about 3 1/4 inches wide. To round it out, I used a glass, then cut around it at both ends of the fabric with a rotery cutter.
Step 3: Sewing the Headband
To start sewing the headband, fold the long piece of fabric so that the right sides are together, then zigzag stitch along the long edge side of the fabric.
Next, take the small piece of fabric that you have cut out, and turn it so that the right sides are together. Zigzag stitch around the outer edge, leaving a small opening for turning.
Step 4: Turning
To hide the raw edges, turn both pieces of fabric right side out. With the smaller piece, you can simply work it right side out through the opening. Once it is turned, press it in place with the iron, then hand stitch the whole shut.
Use a safety pin through the long piece to help turn it right side out. Press it open with an iron.
Bring the two raw ends of the headband together. Overlap them half way, then fold one aroudn the other, then fold the remaining strip of fabric around the other one. This creates a twisted look. Use a straight stitch to sew across the short end that you have folded together to close the end. Trim away any access fabric with pinking scissors, then open up the headband with the seam you just created facing the inside of the headband.
Step 5: Creating the Twist-knot
With your remaining short piece, hand stitch the opening closed. Use the iron to press it flat , especially around the edges.
Step 6: Finishing the Knotted Headband
Take the small strip and tie it in a knot to the top of the headband, put it around the seam that you created, to cover it completely.
Trim away any excess threads. Your finished headband is now ready to proudly wear to show off your hard work and cute style for everyday wear!
PIN for Later!

