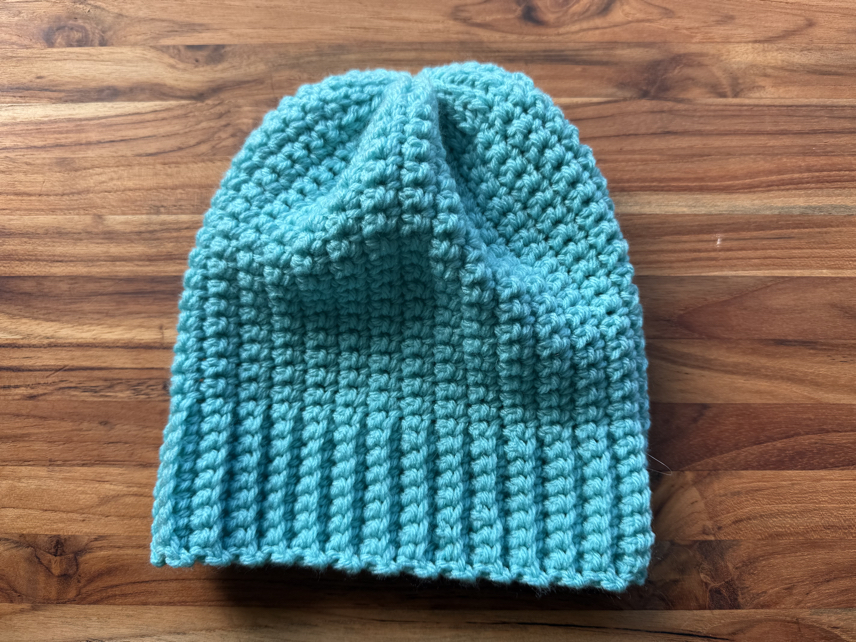
Newborn Crochet Beanie Pattern Free
Making a newborn crochet beanie with this free pattern is so much fun, and is a very easy project to make. These crochet beanies can be made in a variety of sizes, to fit a newborn or older baby, depending on your preference.

I am very excited to walk you through the step-by-step process of making this easy knit look beanie pattern for newborn babies. This pattern is very easy to make and is easily adjustable so that you can make any size you want. If you are new to crocheting, don’t worry! You can still enjoy making this easy hat pattern.
Newborn Crochet Hat Pattern
It’s so much fun to make a newborn crochet beanie because it is useful for new babies and practical for the babies. You can easily make this project in a short amount of time, and give these beanies away as gifts, or even sell them if you want.
This crochet beanie pattern is unique because it uses basic crochet stitches, including a slip stitch to make your crochet beanie for newborn babies. When you use the slip stitch, you will want to work in the back loops only of your stitches in each of the previous rows. By doing this, you will get a nice crochet stitch, that looks like a knit stitch.
The stitch is so nice, because it is so soft, quite stretchy, and makes a thick crochet fabric with a lovely texture to it. The only downside of using this crochet stitch that looks like knitting is that it takes a little while to make a project using it. This is why I recommend using a nice medium-weight yarn, to help your project go a little faster.
I think that this stitch is so pretty when finished and makes a nice thick textured crochet fabric. In my opinion, it’s worth the effort to use this pretty stitch. Just in case you want another option, I’ll show you another stitch idea after this easy pattern.
Join our Mailing List and Receive a…
The Pattern Steps
This pattern is made in three main steps. The first step is to make the crochet fabric in your desired size, either to fit a newborn size baby or an older baby. The second step is to shape the shape the beanie, first into a circle, then to close the top of the beanie. Then finally, after the beanie is created, you can add any cute accents you want to the hat, like a pom pom, or flowers.
Now that you know the general overview of how the easy crochet baby hat is created, let’s get started making this fun crochet beanie pattern for newborn babies.

Baby Hat Crochet Pattern
Skill level: Level 1 – Beginner
Please Note: This pattern is written in US Terms
Materials Needed to Crochet a Newborn Hat
1 Skein Yarn (I prefer a soft medium-weight yarn, but you can use any kind that you want)
Other Tools and Materials
Size H crochet hook
A tapestry needle
Scissors
Abbreviations
sl st – slip stitch
ch – chain
BLO – back loop only
st/sts – stitch/stitches
The Crochet Beanie Pattern
Row 1: ch 30 sts (or until it measures approximately 6.5 inches wide for 0-3 months)
Row 2: turn, sl st in the BLO of the 1st st from the hook, and in each ch st across the row.
Row 3: turn, sl st in the BLO of the 1st sl st in the previous row, and in each ch st across.
Repeat row 3, until your hat measures your desired size.

Finishing the Newborn Crochet Hat
When you have the crocheted rectangle made to your desired size, it is now time to shape it into a cute little beanie for your newborn baby.
Step 1: Finish Off
The first thing you will want to do, is cut the yarn, leaving a long yarn tail for sewing. I like to leave at least 8 inches so that I have plenty of yarn. You can leave even more if you want.
Pull the long tail through your last loop to tie it tight. Then thread a large yarn needle with your yarn tail.
Step 2: Sew the Side
Fold your crochet project, so that the two short ends are together. Sew the ends together so that they hold securely. Now to finish the top of the hat.
Step 3: Cinch the Top of the Beanie
To close the top of your beanie, weave your needle through the top of your project so that it goes in and out every couple of stitches. Once you have gone all of the way around the top of the hat, pull the yarn tight so that it cinches together.
Now, pinch the top of the beanie together, and sew through the sides to hold it closed at the top, finish off by tying a knot. Turn your hat right side out.

Finishing Round
If you wish, I added a round of single crochet stitches on the side of the hat. This helps to give it a nice finished look, especially if the ends of your rows don’t end up being super-even.
To do this, you will simply make a slip stitch in the bottom part of your hat. Chain one stitch, then make a single crochet stitch in each stitch around.
Adding a Pom Pom
If you want, it is a fun idea to add a pom pom to the top of these newborn crochet beanies. You can easily do this by making your own, yarn pom pom, or buying one at your local craft store.
To make your own yarn pom pom, I like to use a large dinner fork, or serving fork, and wrap the yarn around it several times. Then tie a piece of yarn securely around the center. Once it is securely tied in place, take your scissors and cut each of the yarn ends that are wrapped around the fork. Sew this yarn pom pom to the top of your newborn crochet beanie.

Crochet Baby Hat Sizes
When you are making a newborn crochet beanie, there are several different sizes you can make. You can either measure the baby’s head, to use the exact measurements, or slightly larger, to fit the new arrival, or you can use the estimated sizing chart below that I have provided for your quick reference to make this cute hat.
Here are a few estimations of sizes you can make the crochet beanies in for this pattern. Feel free to adjust the stitch count as needed based on your stitching gauge, and the size you wish to make.
Free Crochet Baby Hat Pattern, 0-3 Months
6 ½ inches wide
13 inches long
Approximately 30 chain stitches
Free Crochet Baby Hat Pattern, 3-6 Months
7 inches wide
14 inches long
Approximately 40 chain stitches
Free Crochet Baby Hat Pattern, 6-12 Months
8 inches wide
15 inches long
Approximately 50 chain stitches
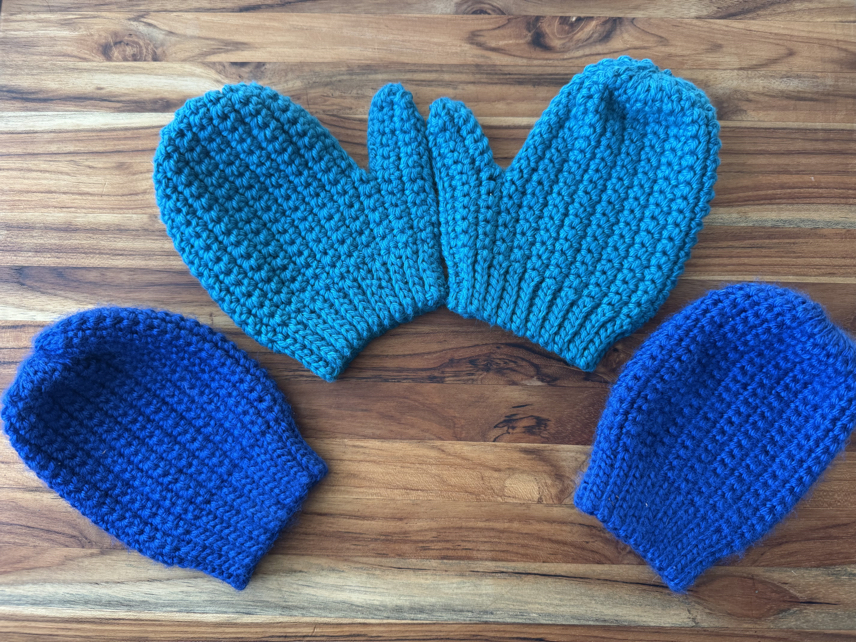
Ribbed Baby Beanie Pattern in Two Ways!
In the above pattern, I have walked you through the step-by-step instructions for making a knit-look crochet beanie pattern for newborn babies. One of the great things about this free pattern is that you can not only make this beanie using the slip stitch, as instructed above. You can also use a half-double crochet stitch, working through the back loop only for a nice ribbed beanie look. This is another great way to make your crochet beanie pattern for newborns.
One of the nice things about using the half double crochet stitch, rather than a slip stitch, is that the project works up a little bit faster, and you still get a similar ribbed look to your project.

Tips and Tricks for this Simple Baby Hat Crochet Pattern
Make the Hat in Different Colors
A great way to mix up this crochet pattern is to make your baby beanie in different colors. Of course, you wouldn’t want to use pink as I did for a baby boy, so feel free to use whatever colors you prefer. Pink and purple are great ideas for baby girls or blue for baby boys. You might also enjoy using neutral yellow, or green colors if the baby’s gender is unknown.
When Making Larger Sizes
Keep in mind, when making the larger sizes of this pattern, you will need more yarn. Typically you can still use one skein of yarn, as long as the skein isn’t really small.
The Best Yarn
In my opinion, the best kind of yarn to use for this type of baby beanie is a nice soft, medium weight yarn. This way, the yarn isn’t as fine as a baby yarn, but still not bulky. Feel free to use whatever type of yarn you prefer the best.
Why Crochet a Newborn Hat?
There are many good reasons why you should crochet a newborn baby hat. Often, people will knit or crochet newborn hats and donate them to their local hospital for each newborn baby to wear. Another great reason is that these hats make a nice baby shower gift. Plus, this is a small project and an easy one to make. This way you can make the little hat in a short amount of time.
How to Crochet a Newborn Hat for Beginners?
This free crochet beanie pattern for newborns is great because it is very easy to make. There are only a few crochet stitches required to make this hat. Another reason why this crochet beanie pattern is easy is that it is first made into a rectangle, then sewn together in a circle, and finally, the top of the hat is gathered together making it a simple crochet beanie pattern.
What is the Size of a Newborn Crochet Hat?
Another great thing about this free newborn beanie crochet pattern is that you can easily make it in any size you want. I have walked you through the step-by-step instructions on how to make a newborn beanie that is estimated to fit a baby ages 0-3 months. Then, I have also included measurements and estimated stitching instructions for making this same hat pattern so that it fits babies ages 3-6 months and 6-12 months old.

Super Simple Newborn Beanie
This free newborn crochet beanie pattern is a lot of fun to make because it is easy and a cute little hat pattern. It is my hope that you will try making this free crochet pattern and that it will be enjoyable for you.
Thank you so much for stopping by to check out my free crochet hat pattern. I hope you enjoy making it!
Happy Crocheting!
Find Us Online!
Be sure to follow us online on your favorite social media platform!
You May Also Like These Patterns
Do you love to make crochet baby hats? If you do, then you should definitely check out my cute hat pattern for a baby beanie with bear ears! It is absolutely adorable! Here are some more free crochet patterns that you might enjoy as well!

Free Easy Crochet Ribbed Baby Beanie Pattern for Beginners

Newborn Crochet Beanie Pattern Free
Materials
- 1 Skein Yarn I prefer a soft medium-weight yarn, but you can use any kind that you want
- Other Tools and Materials
- Size H crochet hook
- A tapestry needle
- Scissors
Instructions
- Row 1: ch 30 sts (or until it measures approximately 6.5 inches wide for 0-3 months)
- Row 2: turn, sl st in the BLO of the 1st st from the hook, and in each ch st across the row.
- Row 3: turn, sl st in the BLO of the 1st sl st in the previous row, and in each ch st across.
- Repeat row 3, until your hat measures your desired size.

Finishing the Newborn Crochet Hat
- When you have the crocheted rectangle made to your desired size, it is now time to shape it into a cute little beanie for your newborn baby.
Step 1: Finish Off
- The first thing you will want to do, is cut the yarn, leaving a long yarn tail for sewing. I like to leave at least 8 inches so that I have plenty of yarn. You can leave even more if you want.
- Pull the long tail through your last loop to tie it tight. Then thread a large yarn needle with your yarn tail.
Step 2: Sew the Side
- Fold your crochet project, so that the two short ends are together. Sew the ends together so that they hold securely. Now to finish the top of the hat.
Step 3: Cinch the Top of the Beanie
- To close the top of your beanie, weave your needle through the top of your project so that it goes in and out every couple of stitches. Once you have gone all of the way around the top of the hat, pull the yarn tight so that it cinches together.
- Now, pinch the top of the beanie together, and sew through the sides to hold it closed at the top, finish off by tying a knot. Turn your hat right side out.

Finishing Round
- If you wish, I added a round of single crochet stitches on the side of the hat. This helps to give it a nice finished look, especially if the ends of your rows don’t end up being super-even.
- To do this, you will simply make a slip stitch in the bottom part of your hat. Chain one stitch, then make a single crochet stitch in each stitch around.

Adding a Pom Pom
- If you want, it is a fun idea to add a pom pom to the top of these newborn crochet beanies. You can easily do this by making your own, yarn pom pom, or buying one at your local craft store.
- To make your own yarn pom pom, I like to use a large dinner fork, or serving fork, and wrap the yarn around it several times. Then tie a piece of yarn securely around the center. Once it is securely tied in place, take your scissors and cut each of the yarn ends that are wrapped around the fork. Sew this yarn pom pom to the top of your newborn crochet beanie.
PIN for Later!

