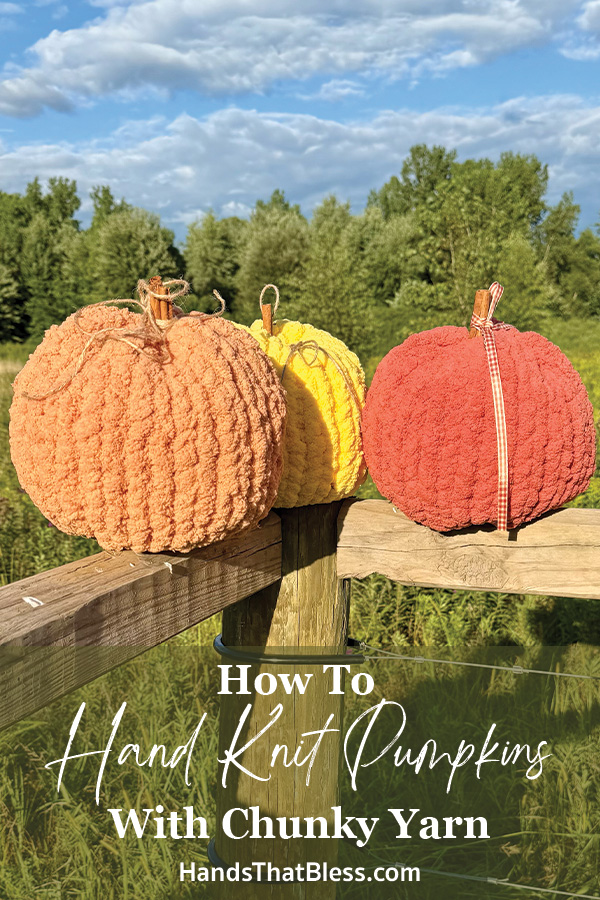
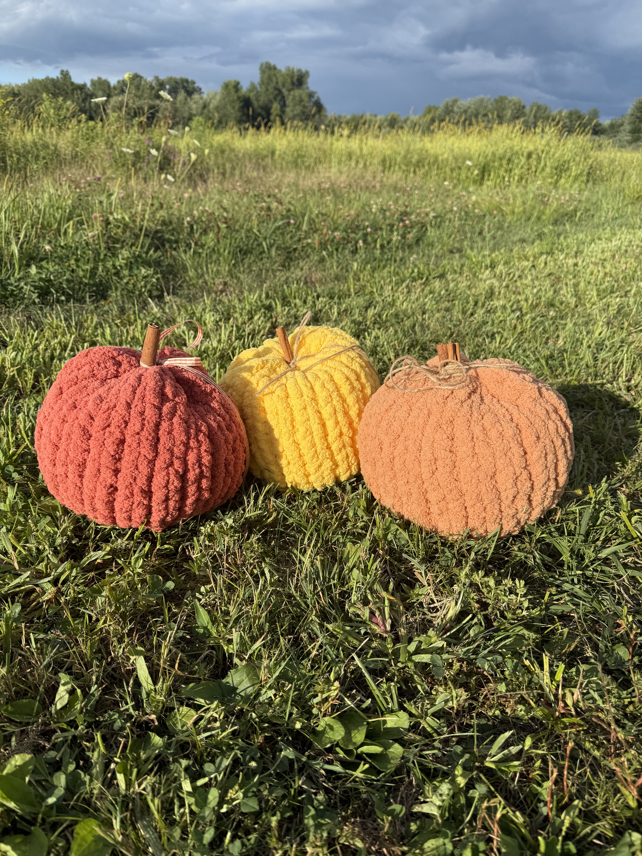
Hand Knit Chunky Pumpkin Pattern
I’m so excited to share this free hand knitting pattern with you to make a cute hand knit chunky pumpkin pattern. This is the perfect project to make this fall. It is so easy to do, you don’t need any knitting experience, just to follow a few basic instructions.

Lift hand knit chunky pumpkin pattern, a quick project that you can make and enjoy with your fall decorations. It can make the perfect throw pillow to add to your home decor or simply a fun accent piece in your home this autumn season.
Chunky Knit Pumpkins
I am so excited to share this free pattern with you to make a chunky knit pumpkin pattern free by following a few easy steps. This cute pumpkin makes the best fall decor in your home.
This cute finger knit pumpkin is something that you can make in a short amount of time, and you only need a few items in order to make the cute pumpkin. Let’s get started by looking at the step-by-step tutorial instructions that you will need to follow.
How To Knit A Pumpkin Step By Step Tutorial
Materials:
1 skein super bulky yarn
Fiber fill stuffing
24 inches twine or hemp
4 cinnamon sticks
The Hand Knit Pumpkin Pattern
Step 1: Cast On
To make the finger knit pumpkin, you will first want to create a foundation chain with the chunky yarn. To do this create a about 10 inches up the length of yarn. Make the slipknot then pull a loop through the previous loop created with your pointer finger and thumb. Repeat this process moving outward as you create each loop. Make 20 chain stitches.


Step 2: Build the Body
Join the chain stitches together by pulling the last loop created through the first one created. With the working yarn, continue pulling a loop through each of the chain spaces.
Continue working by pulling a new loop through the previous loop created as you work your way around the edge in a large circle. Work loops until you have approximately 15 inches of a yarn left. This is just a ballpark estimate, it can be a little bit longer or a little bit shorter yarn tail remaining.


Step 3: Cast Off
For this specific pattern, you don’t have to actually cast off your stitches. Rather take a long tail of yarn that is remaining and feed each working loop through the tale of yarn. Once all of the loops are on your remaining yarn tail, you can pull the yarn tight.
Step 4: Form the Pumpkin
Now take your fiber, fill stuffing and fill the center of your pumpkin pillow with stuffing as desired. You can make it as firm or as soft as you wish.
After the pumpkin has been stuffed, weave the remaining yarn tail through the beginning chain stitches, going through every other stitch. Then pull the yarn tail tight so that it sinches it together. Tie a knot to hold it in place and then tuck in the remaining tales of yarn.


Step 5: Finish it Off
To finish off the pumpkin, make sure that your tails of yarn are all tucked inside of the pumpkin and sides are closed securely.
Then take your cinnamon sticks and tie them together tightly with your piece of twine. Tie the twine into a bow and then stick the cinnamon sticks into the center of one side of the pumpkin. Adjusted and desired. Now your pumpkin is finished and ready to be used to decorate your home.

Pattern Copyright
Please note that this pattern is intended for personal use only, and is not for commercial distribution. By copyright, unless otherwise noted, you are not authorized to copy or claim my content as your own. You are, however, more than welcome to sell your finished products made with my patterns. I always appreciate it when you link to my patterns so that others can find them too!

Tips, Tricks, and FAQs
What Yarn Do I Use To Knit A Pumpkin?
In order to move the chunky and knit pumpkin, you want to use a stain of yarn of super chunky yarn. This is the most bulky type of yarn you can get. I like to use hobby lobby super bulky yarn, you can find it at any local craft store.
Don’t Overstuff The Pumpkin
I like to make sure that there is a lot of stuffing inside the pumpkin, but you don’t want too much. Make sure that there are still room for both sides of the pumpkin to close comfortably so that it is not over stuffed too much.
Choosing the Color Scheme
There are so many different color options to choose from. Make sure that you select whatever color of yarn will go the best with your home decorations for the fall season.
Change the Size
This pattern above uses an entire skin of super bulky yarn. If you want, you can make a larger work, smaller chunky pumpkin by adding additional chain stitches for a larger round pumpkin, or you can make it taller by finger knitting additional rose. You can also decrease the size by decreasing the foundation chain or not making it as many rows tall.

Can I use knitting needles?
Technically, yes, you can use knitting needles to make this chunky pumpkin, but there is really no need to. You can easily make this pumpkin by finger, knitting the yarn together and there is no need to use knitting needles when doing this.
Do I need to know how to knit?
No! The beauty of this pattern is that you do not have to use any knitty needles and you do not need any knitting knowledge. You simply need to be able to pull a new loop through a previously created a loop to make the knitted pumpkin.
How long does the project take?
If you have a chunk of time to dedicate towards making this pumpkin, it does not take long at all. You can probably make the entire thing in one hour or less, depending on how quickly you work.

Simple Hand Knit Chunky Pumpkin Pattern
Thank you so much for stopping by to check out my free hand knit chunky pumpkin pattern. I love to make these chunky pumpkins using super bulky yarn. These chunky pumpkins are a fun way to decorate for the fall season and they are a quick and easy project that anyone can enjoy making.
Thank you so much for stopping by to check out my free hand knit chunky pumpkin pattern. It is my hope that you will give this free pattern to try and that you will enjoy making this fun fall project.
Be sure to follow us online on your favorite social media platform!
More Knitting Projects:


Hand Knit Chunky Pumpkin Pattern
Materials
- 1 skein super bulky yarn
- Fiber fill stuffing
- 24 inches twine or hemp
- 4 cinnamon sticks
Instructions
- Step 1: Cast On
To make the finger knit pumpkin, you will first want to create a foundation chain with the chunky yarn. To do this create a about 10 inches up the length of yarn. Make the slipknot then pull a loop through the previous loop created with your pointer finger and thumb. Repeat this process moving outward as you create each loop. Make 20 chain stitches. - Step 2: Build the Body
Join the chain stitches together by pulling the last loop created through the first one created. With the working yarn, continue pulling a loop through each of the chain spaces.
Continue working by pulling a new loop through the previous loop created as you work your way around the edge in a large circle. Work loops until you have approximately 15 inches of a yarn left. This is just a ballpark estimate, it can be a little bit longer or a little bit shorter yarn tail remaining. - Step 3: Cast Off
For this specific pattern, you don’t have to actually cast off your stitches. Rather take a long tail of yarn that is remaining and feed each working loop through the tale of yarn. Once all of the loops are on your remaining yarn tail, you can pull the yarn tight. - Step 4: Form the Pumpkin
Now take your fiber, fill stuffing and fill the center of your pumpkin pillow with stuffing as desired. You can make it as firm or as soft as you wish.
After the pumpkin has been stuffed, weave the remaining yarn tail through the beginning chain stitches. Then pull the yarn tail tight so that it sinches it together. Tie a knot to hold it in place and then tuck in the remaining tales of yarn. - Step 5: Finish it Off
To finish off the pumpkin, make sure that your tails of yarn are all tucked inside of the pumpkin and sides are closed securely.
Then take your cinnamon sticks and tie them together tightly with your piece of twine. Tie the twine into a bow and then stick the cinnamon sticks into the center of one side of the pumpkin. Adjusted and desired. Now your pumpkin is finished and ready to be used to decorate your home.
The Hand Knit Pumpkin Pattern
PIN for Later!