Baby Hat Sewing Pattern
Want to learn how to make an easy baby hat? Then you are in the right place, because in this free pattern we will walk you through an easy sewing tutorial to make your own diy baby hat project for a newborn baby, in addition to five other sizes. This baby hat sewing pattern is so much fun to make, and the finished item is super cute.

How to Make a Baby’s Reversible Hat
With this free baby hat pattern, you can enjoy making your own little hat in different sizes for babies of all ages. Besides this baby hat being super cute, it is also super nice for the baby themselves to wear because there is no raw edge of the hat. All of the raw edges are hidden inside of the baby hat after it is assembled. This makes the cute baby hat not only comfortable for the baby to wear, but also very adorable because it is nice and reversible.
The baby hats made with this sewing pattern are also the perfect baby shower gift idea. This is because all babies can use a nice soft hat, no matter what the time of year. Adding the handmade touch to your gift with this baby hat which can help to make your gift extra special. These little hats are so useful too, which is another reason they make such great gifts.
To make your own baby hat with this easy sewing pattern, there are just a few easy steps you will need to follow. Below, we will walk through the step by step instructions to show you how you can easily make these cute little hats. Let’s get started with the sewing pattern!

Free Baby Hat Sewing Pattern
Size Options
Before you begin, you will want to be sure to select your size option you want to make. Included in this pattern you will find the following sizes to choose from:
Sizes preemie
0-3 months
3-6 months
6-9 months
9-12 months
Materials
2 pieces of fabric in colors or designs that go together
- ¼ yard jersey knit fabric outside
- ¼ yard jersey knit fabric lining
Tools
A regular sewing machine – you will need it to do a zig zag stitch and a straight stitch
Scissors
Straight pins
Needle and thread
Printer
Printer paper
An iron and ironing board (optional but recommended)

How To Make A Baby Hat with Free Printable Pattern
Step 1: Get the free pattern
Before you begin, you will need to download and print out your copy of our free pattern to make this baby hat. You can do this by entering your email address in the box below. Save the pattern to your device and print it out.
Step 2: Cut the Pattern Pieces
Decide what size of baby hat you want to make, then cut out the appropriate sized pattern pieces.


Step 3: Cut The 3 Baby Hat pieces
Lay your fabric out on a flat surface, and then place your cut out pattern over the piece. Pin the pattern in place, and cut out the hat pieces.
Step 4: Sew the Outside and Lining Fabric Together (optional step)
Take the straight edges of both fabric pieces for the front and back, sew a zigzag line across the straight edges to make the fabric into one piece.
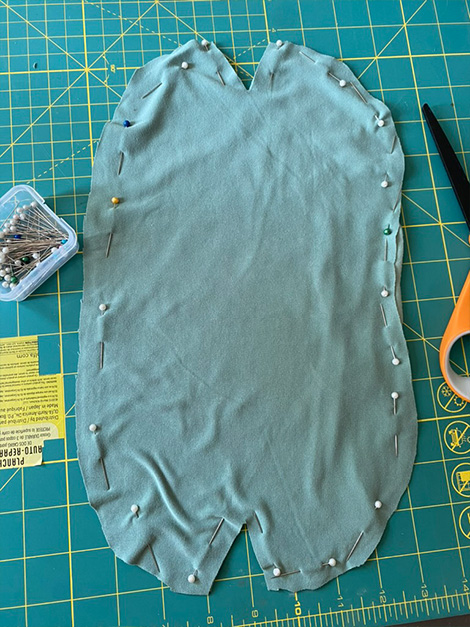


Step 5: Pin the Pieces
Now take the two sewn pieces and place them so that the right sides are together. Pin around the entire edge of the fabric pieces.
Step 6: Sew the 2 Main Pieces together
Now that you have placed the hat pieces so that the right sides are together with the wrong sides facing out. Starting at the top of the hat, sew the layers of fabric together, using the zigzag stitch on your sewing machine. Sew until you come to the opposite side where the darts are to be placed.


Step 7: Sew The Darts On the Main Hat Piece
Now, fold the top of the hat in half so that your dart sides line up. On the outer fabric, sew the entire dart using the zigzag stitch to close it. Repeat the same for the lining fabric, but leave a small space to turn the hat right side out.
Step 8: Finishing
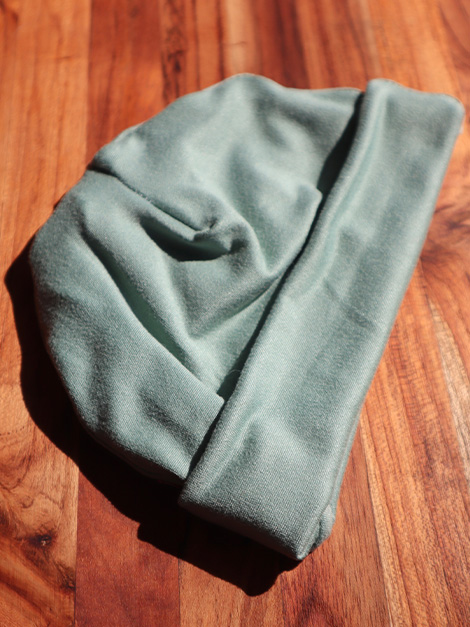
Turn the hat right side out, and use your iron to press the hat if desired. Hand stitch the small opening with a needle and thread to close the lining.
Take the bottom edge of the hat and fold it up, to make the folded brim. I like to iron this in place as well. Now that you have the folded edge of the baby hat band ironed in place, your baby hat is finished and ready to be enjoyed!
Download the Pattern
In order to enjoy making this free baby hat sewing pattern, you will need to get your copy of the free hat pattern. To do this, you will want to enter your email address into the box below. Then a copy will be sent to your inbox. Open the PDF download, print it off and cut out your desired size pattern.
Tips for Sewing with Knit Fabrics
Use a Stretch Stitch
When you are using a medium-weight knit fabric, it’s really important to use a stretch stitch for your sewing projects, so that the stitches don’t pull out, and you can still stretch the hat a little bit. To do this, the best option for a normal sewing machine is to use a zig-zag stitch.
Four Way Stretch Knit Fabric
When you are looking for your jersey knit fabric to make the hats out of, the best option is to use a four way stretch fabric. This way your hats will be nice and stretchy.
Baby Hat Sewing Pattern Copyright
Please note that this pattern is intended for personal use only, and is not for commercial distribution. By copyright, unless otherwise noted, you are not authorized to copy or claim my content as your own. You are, however, more than welcome to sell your finished products made with my patterns. I always appreciate it when you link to my patterns so that others can find them too!
Adorable Baby Hats That Are Handmade
This adorable hat pattern is a fun and easy baby item to make and let your own baby wear, give away as a gift, or sell at a craft show. The little hats are so useful for a new baby, any time of the year. Plus this sewing pattern is easy to make, and you can enjoy making as many of these little hats as you want.
Thank you so much for stopping by to check out my baby hat sewing pattern. This is such a fun way to make your basic baby hat, so that it is not only cute for the baby, but also comfortable for them to wear. I hope that you will give this pattern a try, and I hope you enjoy making it!
If you love making baby hats, you will also enjoy our top knot baby hat pattern! This is another fun type of baby hat, with a cute knot on top of it. Get the free pattern for this hat!
More FREE Sewing Patterns
Find Us Online!
Be sure to follow us online on your favorite social media platform!

Baby Hat Sewing Pattern
Materials
- 2 pieces of fabric in colors or designs that go together
- ¼ yard jersey knit fabric outside
- ¼ yard jersey knit fabric lining
Tools
- A regular sewing machine – you will need it to do a zig zag stitch and a straight stitch
- Scissors
- Straight pins
- Needle and thread
- Printer
- Printer paper
- An iron and ironing board (optional but recommended)
Instructions
- Step 1: Get the free pattern
Before you begin, you will need to download and print out your copy of our free pattern to make this baby hat. You can do this by entering your email address in the box below. Save the pattern to your device and print it out. - Step 2: Cut the Pattern Pieces
Decide what size of baby hat you want to make, then cut out the appropriate sized pattern pieces. - Step 3: Cut The 3 Baby Hat pieces
Lay your fabric out on a flat surface, and then place your cut out pattern over the piece. Pin the pattern in place, and cut out the hat pieces. - Step 4: Sew the Outside and Lining Fabric Together (optional step)
Take the straight edges of both fabric pieces for the front and back, sew a zigzag line across the straight edges to make the fabric into one piece. - Step 5: Pin the Pieces
Now take the two sewn pieces and place them so that the right sides are together. Pin around the entire edge of the fabric pieces. - Step 6: Sew the 2 Main Pieces together
Now that you have placed the hat pieces so that the right sides are together with the wrong sides facing out. Starting at the top of the hat, sew the layers of fabric together, using the zigzag stitch on your sewing machine. Sew until you come to the opposite side where the darts are to be placed. - Step 7: Sew The Darts On the Main Hat Piece
Now, fold the top of the hat in half so that your dart sides line up. On the outer fabric, sew the entire dart using the zigzag stitch to close it. Repeat the same for the lining fabric, but leave a small space to turn the hat right side out. - Step 8: Finishing
Turn the hat right side out, and use your iron to press the hat if desired. Hand stitch the small opening with a needle and thread to close the lining.
Take the bottom edge of the hat and fold it up, to make the folded brim. I like to iron this in place as well. Now that you have the folded edge of the baby hat band ironed in place, your baby hat is finished and ready to be enjoyed!
Pin Free Baby Hat Sewing Pattern for later:

