How to Iron Perler Beads
Making perler bead crafts with your kids is a lot of fun. However, it is important to know how to iron the perler beads so that the project turns out with very little hassle. I am going to walk you through the step-by-step process of ironing these special beads so that your child’s project turns out great.
Perler Bead Projects
What are Perler Beads?
Perler beads are a type of small plastic bead that are used to create little crafts. You can make a design, shape, or character out of these beads, using a peg board for guidance. Then Iron them together, so that the beads melt slightly and hold their shape even after they are removed from the peg board.
In addition to ironing the perler beads, there are different methods you can use to help them maintain their shape. Although there are different ways, the best, fastest, and easiest way to get these round beads to stay put is to iron them, using a few specific steps. This is what we are going to learn about below.
Making perler bead projects is so much fun. The little beads can be made into any design your child can imagine and used as refrigerator magnets, key chains, or even Christmas tree ornaments.
Let’s look at the different items you will want to have on hand when making a perler bead project.
Materials Needed
Perler beads
Peg board
Ironing paper or parchment paper
Iron
Magnet or string
Simple Instructions for Perler Beads
Preparing your Perler Bead Design
The first step in making a perler bead project is to make your design out of beads. To do this you will want to use a peg board on a flat surface. Then add the perler bead pattern you wish using whatever colors you want onto the plastic pegboard.

Some plastic pegboards come shaped with official patterns, or you can use a basic pegboard to make up your own pattern. Consider using clear pegboards if possible so that you can see your project more easily.
After you have created your perler bead design, it’s time to carefully move it to your ironing board, so that you can set it permanently in place.

Ironing Techniques
Before you begin ironing your perler beads in place, you will first want to make sure you have a nice flat working surface. Make sure that you have some ironing paper on hand. Your perler bead kit will likely have come with some ironing paper, if not you can use a sheet of parchment paper.
You do not want to iron directly on the pearl or beads, as they will melt into your iron. You also want to avoid using wax paper, as this will also melt into your iron as well. Make sure that you use either the ironing paper that came with the beads or a sheet of parchment paper.
Allow your iron to warm before ironing the beads. You will want to warm the iron, to medium or low heat, and make sure that it is in a dry setting, and not one with steam.
Once the iron is warmed up, you can add a layer of parchment paper on top of the beads before you start to iron them.
The point of ironing the perler beads is to melt them together. This will enable your beaded project to stay together without the pegboard to maintain its shape. The goal is not to melt the project too much, but just enough so that it holds its own shape.

Tips for Ironing Perler Beads
Use Parchment Paper. When you use parchment paper to iron the perler beads, it will protect both the iron and beads from melting where you don’t want them to.
Use Medium Heat with a Dry Iron Setting. It’s important that your iron isn’t too warm when finishing your perler bead project. It’s also a good idea to make sure that you use a dry iron setting and not one that is set to mist or steam.
Iron in Small Circles. As you are ironing the project, slowly move your iron in small circles over the surface of the beads. This will help them to melt evenly.
Short Amounts of Time. When you are ironing a perler bead project with a preheated iron, you won’t need a lot of time for the beads to melt together. It’s a good idea to iron for a short time, and then check the project before continuing to iron. If you iron for too long, then the entire project might turn into a melted blob.
The Ironing Process: How to Iron Perler Beads
Step 1: Preheat the Iron
Preheat the iron to a medium setting for the heat. This way your hot iron isn’t too hot, but warm enough to do the trick. If you are using a regular clothes iron, make sure to turn off any steam settings so that it is a dry heat only.
Step 2: Make sure your Flat Surface is Cleared
Before you begin ironing the project, clear off your flat surface. If you have an ironing board this is ideal. Otherwise, you can put a folded towel on a flat surface to iron the project in place.

Step 3: Cover the Perler Beads with Ironing Paper
When the iron is warmed to medium heat, cover the perler beads with the ironing paper included with your beads, or use a piece of parchment paper that is large enough to cover the entire beaded project.

Step 4: Iron in a Circular Motion
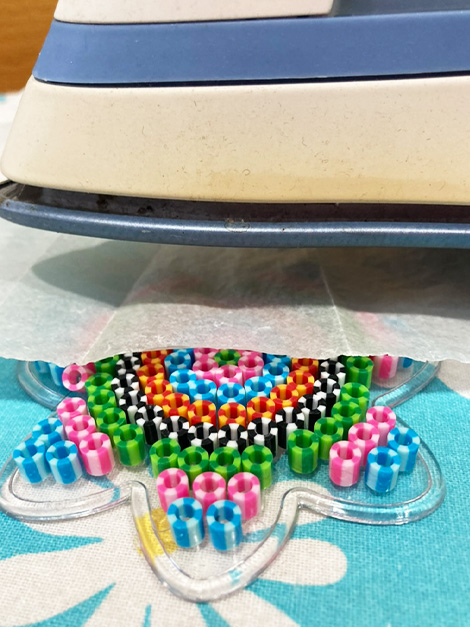
Carefully place your hot iron on top of the ironing paper. Carefully move the iron in a gentle circular motion for only a couple of minutes. It’s a good idea to pull up the corner of the paper to check on your beads and see how they are melting.
Ideally, you don’t want to melt them too much, just enough to hold the craft together. The exact amount of time it takes to iron your project will depend on your specific iron. Once you begin to see the beads melted together, turn the iron off, and set your beaded project aside.

Step 5: Cool the Beads
After your beaded project has been ironed in place, set the beaded project aside to cool.
Cooling and Removing the Beads from the Pegboard
Now that you have ironed your perler beads to fuse beads together, you will want to let it cool completely before you touch it, as the beads will retain heat for a little while.
As the craft is cooling you might need to set a heavy book on the craft to keep the sides from curling up. Once it’s cool to the touch, you can remove the book, and carefully pull the parchment paper back.

The easiest way to remove the paper is to pull it back at a sharp angle, applying steady yet gentle pressure as you remove the paper from the beads.
Once the paper is removed you can gently transfer the beaded project out of the pegboard. If needed you can carefully iron the other side of the project to help it hold together, however, this is entirely a matter of personal preference.
Perler Bead Creation Finishing Touches
Now that your beaded craft is finished you can add a strip of magnet to the back of your craft to turn it into a refrigerator magnet. Or feel free to add a string to hang the project from your Christmas tree. These are just a few fun ways to finish off your craft project.

Troubleshooting Tips and Tricks
Melt Perler Beads. The whole goal of ironing perler beads is to help them melt together. In order to do this, you will want to use your electric iron set to the right heat. The best heat setting is to use medium heat so that it’s not super hot.
Speaking from personal experience, you don’t want to melt them too much so that they become a big blob of colors, but just enough to hold the project together.
Ironing Skills. You don’t have to have mad ironing skills in order to help your children make these perler bead crafts. The best way is to add your ironing paper on top of the finished bead project, then move the iron in small circles over the top of the project for 10-20 seconds, then move it to another part of the project.
After you have ironed the entire top of the craft, you can carefully peal back a corner to see if the beads are evenly melted. If they are, then you are good to let it cool off. If not, then keep ironing for a few more minutes, or just until the beads are melted enough to hold the craft together.

Should you Iron the Back Side?
It’s entirely a matter of preference if you should iron the back side of your perler bead project or not. I personally like to do this for a few seconds, just so that this side is held together as well. However, some people like to skip ironing the back side because it could change the appearance of the beaded designs made.
Which is the “Back Side”?
What you consider to be the back side of your project is up to your preference. Personally, I like to put the side that was ironed the most at the back, leaving the front side of the perler bead project as the one that I ironed for just a few minutes.

Safety Precautions
When you are working on a perler bead project, it is important that you are very careful. You are working with a hot iron which is extremely hot and can be dangerous. Don’t leave the hot iron unattended, and make sure you let the project cool before touching the hot beads.
Fun Perler Bead Projects
Making these melty beads into different types of fun crafts is a great project for your kids that also helps them work on improving their fine motor skills. This craft is a fun way for your children can design cool projects like key chains, refrigerator magnets, or even Christmas tree ornaments. It doesn’t have to be anything fancy, a small simple design works just as well and will be a fun project for you and your kids to work on together.
I hope that these tips and tricks have been helpful to you as you learn how to iron perler beads! Now that you know, you can give this project a try on your own!
Happy Crafting!


How to Iron Perler Beads
Materials
- Perler beads
- Peg board
- Ironing paper or parchment paper
- Iron
- Magnet or string
Instructions
Preheat the Iron
- Preheat the iron to a medium setting for the heat. This way your hot iron isn’t too hot, but warm enough to do the trick. If you are using a regular clothes iron, make sure to turn off any steam settings so that it is a dry heat only.
Make sure your Flat Surface is Cleared
- Before you begin ironing the project, clear off your flat surface. If you have an ironing board this is ideal. Otherwise, you can put a folded towel on a flat surface to iron the project in place.
Cover the Perler Beads with Ironing Paper
- When the iron is warmed to medium heat, cover the perler beads with the ironing paper included with your beads, or use a piece of parchment paper that is large enough to cover the entire beaded project.
Iron in a Circular Motion
- Carefully place your hot iron on top of the ironing paper. Carefully move the iron in a gentle circular motion for only a couple of minutes. It’s a good idea to pull up the corner of the paper to check on your beads and see how they are melting.
- Ideally, you don’t want to melt them too much, just enough to hold the craft together. The exact amount of time it takes to iron your project will depend on your specific iron. Once you begin to see the beads melted together, turn the iron off, and set your beaded project aside.
Cool the Beads
- After your beaded project has been ironed in place, set the beaded project aside to cool.
Cooling and Removing the Beads from the Pegboard
- Now that you have ironed your perler beads to fuse beads together, you will want to let it cool completely before you touch it, as the beads will retain heat for a little while.
- As the craft is cooling you might need to set a heavy book on the craft to keep the sides from curling up. Once it’s cool to the touch, you can remove the book, and carefully pull the parchment paper back.
- The easiest way to remove the paper is to pull it back at a sharp angle, applying steady yet gentle pressure as you remove the paper from the beads.
- Once the paper is removed you can gently transfer the beaded project out of the pegboard. If needed you can carefully iron the other side of the project to help it hold together, however, this is entirely a matter of personal preference.
Perler Bead Creation Finishing Touches
- Now that your beaded craft is finished you can add a strip of magnet to the back of your craft to turn it into a refrigerator magnet. Or feel free to add a string to hang the project from your Christmas tree. These are just a few fun ways to finish off your craft project.
PIN for Later!

