Crochet Mittens Pattern
Making crocheted mittens is a fun project to do, and they make great gifts to give away, to anyone on your list. This crochet mittens pattern will show you how to make some elegant, crocheted mittens. There are only a few basic stitches used in this crochet mittens pattern, but the result is quite lovely.

If you were looking to make the perfect pair of mittens, whether for yourself or to give away as gifts, this free crochet pattern is a great pattern to try. Of course, I might be partial, but I think that it is a great project to make, no matter what the purpose of making mittens is.
You can never have too many pairs of mittens after all. It seems like I always struggle to find a pair when I need one, plus they make great gifts for anyone on your list. No matter if you’re looking to make crocheted mittens for a family member, friend, or significant other, this pattern is a great place to start.
Free Crochet Mitten Pattern
Before you begin making this free crochet mittens pattern, you might want to know a few details about this pattern. Here are some tips and tricks to help get you started. Let’s first look at the different basic stitches used to make these mittens.
The Basic Crochet Stitches
Magic Circle. The magic circle, also known as the magic ring, is used to start your crocheted mittens. This is an important way to start your mittens so that the whole does not become too large at the tips of the fingers. Check out this tutorial to see exactly how to make a magic ring.
Single Crochet Stitches. Single crochet stitches or smaller stitches are used in this pattern. To make a single crochet stitch insert the hook into the stitch indicated, yarn over, and pull up the loop. Then when there are two loops on the hook, yarn over and pull through both of the loops to make a single crocheted stitch.
Half Double Crochet. A half double crochet stitch is a size in between a single crochet, and double crochet. It’s not quite as tall as the double, but taller than a single. To make a half double crochet stitch, first yarn over then insert the hook into the stitch indicated. Yarn over and pull up a loop. When there are three loops on the hook, yarn over, and pull through all three loops to make a half-double crochet stitch.
Double Crochet Stitches. Double crochet stitches are another easy stitch pattern. To make double crochet stitches, first yarn over it then insert the hook into the stitch indicated. Yarn over and pull up a loop. There are now three loops on the hook. Yarn over and pull through the first two loops on the hook. There are two loops remaining. Yarn over and pull through the remaining two loops on the hook to make a double crochet stitch.
Slip Stitches. A slip stitch is usually used to join a round together. In this pattern, you might see it referenced as “sl st join”. Typically, a slip stitch is an invisible stitch, used to hold the round together, before you continue on to the next round.
Join our Mailing List and Receive a…
Double Crochet Decrease. To make a double crochet decrease stitch, you will first yarn over, then insert your hook into the first stitch, yarn over and pull up a loop. There are now three loops on the hook. Yarn over and pull through the first two loops. Yarn over again, and insert the hook into the next stitch. Yarn over and pull up a loop. Yarn over and pull through the first two loops on the hook. Yarn over and pull through the remaining stitches on the hook to make a double crochet decrease stitch.
Single Crochet Decrease. To make a single crochet decrease, you will work the stitches in two stitches to decrease the overall number of stitches. First, insert your hook into the first stitch, yarn over, and pull up a loop. Then insert the hook into the next stitch, yarn over, and pull up another loop. Finally, yarn over and pull through all of the loops on the hook to make a single crochet decrease stitch.
The simple stitches can also be combined into other types of special stitches or stitch patterns. One stitch pattern used in this crochet mittens pattern is a moss stitch. This is a type of stitch using a single crochet stitch, and chain stitch, alternating to make what is known as a linen stitch or must stitch in these basic crochet mittens.
Another type of special stitch used in this pattern is when you work in the back loop only of the stitches on the previous round. I’d like to make this pattern, so that you are working in the third loop, of the previous around half double crochet stitches. This gives you a nice textured look for the mittens.
Learn more about these basic crochet stitches in our post for Learning How to Crochet! This is a great resource, especially if you are just starting out.

Special Stitches
Making a Moss Stitch. The moss stitch is made by using a single crochet stitch and alternating it with a chain stitch. The first round of them is a stitch, you’ll make a single crochet, then chain one stitch. Skip the next space for stitches and make another single crochet stitch in the following space. Then when you get to the next row, you will work your single crochet stitches in the chain one space from the previous round.
Back Loop Only (BLO). Typically, when crocheting you will work your stitches either in the top two loops of the stitches from your previous round or in the back loop only of the stitches from the previous round. In this pattern, I recommend working in the third loop on the previous round.
The third loop is typically located on the back side of the half-double crochet from the previous round. Working in the third loop it will give your mittens a lovely texture. To do this, you will simply insert the hook through this third loop, and make your stitches as instructed in the pattern.
Favorite Yarns
To make crocheted mittens, you will want to make sure that you have a thick enough yarn. Most acrylic yarn will come in a medium worsted weight yarn. This is a good option to use for crochet and mittens. You can also choose to use a more bulky yarn if d keep in mind that your bulky yarn will be warmer when wearing the mittens, and may also increase the overall size of your mittens depending on how tight your stitches are made.
Personally, I like to use a thicker yarn for crocheted mittens if possible. That way you don’t have to worry about making the lining go inside of your crocheted mittens, and they will still keep your hands nice and warm.
Classic Mittens Using Worsted Weight Yarn
When making mittens, I like to use a soft medium weight yarn, so that the mittens turn out nice and warm. You can find it in a worsted weight yarn, but I like to use a heavier weight yarn, or chunky yarn.
A nice number four or medium-weight yarn from Hobby Lobby will work well. Just make sure to choose a nice, soft yarn.
Hook Size
When making crocheted mittens, I like to use a larger hook, rather than a smaller hook. Especially if you are using chunkier yarn, it’s always a good idea to use a larger hook.
However, I would like to point out that if you were using a medium worsted-weight yarn, then you might need to use a slightly smaller hook so that there are no large holes in your crocheted mittens.
You can also reference the packaging of your yarn scheme, to see what the manufacturer recommends as far as hook size for that specific yarn you are using. Using the recommended hook size is typically a good starting point.
Skill Level
Although this crocheted mitten pattern does use basic crochet stitches, to make up the different stitch patterns. It might be slightly complicated if you are a beginner crocheter. While I never say to don’t try a new pattern, I would suggest you check out this beginner-level crocheted mittens pattern, because it is less complicated and simpler to create.
This crocheted mitten pattern is more suited to an intermediate-level crocheter. This is because of the different stitch patterns used to make the design for these crocheted mittens.
Should this pattern be worked in continuous rounds?
I do not recommend that you make crocheted mittens by working in continuous rounds. It is much cleaner, to end each round by joining the first stitch with the last, by making a slip stitch. Then begin the next round each time. If needed, you can use a stitch marker to help you determine where the beginning of each round is located.
What sizes does this crochet pattern make?
This crocheted mitten pattern is designed to make adult-size mittens. You can adjust this pattern to make as large or small of mitten sizes as needed. However, I do not recommend that you use these crocheted mittens patterns to make kid’s mittens, as they also need to be shorter as well as smaller around.

Free Crochet Mittens Pattern
Crochet Mittens Supplies:
1 skein of medium worsted weight yarn or higher
Size H or 5.0 mm hook
Stitch Marker
Scissors
Yarn Needle
Left Hand vs Right Hand
Making the left mittens will be slightly different from the right-hand of mittens. To be sure they end up correctly, then you will want to follow this pattern for the body of the mitten.
Abbreviations
ch – chain
dc – double crochet
hdc – half double crochet
sc – single crochet
sl st – slip stitch
st / sts – stitch / stitches
dc dec – double crochet decrease
sc dec – single crochet decrease
Left-Hand Body of the Mitten
Round 1: make a magic ring. In the magic ring, ch 1, then make 12 dc stitches into the magic ring. Pull the ring tight, then join the dc stitches together with a sl st into the first dc st. (12 sts)
Round 2: ch 2, make 2 dc sts in each st around. Join with a sl st. (24 sts)
Round 3: ch 1, in the first st make 2 hdc sts, hdc in the next stitch. Continue (2 hdc, hdc) around. Join with a sl st. (36 sts)
Round 4: ch 1, working in the 3rd loop of the previous rounds hdc sts, make a hdc in each st around. Join with a sl st. (36 st)
Round 5: ch 1, hdc in each st around, working in the 3rd loop. Join with a sl st. (36 st)
Round 6: ch 1, sc in the first st, ch 1, skip the next st, then sc in the next st, ch 1. Repeat (sc, ch 1) around to the last st. Join with a sc st to the first st (counts as a ch 1 space). (36 st) *Moss stitch round
Round 7-11: ch 1, work sc around the joining sc st from the previous round. Ch 1. Working in the ch spaces from the previous round, sc in the next ch sp, (ch 1, sc in the next ch sp). Repeat around. Join with a sc to the first sc space (this last sc to join counts as a ch 1 space in following rounds). (36 st) *Moss stitch rounds
Round 12: ch 1, hdc in each st around. Join with a sl st. (36 st)
Round 13 – 14: ch 1, working in 3rd loop, make hdc in each st around. Join with a sl st. (36 st)
Round 15: ch 1, (sc, skip the next stitch, ch 1, sc in the following st) repeat around. Join with sc to the first st. (36 st) * Moss stitch round
Round 16-20: ch 1, (sc, ch 1, sc in the next ch space) repeat around working sc sts in ch spaces from the previous round. Join with a sc to the first st. (36 st) *Moss stitch rounds
Round 21: ch 1, hdc in each st around. Join with a sl st. (36 sts)
Round 22: ch 1, working in the 3rd loop, hdc in each st, until you reach the last 6 sts. Working very loosely, make 10 ch st. skip the last 6 sts, and join with a sl st. This chain space creates a thumb hole space. (40 st)
Round 23: ch 1, working in the 3rd loop, hdc in each st around until you reach the ch spaces. Make 10 hdc in each ch space. Join with a sl st. (40 sts)
Round 24: ch 1, (sc, skip the next stitch, ch 1, sc in the following st) repeat around. Join with sc to the first st. (40 st) * Moss stitch round
Round 25 – 29: ch 1, (sc, ch 1, sc in the next ch space) repeat around working sc sts in ch spaces from the previous round. Join with a sc to the first st. (40 st) *Moss stitch rounds
Round 30: ch 1, hdc in each st around. Join with a sl st. (40 st)
Round 31: ch 2, working in the 3rd loop, make a dc dec, dc in the next 8 sts. Repeat (dc dec, 8 dc) around. Join with a sl st. (36 st)
Round 32: ch 1, sc dec, then sc in the next 7 sts. Repeat (sc dec, 7 sc) around. Join with a sl st. (34 sts)
Do not finish off. Continue to make the cuff on each mitten.
Cuff Top of the Mitten
Tip: I like to change to a smaller hook size. I used a size 7 hook for this part.
There are two main ways you can make the cuff for the top of the mitten. The first way is to make the cut and attach it all at the same time, and the second is to create the cuff, then sew it on after you have it made.
Making the Cuff Attached
Row 1: After you finished making the main part of the mitten body, leave the yarn attached. Ch 11 sts.
Row 2: turn, in the 2nd ch from the hook, work a hdc st in each ch space. When you reach the body of the mitten, make 2 sl sts, the first st in the one nearest you, the second in the stitch right above. (10 st)
Row 3: turn, working in the 2nd and 3rd loops of the hdc from the previous round, make a hdc st in each st.
Row 4: ch 1, turn. Work hdc in the 2nd and 3rd loop of each st across. When you reach the body of the mitten, sl st in the next stitch, above the previously attached row, then sl st in the row above.
Repeat row 3 and 4 until you have worked your way around the top of the mitten to make the cuff.
Creating the Cuff and then Attaching it
Row 1: ch 11
Row 2: in the 2nd ch from the hook, work a hdc, hdc in each remaining 9 ch spaces.
Row 3: ch 1, working in the BLO, make a hdc in each st across.
Repeat row 3 until your cuff measures the circumference of the top of your main mitten. Once it reaches your desired size, finish off and leave a long tail for sewing.
Use a yarn needle, to sew the cuff to the top of your mitten body.

Right-Hand Body of the Mitten
Round 1: make a magic ring. In the magic ring, ch 1, then make 12 dc stitches into the magic ring. Pull the ring tight, then join the dc stitches together with a sl st into the first dc st. (12 sts)
Round 2: ch 2, make 2 dc sts in each st around. Join with a sl st. (24 sts)
Round 3: ch 1, in the first st make 2 hdc sts, hdc in the next stitch. Continue (2 hdc, hdc) around. Join with a sl st. (36 sts)
Round 4: ch 1, working in the 3rd loop of the previous rounds hdc sts, make a hdc in each st around. Join with a sl st. (36 st)
Round 5: ch 1, hdc in each st around, working in the 3rd loop. Join with a sl st. (36 st)
Round 6: ch 1, sc in the first st, ch 1, skip the next st, then sc in the next st, ch 1. Repeat (sc, ch 1) around to the last st. Join with a sc st to the first st (counts as a ch 1 space). (36 st) *Moss stitch round
Round 7-11: ch 1, work sc around the joining sc st from the previous round. Ch 1. Working in the ch spaces from the previous round, sc in the next ch sp, (ch 1, sc in the next ch sp). Repeat around. Join with a sc to the first sc space (this last sc to join counts as a ch 1 space in following rounds). (36 st) *Moss stitch rounds
Round 12: ch 1, hdc in each st around. Join with a sl st. (36 st)
Round 13 – 14: ch 1, working in 3rd loop, make hdc in each st around. Join with a sl st. (36 st)
Round 15: ch 1, (sc, skip the next stitch, ch 1, sc in the following st) repeat around. Join with sc to the first st. (36 st) * Moss stitch round
Round 16-20: ch 1, (sc, ch 1, sc in the next ch space) repeat around working sc sts in ch spaces from the previous round. Join with a sc to the first st. (36 st) *Moss stitch rounds
Round 21: ch 1, hdc in each st around. Join with a sl st. (36 sts)
Round 22: ch 1, working in the 3rd loop, hdc in the first 2 sts, then, working very loosely, make 10 ch st. skip the last 6 sts. Then make a hdc the 3rd loop of each remaining st. Join with a sl st. This chain space creates a thumb hole space. (40 st)
Round 23: ch 1, working in the 3rd loop, hdc the first 2 sts, when you reach the ch spaces make 10 hdc in each ch space. Continue around, working a hdc st in the 3rd loop of each st. Join with a sl st. (40 sts)
Round 24: ch 1, (sc, skip the next stitch, ch 1, sc in the following st) repeat around. Join with sc to the first st. (40 st) * Moss stitch round
Round 25 – 29: ch 1, (sc, ch 1, sc in the next ch space) repeat around working sc sts in ch spaces from the previous round. Join with a sc to the first st. (40 st) *Moss stitch rounds
Round 30: ch 1, hdc in each st around. Join with a sl st. (40 st)
Round 31: ch 2, working in the 3rd loop, make a dc dec, dc in the next 8 sts. Repeat (dc dec, 8 dc) around. Join with a sl st. (36 st)
Round 32: ch 1, sc dec, then sc in the next 7 sts. Repeat (sc dec, 7 sc) around. Join with a sl st. (34 sts)
Please note that the number of stitches for each round is noted at the end so that you can keep track.
This completes the main mitten, you will now need to create the rest of the mitten, including the cuff, and thumb portions for the right hand.
Thumb To Fill Hole (make 2)
Round 1: make a magic ring, then in the magic ring, make 7 dc sts. Pull the magic ring right, and join with a sl st to form a circle. (7 st)
Round 2: ch 2, make 2 dc sts, in each st around. Join with a sl st. (14 st)
Round 3: ch 1, hdc in each st around. Join with a sl st. (14 st)
Round 4 – 5: ch 1, work hdc in 3rd loop of each st around. Join with a sl st. 14 st)
Round 6 – 7: ch 1, hdc in each st around. Join with a sl st. 14 st)
Round 8: ch 1, hdc in 3rd loop of each st around. Join with a sl st. 14 st)
Round 9: ch 1, working in 3rd loop, make 2 hdc in the first st, 2 hdc in the next st. hdc in the next 5 sts, then make 2 hdc sts in the next 2 stitches. Make 5 hdc sts in the remaining spaces. Join with a sl st. (18 st)
Round 10: ch 1, hdc in each st around. Join with a sl st.
Finish off, and leave a long yarn tail for sewing.
To attach the thumb to the main mitten, you will want to either sew the wrong side together or make a slip stitch seam with the wrong sides together. After the thumb is attached, finish off and weave in the ends.
Frequently Asked Questions
What size mittens does this pattern make?
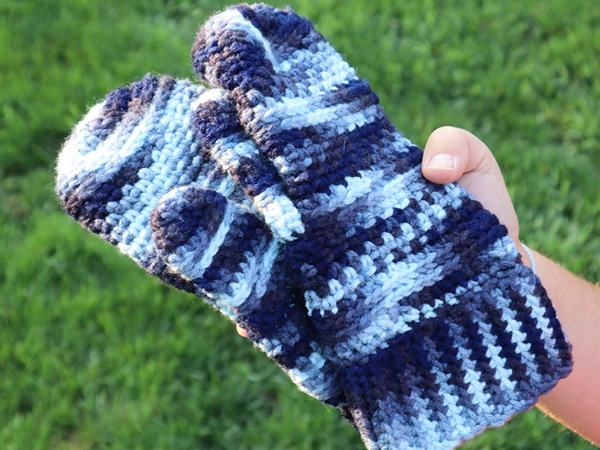
These mittens, when finished are approximately 4 1/4 inches wide, and about 10 inches long including the cuff. The cuff itself is about 3 inches wide.
How do you increase of decrease the size of the mittens?
Increasing the size of the overall mittens is easy, if you are making the mittens to fit longer hands, add more rows to the length of the mitten. For a wider mitten, you can add more stitches to the magic ring when starting the mitten.
Are Mittens the Perfect Crochet Gift?
Yes, I think that crochet mittens are the perfect handmade crochet gift! You can make these in any size or color, and they will be perfect for anyone on your list.
What are the Best Yarns for Crochet Mittens?
You can use any type of yarn that you prefer. However, my preference is to use a nice, soft, medium weight, or thicker yarn to crochet mittens.
How Much Yarn Do I Need for Mittens?
You will need at least one skein of number four medium-weight yarn, that is 252 yards long.
Easy Crochet Mittens
Making these easy crocheted mittens is such a fun project to do, and it doesn’t require a lot of time. This is a perfect project to make and give away as gifts or to enjoy yourself to keep your hands warm during the cold winter months. You don’t need much yarn, typically one skein of medium worsted weight yarn will do the trick.
Thank you so much for stopping by to check out my free crocheted mittens pattern. I hope that you have enjoyed this pattern, and now you can get started making your own version of these crocheted mittens.
Grab your crochet hook and let’s get started!
Find Us Online!
Be sure to follow us online on your favorite social media platform!
Well, That Was Fun! What’s Nest? Check out More Free Crochet Patterns!

Crochet Mittens Pattern
Materials
- 1 skein of medium weight yarn or higher
- Size H or 5.0 mm hook
- Stitch Marker
- Scissors
- Yarn Needle
Instructions
Left-Hand Body of the Mitten
- Round 1: make a magic ring. In the magic ring, ch 1, then make 12 dc stitches into the magic ring. Pull the ring tight, then join the dc stitches together with a sl st into the first dc st. (12 sts)
- Round 2: ch 2, make 2 dc sts in each st around. Join with a sl st. (24 sts)
- Round 3: ch 1, in the first st make 2 hdc sts, hdc in the next stitch. Continue (2 hdc, hdc) around. Join with a sl st. (36 sts)
- Round 4: ch 1, working in the 3rd loop of the previous rounds hdc sts, make a hdc in each st around. Join with a sl st. (36 st)
- Round 5: ch 1, hdc in each st around, working in the 3rd loop. Join with a sl st. (36 st)
- Round 6: ch 1, sc in the first st, ch 1, skip the next st, then sc in the next st, ch 1. Repeat (sc, ch 1) around to the last st. Join with a sc st to the first st (counts as a ch 1 space). (36 st) *Moss stitch round
- Round 7-11: ch 1, work sc around the joining sc st from the previous round. Ch 1. Working in the ch spaces from the previous round, sc in the next ch sp, (ch 1, sc in the next ch sp). Repeat around. Join with a sc to the first sc space (this last sc to join counts as a ch 1 space in following rounds). (36 st) *Moss stitch rounds
- Round 12: ch 1, hdc in each st around. Join with a sl st. (36 st)
- Round 13 – 14: ch 1, working in 3rd loop, make hdc in each st around. Join with a sl st. (36 st)
- Round 15: ch 1, (sc, skip the next stitch, ch 1, sc in the following st) repeat around. Join with sc to the first st. (36 st) * Moss stitch round
- Round 16-20: ch 1, (sc, ch 1, sc in the next ch space) repeat around working sc sts in ch spaces from the previous round. Join with a sc to the first st. (36 st) *Moss stitch rounds
- Round 21: ch 1, hdc in each st around. Join with a sl st. (36 sts)
- Round 22: ch 1, working in the 3rd loop, hdc in each st, until you reach the last 6 sts. Working very loosely, make 10 ch st. skip the last 6 sts, and join with a sl st. This chain space creates a thumb hole space. (40 st)
- Round 23: ch 1, working in the 3rd loop, hdc in each st around until you reach the ch spaces. Make 10 hdc in each ch space. Join with a sl st. (40 sts)
- Round 24: ch 1, (sc, skip the next stitch, ch 1, sc in the following st) repeat around. Join with sc to the first st. (40 st) * Moss stitch round
- Round 25 – 29: ch 1, (sc, ch 1, sc in the next ch space) repeat around working sc sts in ch spaces from the previous round. Join with a sc to the first st. (40 st) *Moss stitch rounds
- Round 30: ch 1, hdc in each st around. Join with a sl st. (40 st)
- Round 31: ch 2, working in the 3rd loop, make a dc dec, dc in the next 8 sts. Repeat (dc dec, 8 dc) around. Join with a sl st. (36 st)
- Round 32: ch 1, sc dec, then sc in the next 7 sts. Repeat (sc dec, 7 sc) around. Join with a sl st. (34 sts)
- Do not finish off. Continue to make the cuff on each mitten.
Cuff Top of the Mitten
- Tip: I like to change to a smaller hook size. I used a size 7 hook for this part.
- There are two main ways you can make the cuff for the top of the mitten. The first way is to make the cut and attach it all at the same time, and the second is to create the cuff, then sew it on after you have it made.
Making the Cuff Attached
- Row 1: After you finished making the main part of the mitten body, leave the yarn attached. Ch 11 sts.
- Row 2: turn, in the 2nd ch from the hook, work a hdc st in each ch space. When you reach the body of the mitten, make 2 sl sts, the first st in the one nearest you, the second in the stitch right above. (10 st)
- Row 3: turn, working in the 2nd and 3rd loops of the hdc from the previous round, make a hdc st in each st.
- Row 4: ch 1, turn. Work hdc in the 2nd and 3rd loop of each st across. When you reach the body of the mitten, sl st in the next stitch, above the previously attached row, then sl st in the row above.
- Repeat row 3 and 4 until you have worked your way around the top of the mitten to make the cuff.
Creating the Cuff and then Attaching it
- Row 1: ch 11
- Row 2: in the 2nd ch from the hook, work a hdc, hdc in each remaining 9 ch spaces.
- Row 3: ch 1, working in the BLO, make a hdc in each st across.
- Repeat row 3 until your cuff measures the circumference of the top of your main mitten. Once it reaches your desired size, finish off and leave a long tail for sewing.
- Use a yarn needle, to sew the cuff to the top of your mitten body.
Right-Hand Body of the Mitten
- Round 1: make a magic ring. In the magic ring, ch 1, then make 12 dc stitches into the magic ring. Pull the ring tight, then join the dc stitches together with a sl st into the first dc st. (12 sts)
- Round 2: ch 2, make 2 dc sts in each st around. Join with a sl st. (24 sts)
- Round 3: ch 1, in the first st make 2 hdc sts, hdc in the next stitch. Continue (2 hdc, hdc) around. Join with a sl st. (36 sts)
- Round 4: ch 1, working in the 3rd loop of the previous rounds hdc sts, make a hdc in each st around. Join with a sl st. (36 st)
- Round 5: ch 1, hdc in each st around, working in the 3rd loop. Join with a sl st. (36 st)
- Round 6: ch 1, sc in the first st, ch 1, skip the next st, then sc in the next st, ch 1. Repeat (sc, ch 1) around to the last st. Join with a sc st to the first st (counts as a ch 1 space). (36 st) *Moss stitch round
- Round 7-11: ch 1, work sc around the joining sc st from the previous round. Ch 1. Working in the ch spaces from the previous round, sc in the next ch sp, (ch 1, sc in the next ch sp). Repeat around. Join with a sc to the first sc space (this last sc to join counts as a ch 1 space in following rounds). (36 st) *Moss stitch rounds
- Round 12: ch 1, hdc in each st around. Join with a sl st. (36 st)
- Round 13 – 14: ch 1, working in 3rd loop, make hdc in each st around. Join with a sl st. (36 st)
- Round 15: ch 1, (sc, skip the next stitch, ch 1, sc in the following st) repeat around. Join with sc to the first st. (36 st) * Moss stitch round
- Round 16-20: ch 1, (sc, ch 1, sc in the next ch space) repeat around working sc sts in ch spaces from the previous round. Join with a sc to the first st. (36 st) *Moss stitch rounds
- Round 21: ch 1, hdc in each st around. Join with a sl st. (36 sts)
- Round 22: ch 1, working in the 3rd loop, hdc in the first 2 sts, then, working very loosely, make 10 ch st. skip the last 6 sts. Then make a hdc the 3rd loop of each remaining st. Join with a sl st. This chain space creates a thumb hole space. (40 st)
- Round 23: ch 1, working in the 3rd loop, hdc the first 2 sts, when you reach the ch spaces make 10 hdc in each ch space. Continue around, working a hdc st in the 3rd loop of each st. Join with a sl st. (40 sts)
- Round 24: ch 1, (sc, skip the next stitch, ch 1, sc in the following st) repeat around. Join with sc to the first st. (40 st) * Moss stitch round
- Round 25 – 29: ch 1, (sc, ch 1, sc in the next ch space) repeat around working sc sts in ch spaces from the previous round. Join with a sc to the first st. (40 st) *Moss stitch rounds
- Round 30: ch 1, hdc in each st around. Join with a sl st. (40 st)
- Round 31: ch 2, working in the 3rd loop, make a dc dec, dc in the next 8 sts. Repeat (dc dec, 8 dc) around. Join with a sl st. (36 st)
- Round 32: ch 1, sc dec, then sc in the next 7 sts. Repeat (sc dec, 7 sc) around. Join with a sl st. (34 sts)
- Please note that the number of stitches for each round is noted at the end so that you can keep track.
- This completes the main mitten, you will now need to create the rest of the mitten, including the cuff, and thumb portions for the right hand.
Thumb To Fill Hole (make 2)
- Round 1: make a magic ring, then in the magic ring, make 7 dc sts. Pull the magic ring right, and join with a sl st to form a circle. (7 st)
- Round 2: ch 2, make 2 dc sts, in each st around. Join with a sl st. (14 st)
- Round 3: ch 1, hdc in each st around. Join with a sl st. (14 st)
- Round 4 – 5: ch 1, work hdc in 3rd loop of each st around. Join with a sl st. 14 st)
- Round 6 – 7: ch 1, hdc in each st around. Join with a sl st. 14 st)
- Round 8: ch 1, hdc in 3rd loop of each st around. Join with a sl st. 14 st)
- Round 9: ch 1, working in 3rd loop, make 2 hdc in the first st, 2 hdc in the next st. hdc in the next 5 sts, then make 2 hdc sts in the next 2 stitches. Make 5 hdc sts in the remaining spaces. Join with a sl st. (18 st)
- Round 10: ch 1, hdc in each st around. Join with a sl st.
- Finish off, and leave a long yarn tail for sewing.
- To attach the thumb to the main mitten, you will want to either sew the wrong side together or make a slip stitch seam with the wrong sides together. After the thumb is attached, finish off and weave in the ends.
PIN for Later!

You might also be interested in this Easy Double Crochet Mitten Pattern for Beginners! Also, make sure to check out more free crochet patterns!
